> ## Documentation Index
> Fetch the complete documentation index at: https://docs.skypoint.ai/llms.txt
> Use this file to discover all available pages before exploring further.
# Shopifyimport
# Connecting to Shopify
# Import data
## Overview
Shopify is an eCommerce platform for online stores and retail point-of-sale systems. You can use Skypoint AI's built-in connector for importing data from Shopify.
This document will guide you through the process of connecting Shopify to Skypoint AI.
## Prerequisite
You must have the following details to configure and import data using Shopify import connector:
* [Shopify Account](https://accounts.shopify.com/lookup?rid=b2c3149a-a288-42ff-9916-0ba6717332d0)
* URI
* API password
* API key.
You can refer to the Shopify Setup guide document to learn more about the Prerequisites.
## Import Data using Shopify connector
1. In the left pane, go to **Dataflow** > **Imports**.
The **Dataflow** window appears.
 2. Click **New Dataflow** to create dataflow.
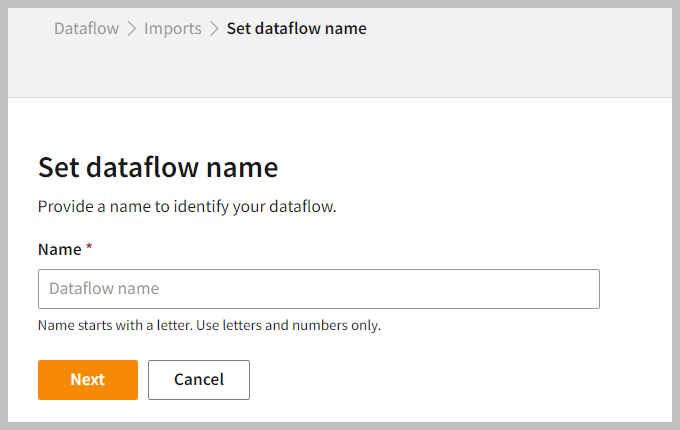 3. Enter a **Name** to identify your Dataflow.
The name must start with a letter and can only include letters and numbers, with no spaces between them.
4. Click **Next**.
## Add Shopify Connector
1. In the **All categories** or **Ecommerce** tab, select the **Shopify** connector to start the configuration.
2. Also, you can use the **Search** function to find the **Shopify** connector.
3. Enter a **Name** to identify your Dataflow.
The name must start with a letter and can only include letters and numbers, with no spaces between them.
4. Click **Next**.
## Add Shopify Connector
1. In the **All categories** or **Ecommerce** tab, select the **Shopify** connector to start the configuration.
2. Also, you can use the **Search** function to find the **Shopify** connector.
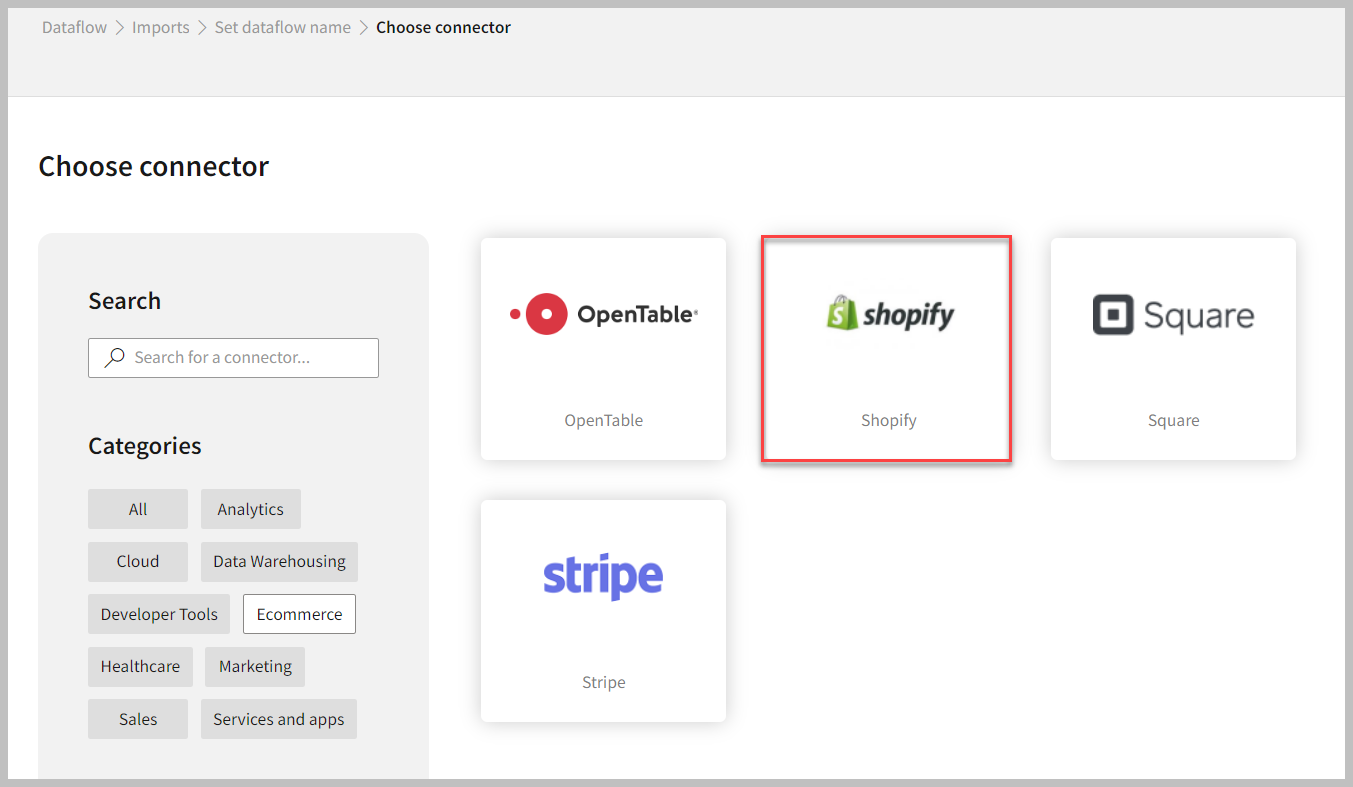 3. Select the Shopify connector to start the configuration.
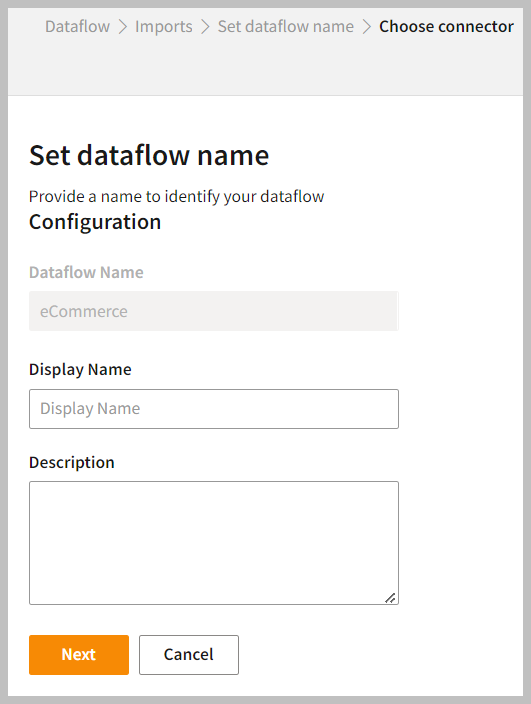 4. Enter the **Display Name** to identify your Dataflow.
5. In the **Description** box, you can enter an explanation of the connector.
6. Click **Next**.
4. Enter the **Display Name** to identify your Dataflow.
5. In the **Description** box, you can enter an explanation of the connector.
6. Click **Next**.
 ## To configure Shopify
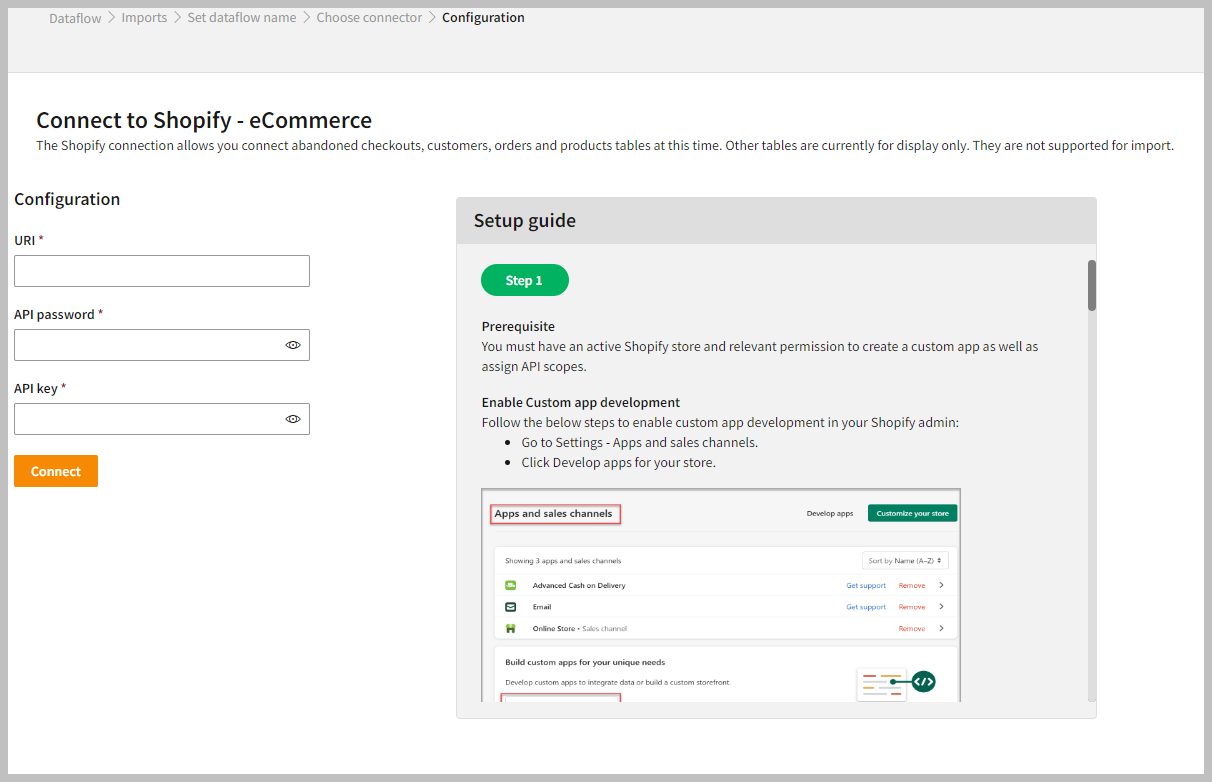
Follow the below steps to configure the connection to Shopify:
1. Enter your credentials such as **Uniform Resource Identifier (URI)**, **API Password**, and **API Key** to connect with Shopify.
2. Click **Connect**.
## To configure Shopify
Follow the below steps to configure the connection to Shopify:
1. Enter your credentials such as **Uniform Resource Identifier (URI)**, **API Password**, and **API Key** to connect with Shopify.
2. Click **Connect**.
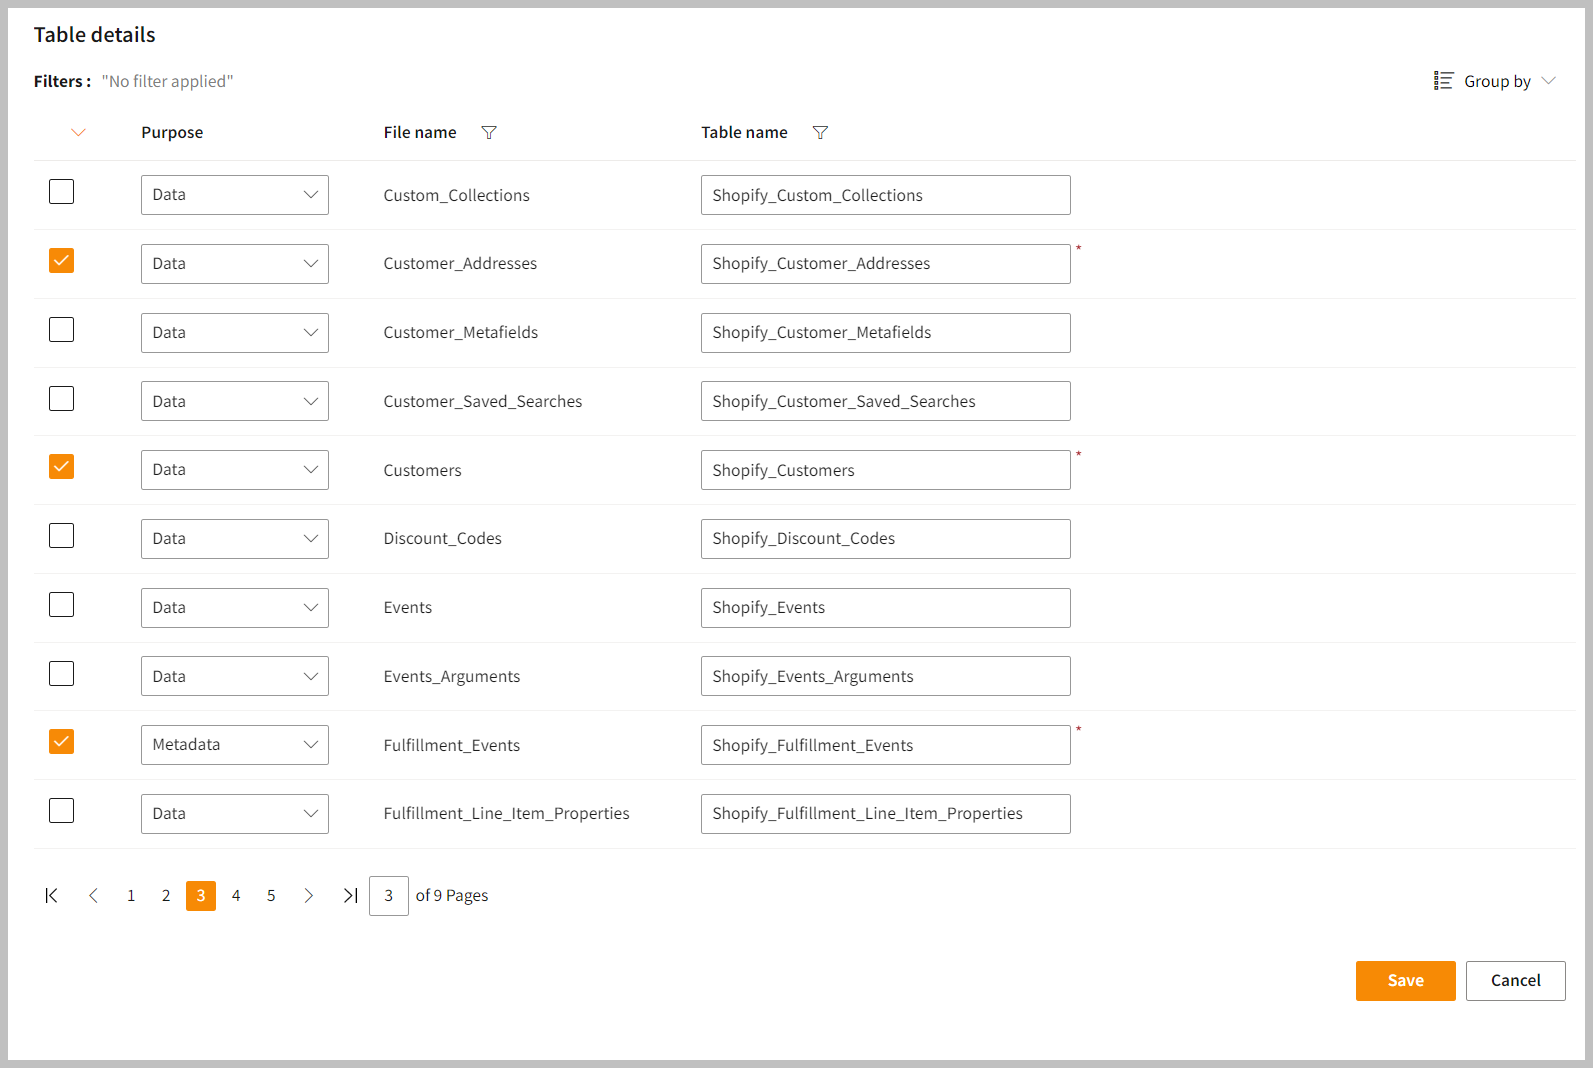 3. After configuration, you can enter the **Table Details** to process the data.
In the **Table Details** column, you can select only those data fields that you want to import and process.
| Item | Description |
| :------------------------ | :---------------------------------------------------------- |
| Purpose | Option to assign a purpose (Data, Metadata) for each table. |
| Data | Loads customer data. |
| Metadata | Loads Metadata. |
| File Name | Displays the name of the file that you imported. |
| Table Name | Displays the imported table name. |
4. Click **Save** to apply the changes.
## Run, edit, and delete the imported data
1. After saving the connection, the Shopify connector appears on the Dataflow page. Also, you can see the list of created tables in the [Databases](https://skypointcdpdocs.z22.web.core.windows.net/docs/entities.html) section.
3. After configuration, you can enter the **Table Details** to process the data.
In the **Table Details** column, you can select only those data fields that you want to import and process.
| Item | Description |
| :------------------------ | :---------------------------------------------------------- |
| Purpose | Option to assign a purpose (Data, Metadata) for each table. |
| Data | Loads customer data. |
| Metadata | Loads Metadata. |
| File Name | Displays the name of the file that you imported. |
| Table Name | Displays the imported table name. |
4. Click **Save** to apply the changes.
## Run, edit, and delete the imported data
1. After saving the connection, the Shopify connector appears on the Dataflow page. Also, you can see the list of created tables in the [Databases](https://skypointcdpdocs.z22.web.core.windows.net/docs/entities.html) section.
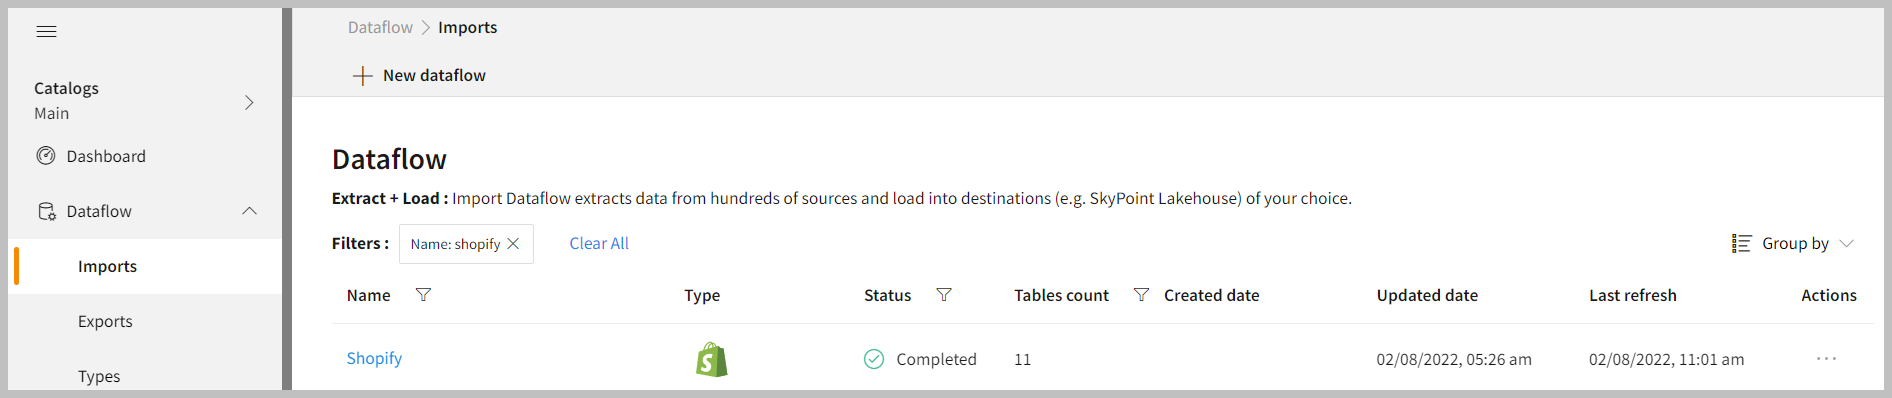 | Item | Description |
| :----------- | :------------------------------------------------------------------------------ |
| Name | Displays the name of the Dataflow. |
| Type | Displays connector type symbol. |
| Status | Indicates whether the data is imported successfully. |
| Tables Count | Displays the number of tables. |
| Created Date | Displays date of creation. |
| Updated Date | Displays last modified date. |
| Last Refresh | Displays the latest refresh date, which updates each time you refresh the data. |
| Group by | Option to view the items in a specific Group (For example, name, type, status). |
2. Select the horizontal ellipsis in the **Actions** column and do the following:
| If you want to | Then |
| :----------------------------------- | :------------------------------------------------------------------------------------------------- |
| Modify the Dataflow | Select **Edit** and modify the Dataflow. Click **Save** to apply your changes. |
| Execute the Dataflow | Select **Run**. |
| Bring the data to its previous state | Select **Rollback**. |
| Delete the Dataflow | Select **Remove** and then click the **Delete** button. All tables in the data source get deleted. |
| See the run history of the Dataflow | Select **Run History**. |
In the Dataflow, you can view the error message for data import failures from the data source under **Run History** > **Description**.
# Setup guide
## Overview
This document will help you gather all credentials for connecting [Shopify](https://accounts.shopify.com/lookup?rid=9a773bd0-16b4-425b-95d0-a6767c33b4a7) with Skypoint AI.
## Prerequisite
You require an active Shopify store and relevant [permissions](https://shopify.dev/apps/auth/admin-app-access-tokens#permissions-required-to-assign-scopes-to-a-custom-app) to create a custom app as well as assign API scopes.
## Enable Custom app development
Follow the below steps to enable custom app development in your **Shopify admin**:
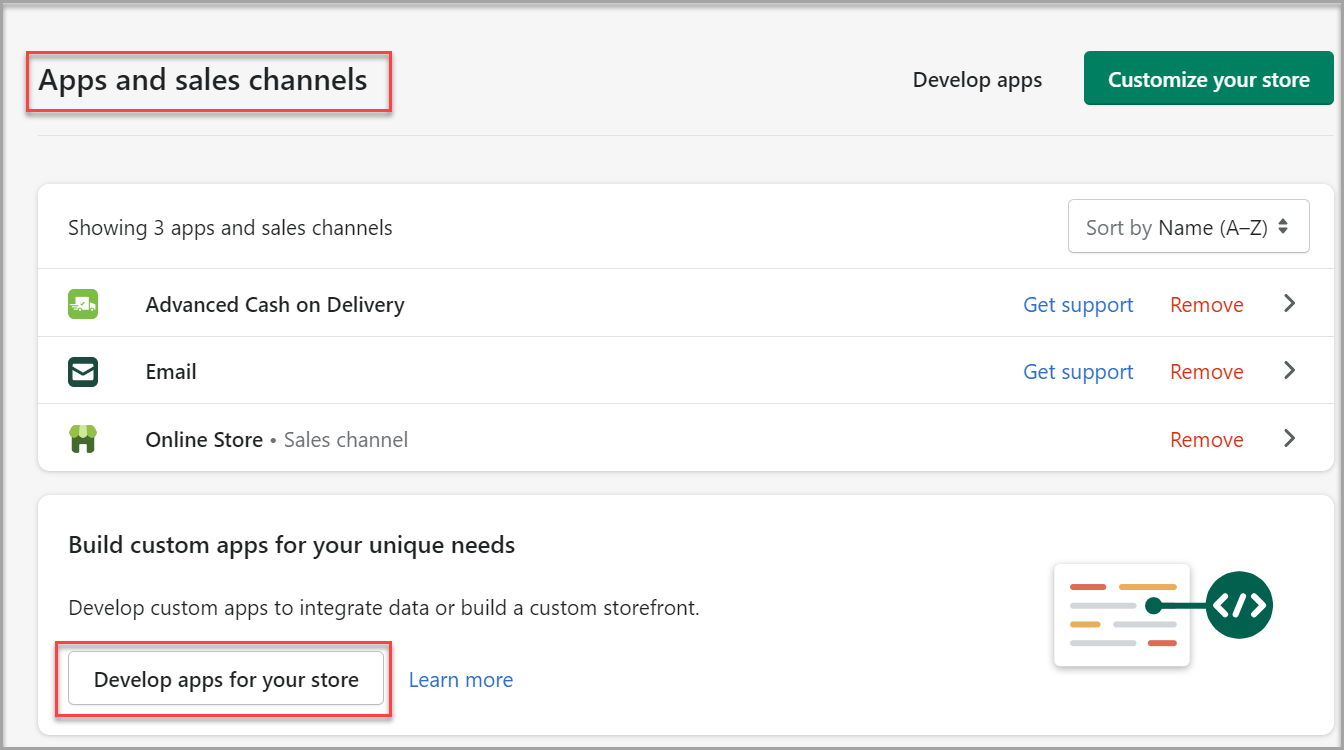
1. Go to **Settings > Apps and sales channels**.
2. Click **Develop apps for your store**.
| Item | Description |
| :----------- | :------------------------------------------------------------------------------ |
| Name | Displays the name of the Dataflow. |
| Type | Displays connector type symbol. |
| Status | Indicates whether the data is imported successfully. |
| Tables Count | Displays the number of tables. |
| Created Date | Displays date of creation. |
| Updated Date | Displays last modified date. |
| Last Refresh | Displays the latest refresh date, which updates each time you refresh the data. |
| Group by | Option to view the items in a specific Group (For example, name, type, status). |
2. Select the horizontal ellipsis in the **Actions** column and do the following:
| If you want to | Then |
| :----------------------------------- | :------------------------------------------------------------------------------------------------- |
| Modify the Dataflow | Select **Edit** and modify the Dataflow. Click **Save** to apply your changes. |
| Execute the Dataflow | Select **Run**. |
| Bring the data to its previous state | Select **Rollback**. |
| Delete the Dataflow | Select **Remove** and then click the **Delete** button. All tables in the data source get deleted. |
| See the run history of the Dataflow | Select **Run History**. |
In the Dataflow, you can view the error message for data import failures from the data source under **Run History** > **Description**.
# Setup guide
## Overview
This document will help you gather all credentials for connecting [Shopify](https://accounts.shopify.com/lookup?rid=9a773bd0-16b4-425b-95d0-a6767c33b4a7) with Skypoint AI.
## Prerequisite
You require an active Shopify store and relevant [permissions](https://shopify.dev/apps/auth/admin-app-access-tokens#permissions-required-to-assign-scopes-to-a-custom-app) to create a custom app as well as assign API scopes.
## Enable Custom app development
Follow the below steps to enable custom app development in your **Shopify admin**:
1. Go to **Settings > Apps and sales channels**.
2. Click **Develop apps for your store**.
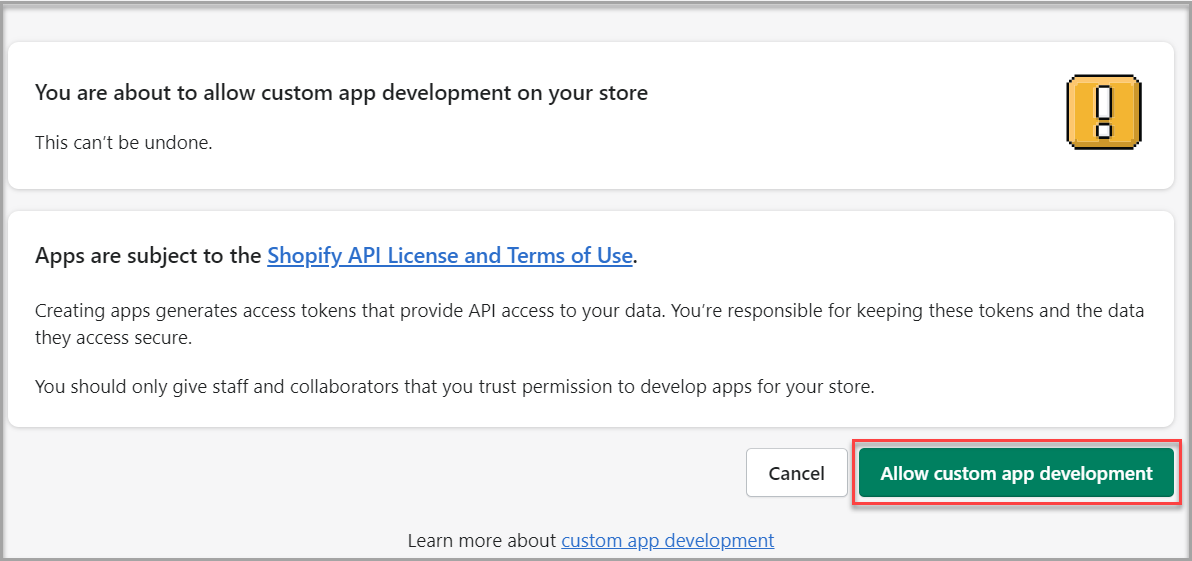
 3. Click **Allow custom app development**.
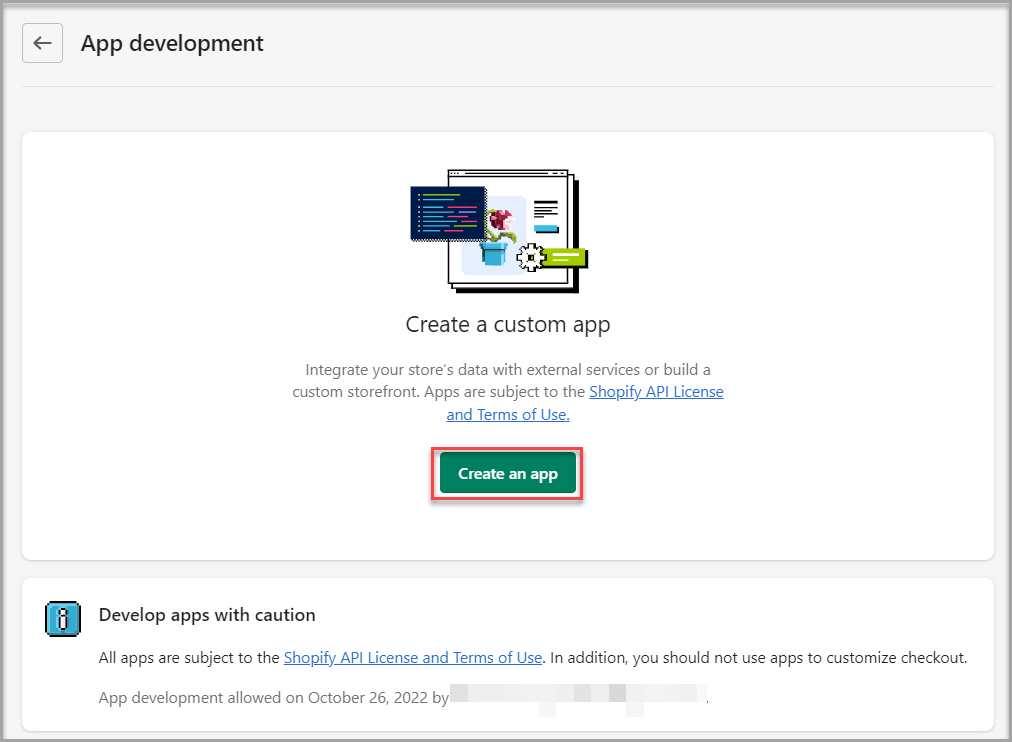
 4. Click **Create an app** to integrate your store’s data with external services or build a custom storefront.
 5. A **Create an app** pop-up appears.
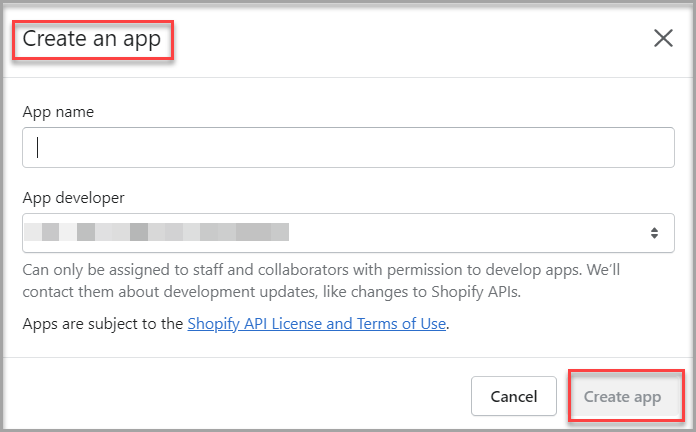 * Type your **App name** in the text area.
* Select the **App developer** from the drop-down list.
6. Click **Create app**.
Your app gets created.
* Type your **App name** in the text area.
* Select the **App developer** from the drop-down list.
6. Click **Create app**.
Your app gets created.
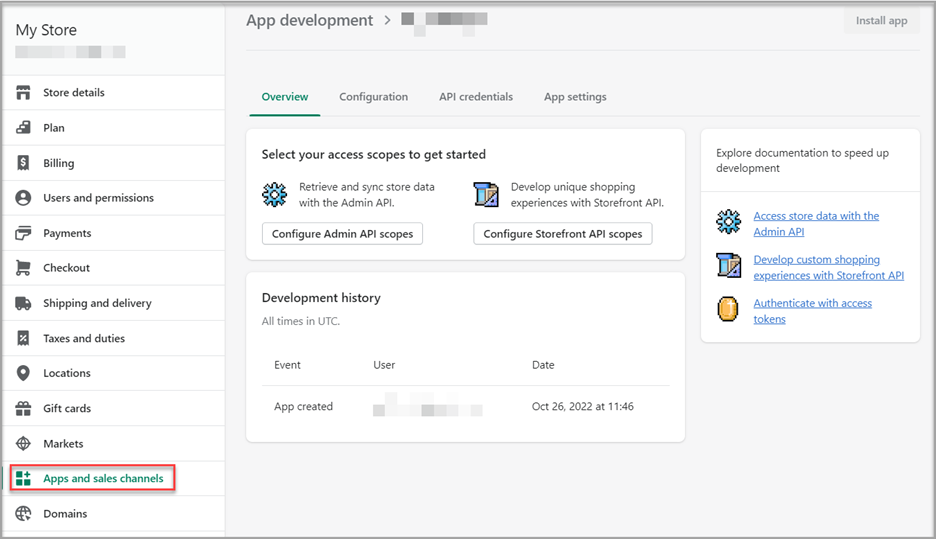 7. Click **Configure Admin API scopes**.
8. Select your preferred **Admin API access scopes**.
7. Click **Configure Admin API scopes**.
8. Select your preferred **Admin API access scopes**.
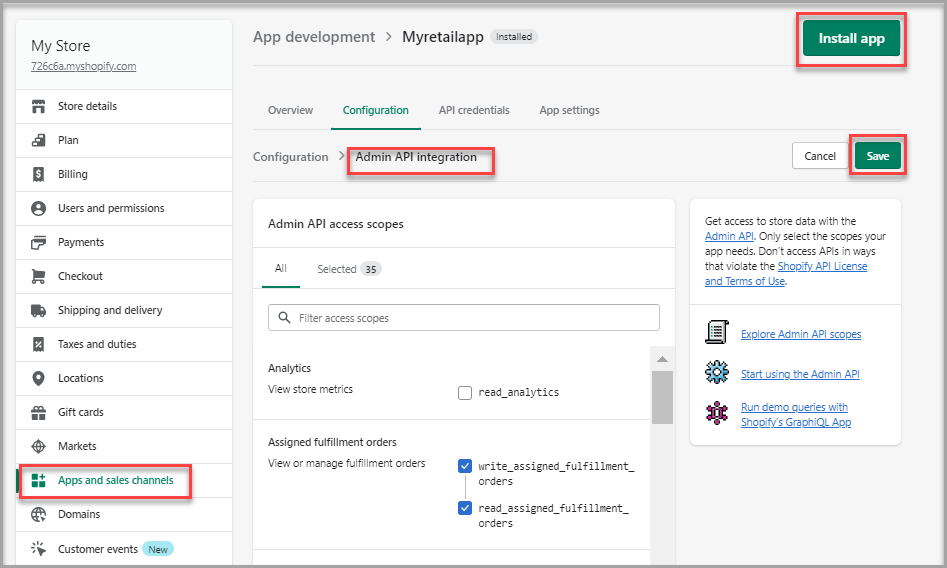 9. Configure the **Storefront API scopes**.
10. Click **Save** and then click **Install app**.
A confirmation pop-up appears.
9. Configure the **Storefront API scopes**.
10. Click **Save** and then click **Install app**.
A confirmation pop-up appears.
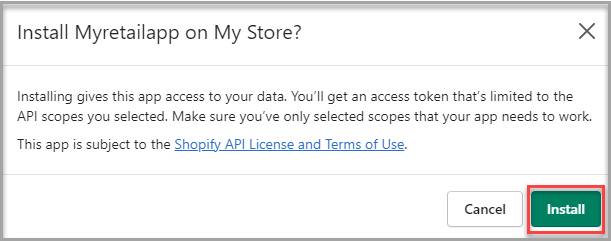 11. Click **Install**.
## To find the Configuration credentials
Follow the below step to find the required credentials for configuring Shopify import connector:
* Go to **Apps and sales channels > API credentials** to find the **API key**, **API access token**, and **URI**.
11. Click **Install**.
## To find the Configuration credentials
Follow the below step to find the required credentials for configuring Shopify import connector:
* Go to **Apps and sales channels > API credentials** to find the **API key**, **API access token**, and **URI**.
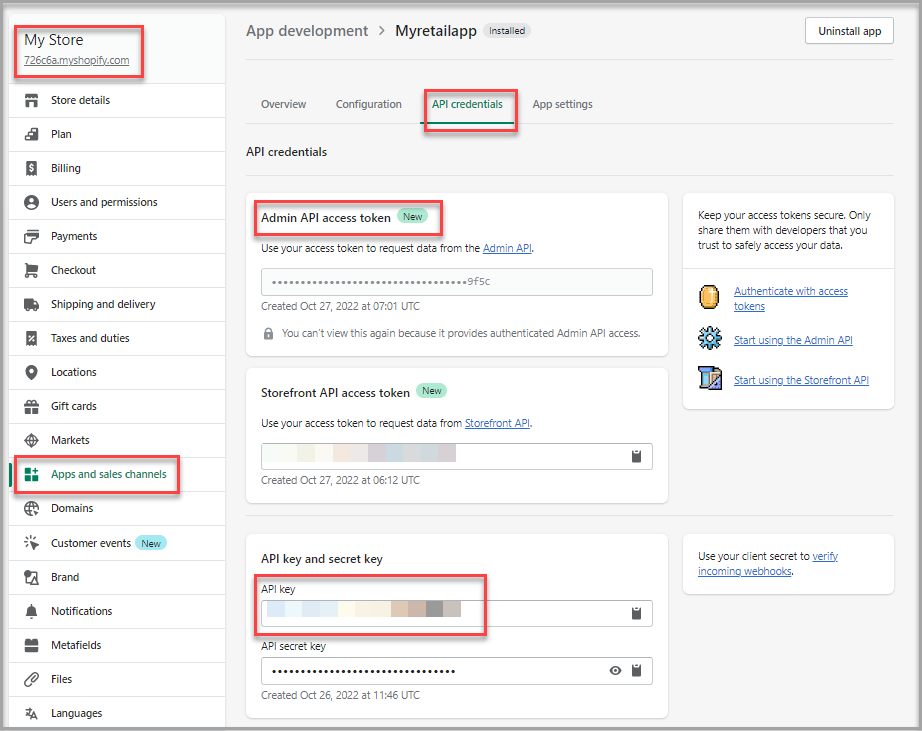 You can use the Admin API access token as the API password while configuring your Shopify import connector.
## Next step
After completing the data import, start the [Master Data Management (MDM) - Stitch process](stitch.md) to develop a unified view of your customers.


# ERD
You can use the Admin API access token as the API password while configuring your Shopify import connector.
## Next step
After completing the data import, start the [Master Data Management (MDM) - Stitch process](stitch.md) to develop a unified view of your customers.
# ERD