> ## Documentation Index
> Fetch the complete documentation index at: https://docs.skypoint.ai/llms.txt
> Use this file to discover all available pages before exploring further.
#
# How to configure SharePoint on skyData Studio
This guide walks you through the steps to connect SharePoint with skyData, covering setup, configuration, and key considerations.
Microsoft SharePoint is a collaboration and document management platform that enables teams to securely store, organize, and share content. Integrated with Microsoft 365, it streamlines workflows, enhances productivity, and supports enterprise content management.
## Prerequisite
You need the following credentials to configure and import data from SharePoint:
* Client Secret
* Application (Client) ID
* Directory (Tenant) ID
* SharePoint site URL
Users can setup SharePoint datasource on skyData studio by following the below steps:
* **Azure App Registration:** Register an app in Azure AD and generate credentials for SharePoint access.
* **skyData Studio Setup:** Configure SharePoint as a data source using the app credentials and site URL.
## Azure App Registration
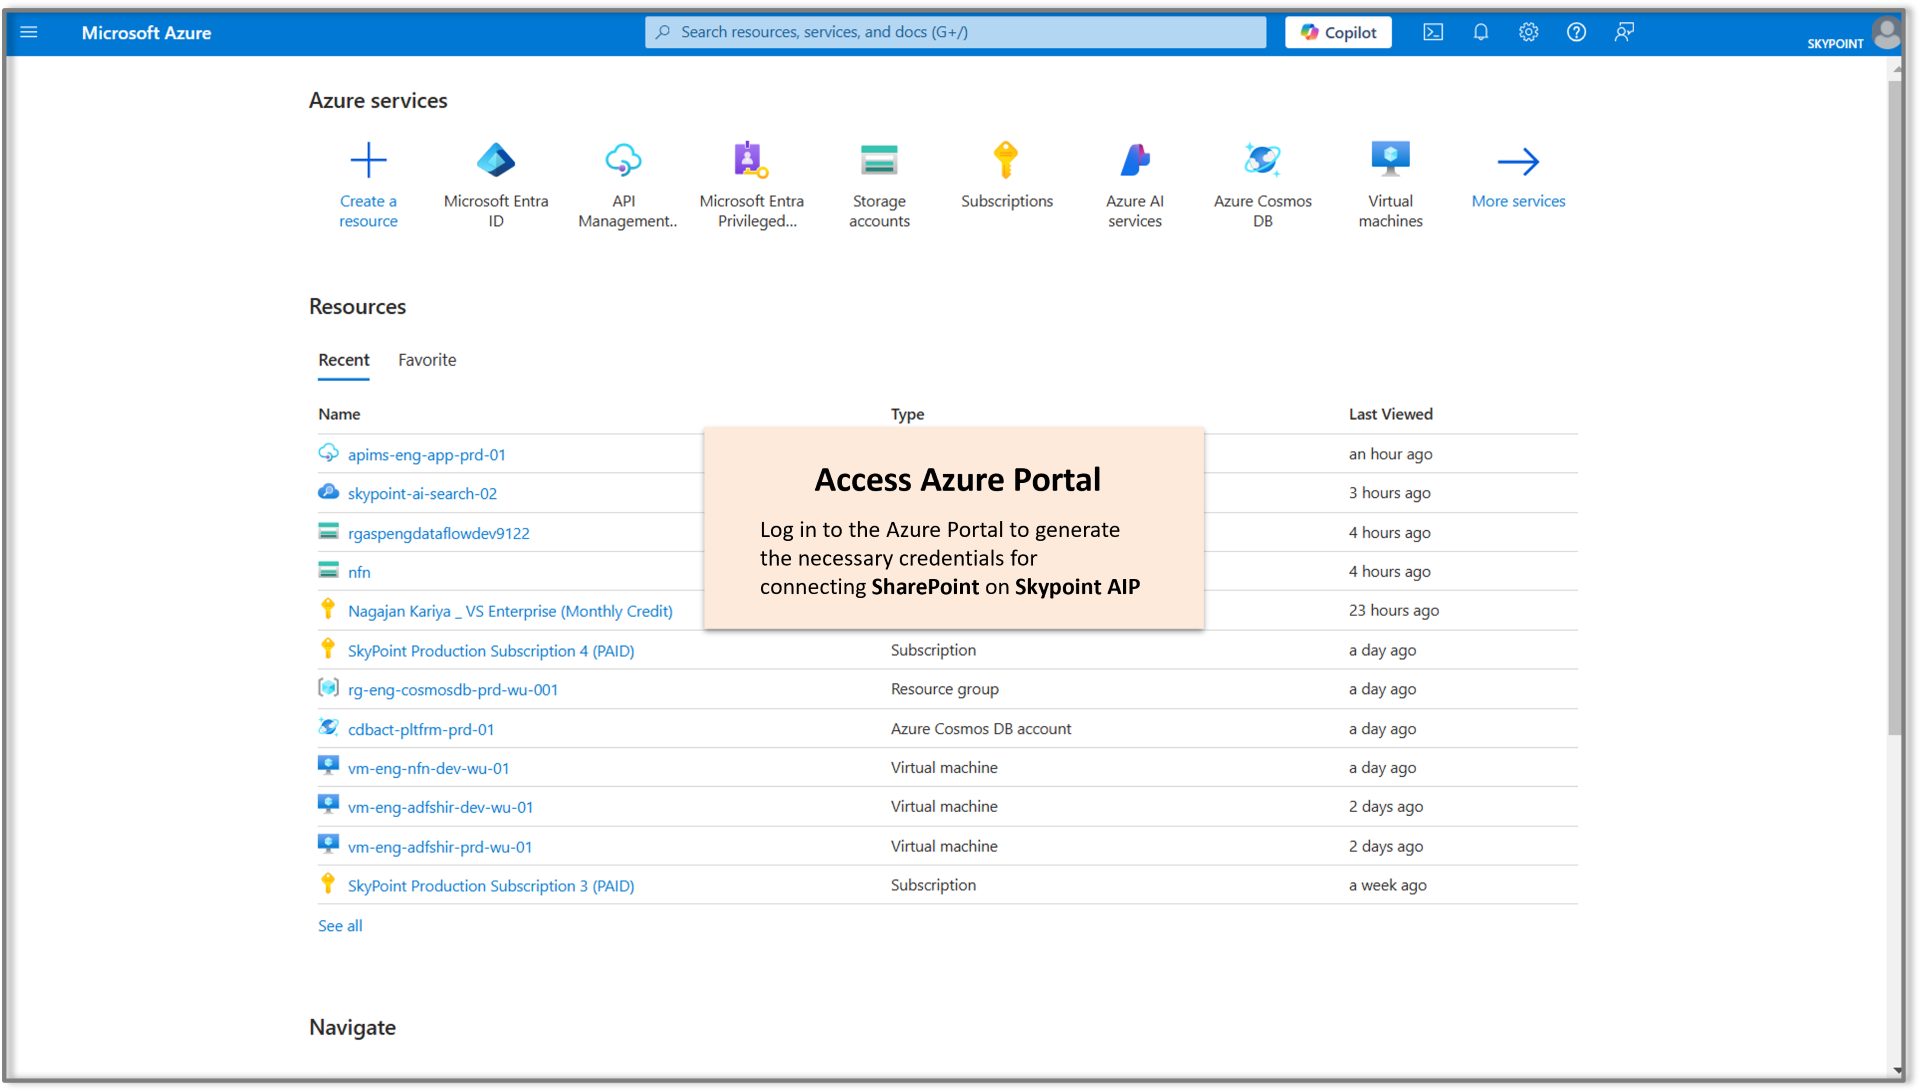
1. Sign in to the [Azure Portal](https://portal.azure.com/).
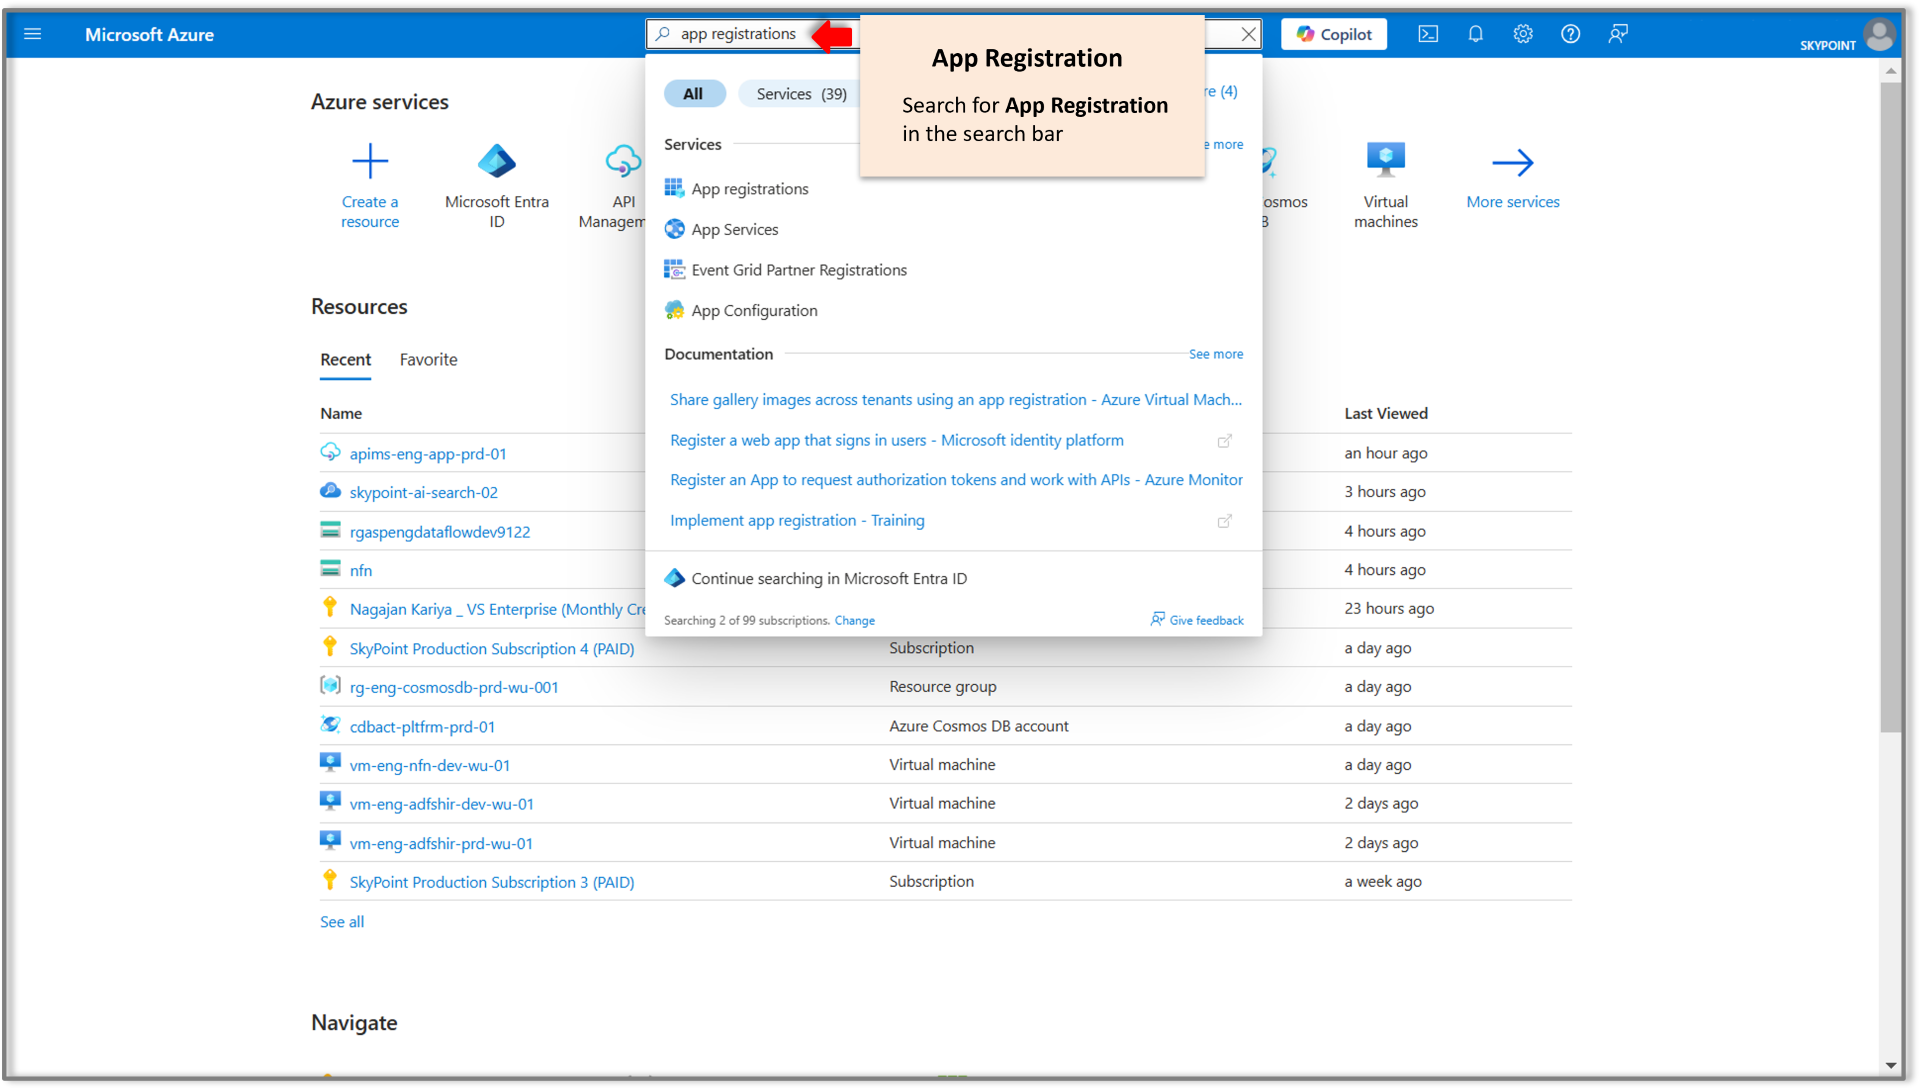
 2. Search for **App Registration** in the search bar, as indicated with an arrow.
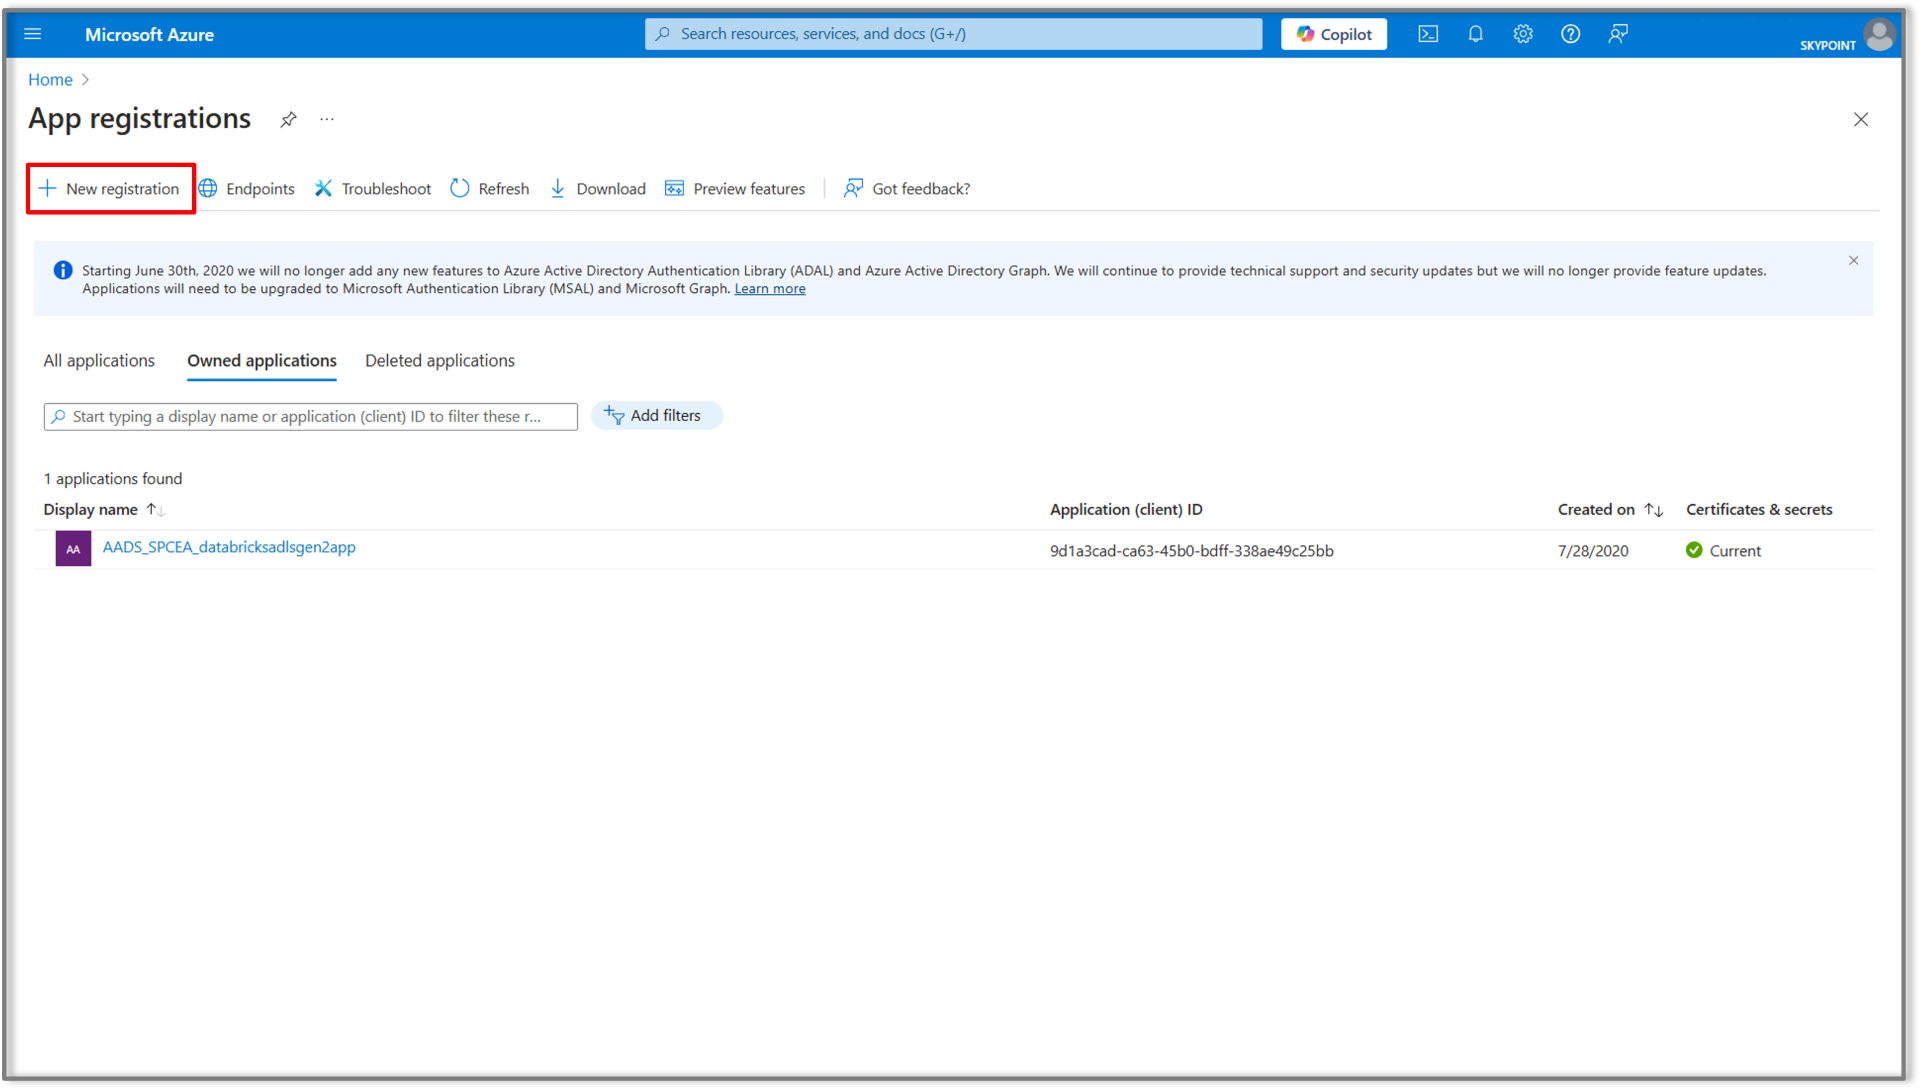
 3. Next, click on the **New Registration** button located at the top left corner, as highlighted.
 4. Enter the display name for the application following a standard naming convention, ensuring it begins with a letter and contains only letters or numbers.
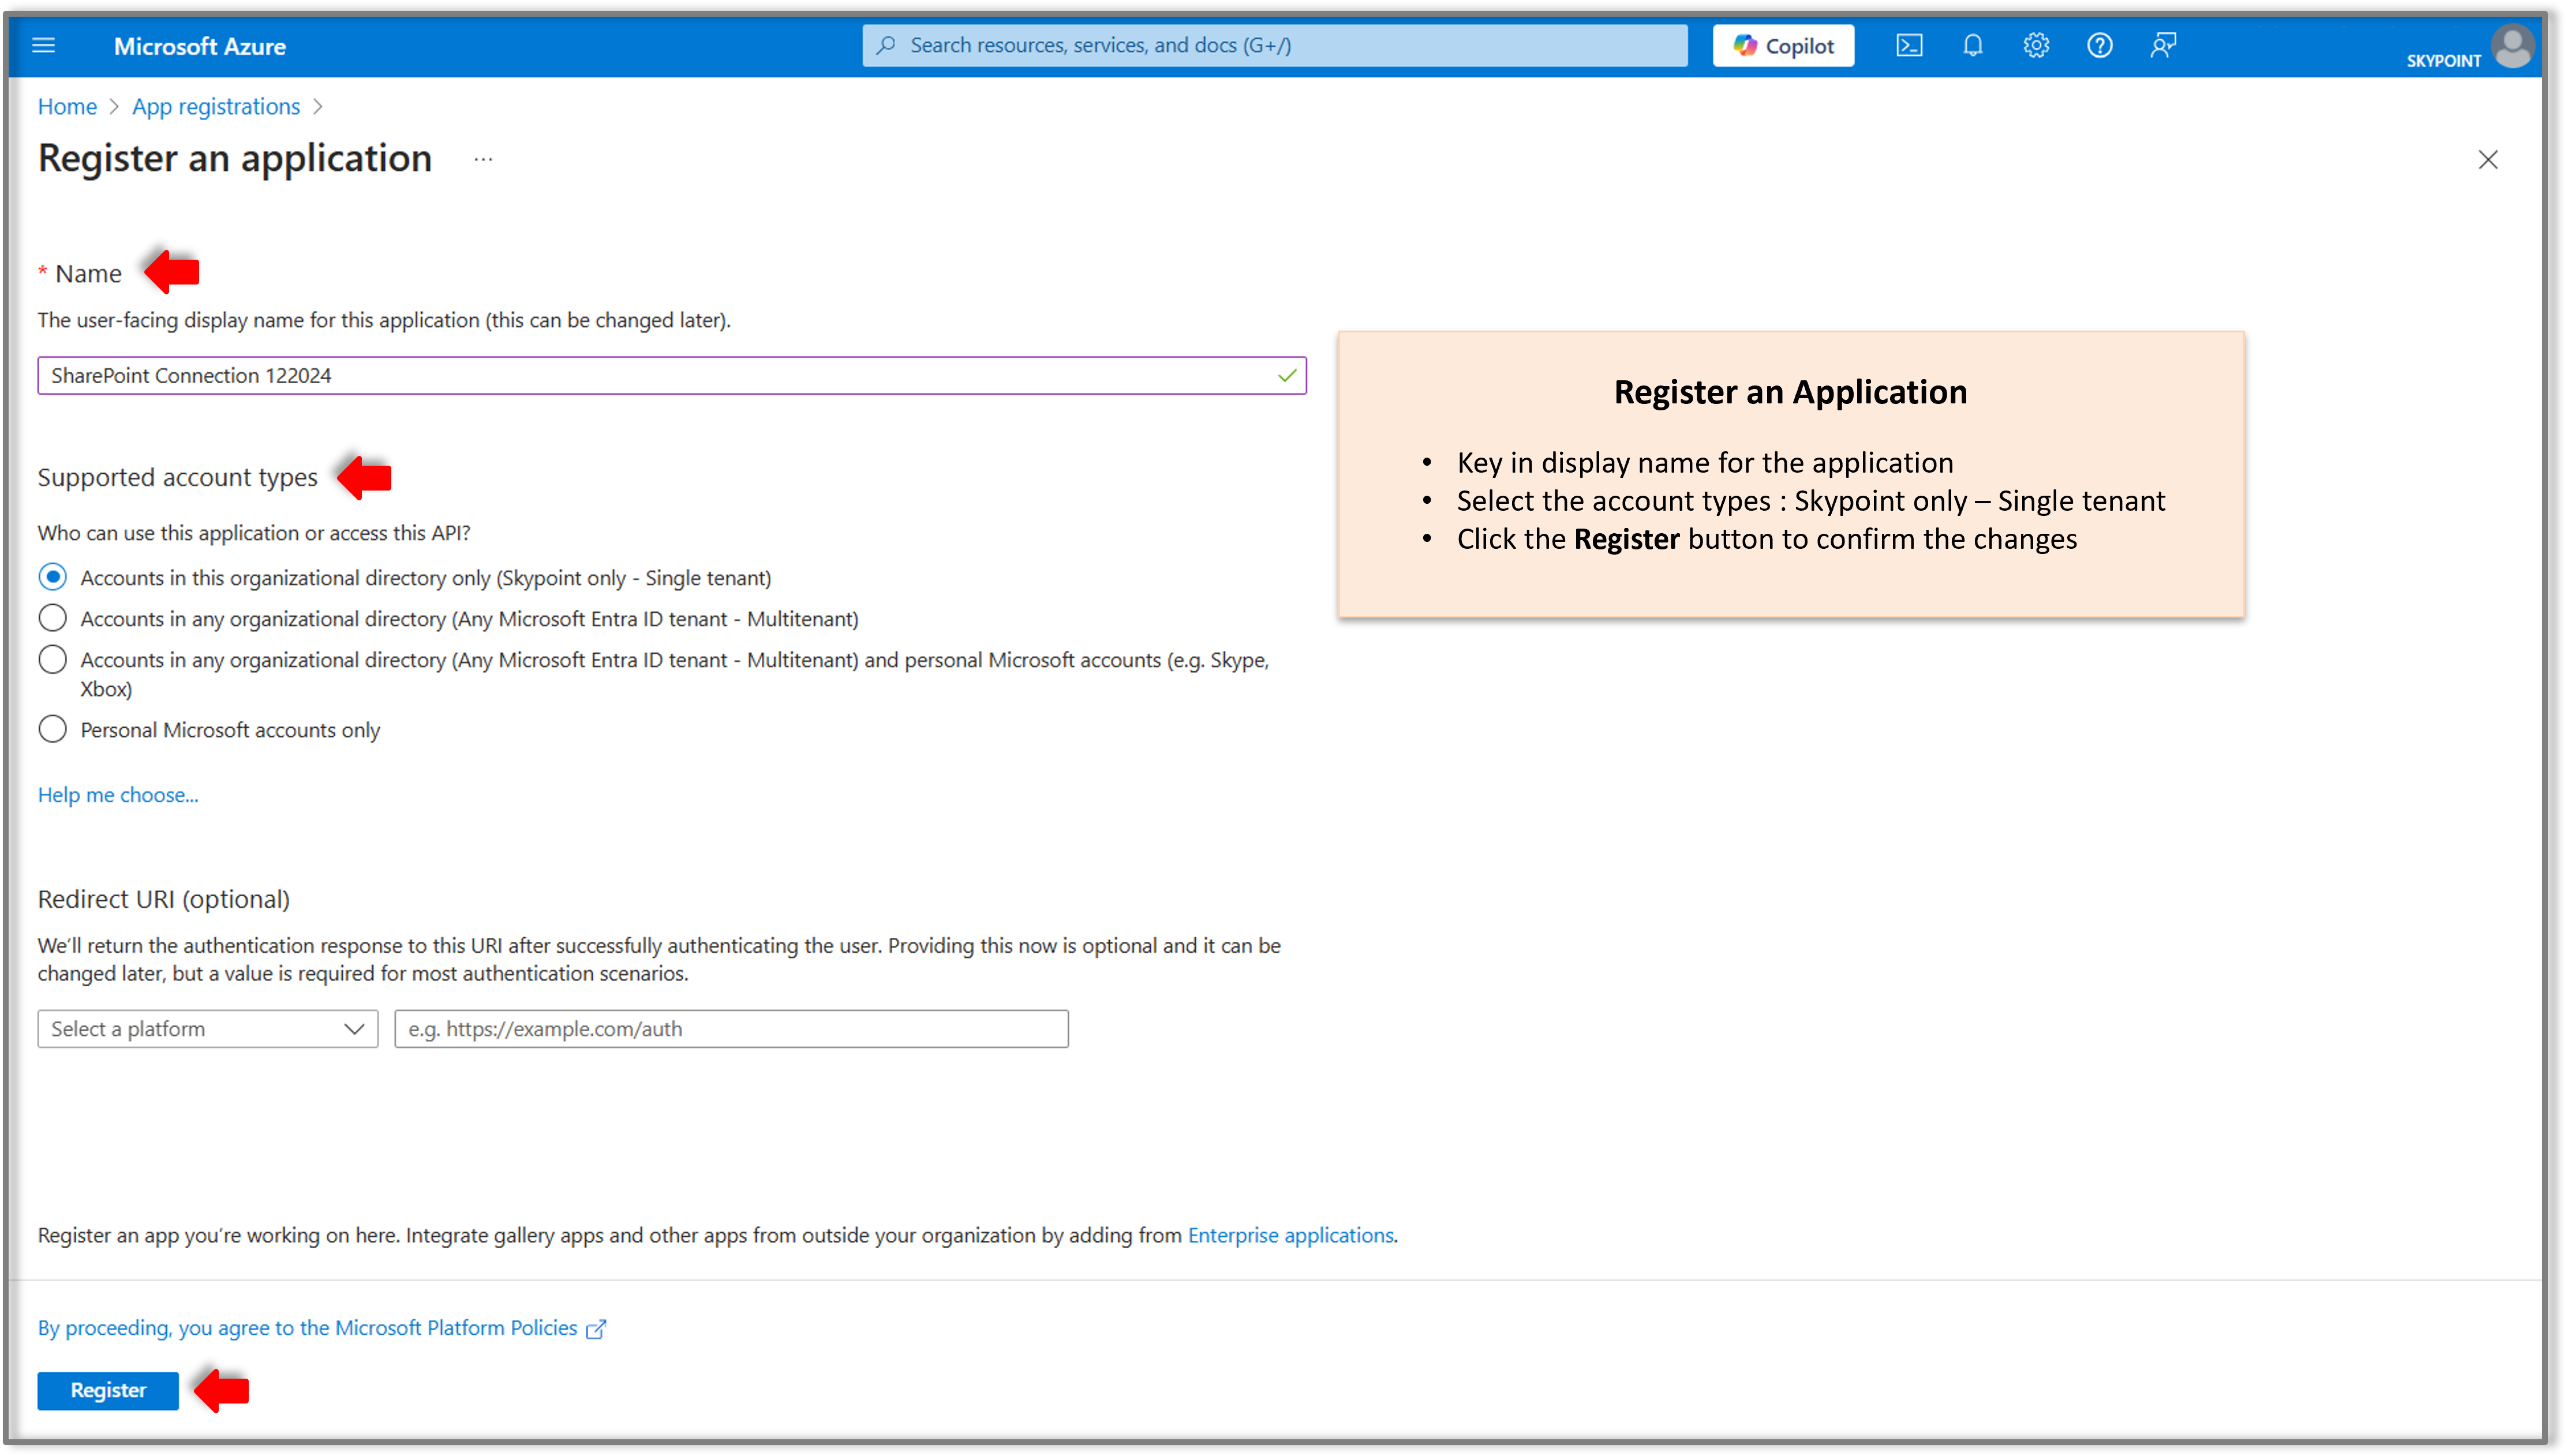 5. Select the account type by choosing the radio button next to **Accounts in this organizational directory only (Skypoint only – single tenant).**
6. Next, click the **Register** button at the bottom.
The **Application Registration** page will appear:
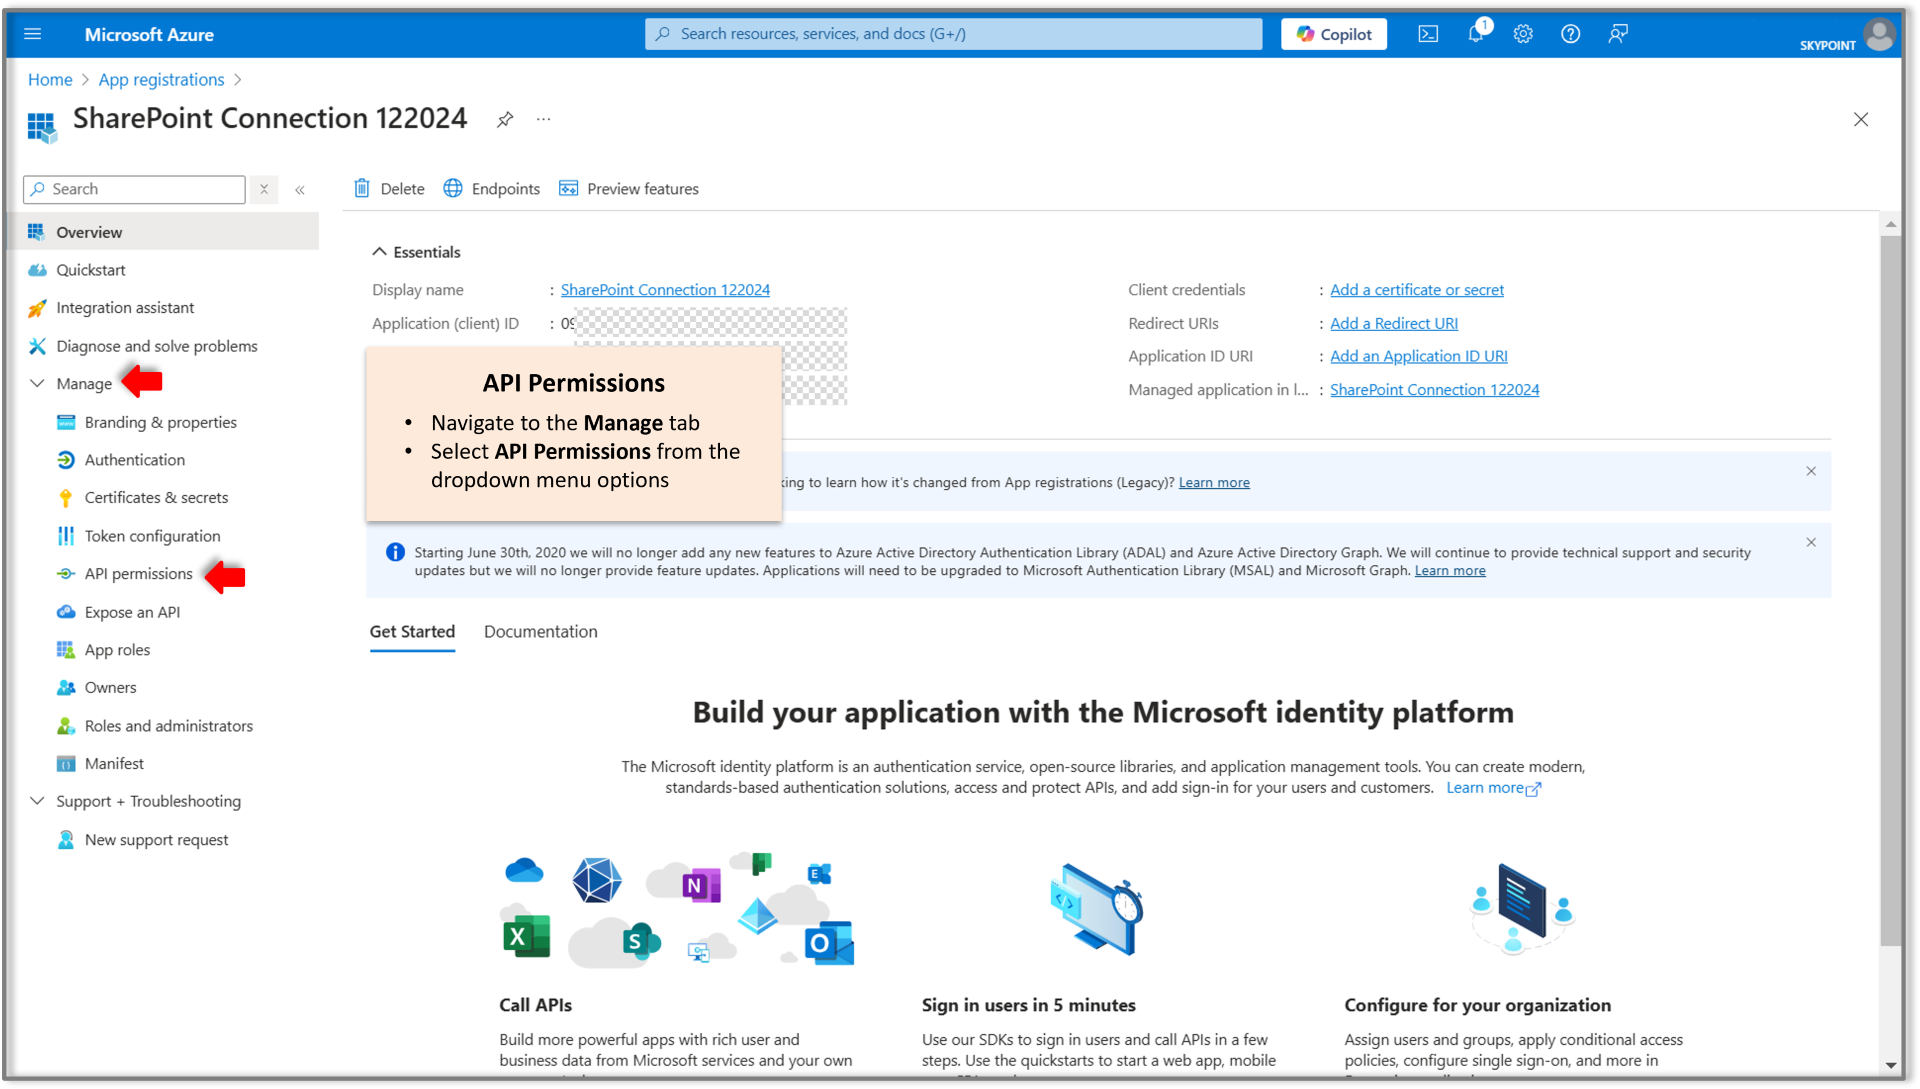
7. Navigate to the **Manage** tab and select **API Permissions** from the dropdown menu options.
5. Select the account type by choosing the radio button next to **Accounts in this organizational directory only (Skypoint only – single tenant).**
6. Next, click the **Register** button at the bottom.
The **Application Registration** page will appear:
7. Navigate to the **Manage** tab and select **API Permissions** from the dropdown menu options.
 8. Then, click on **Add a permission,** as highlighted.
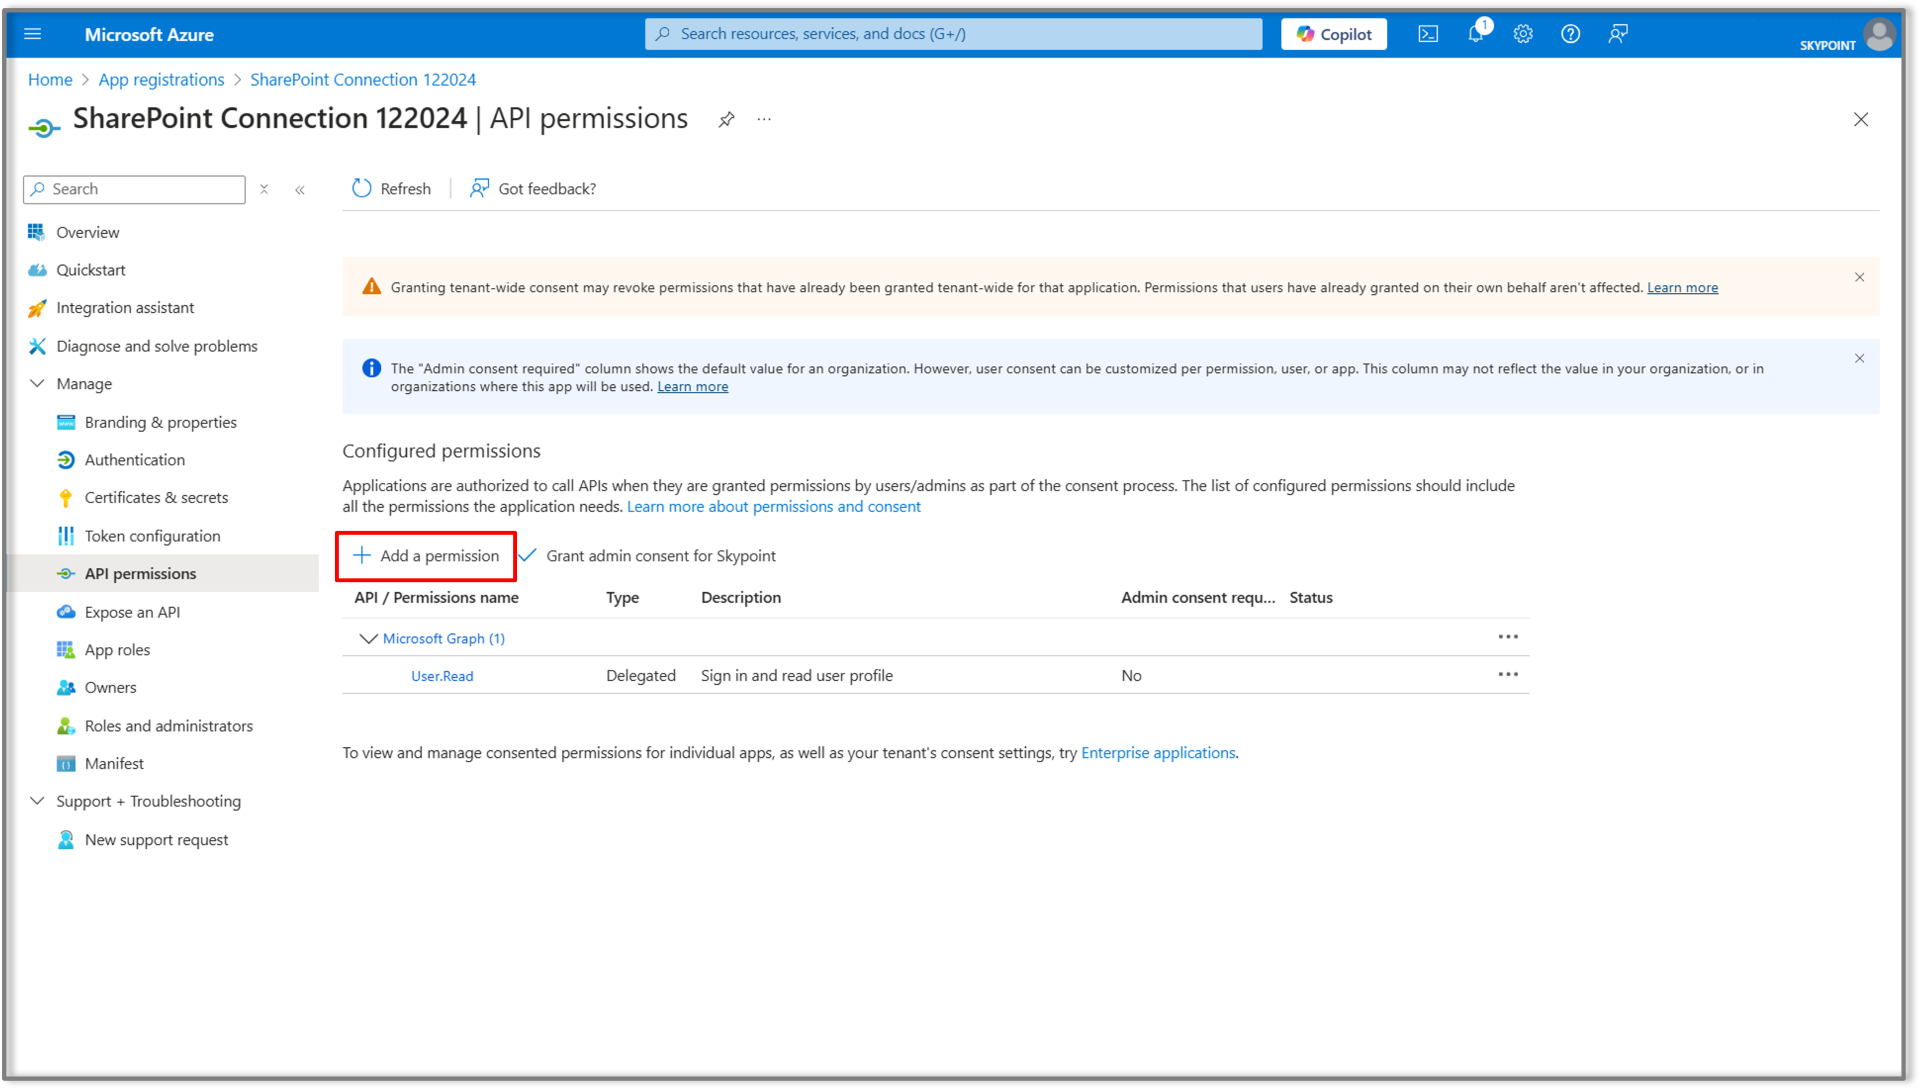 This action triggers a pop-up that appears on the right side of the webpage.
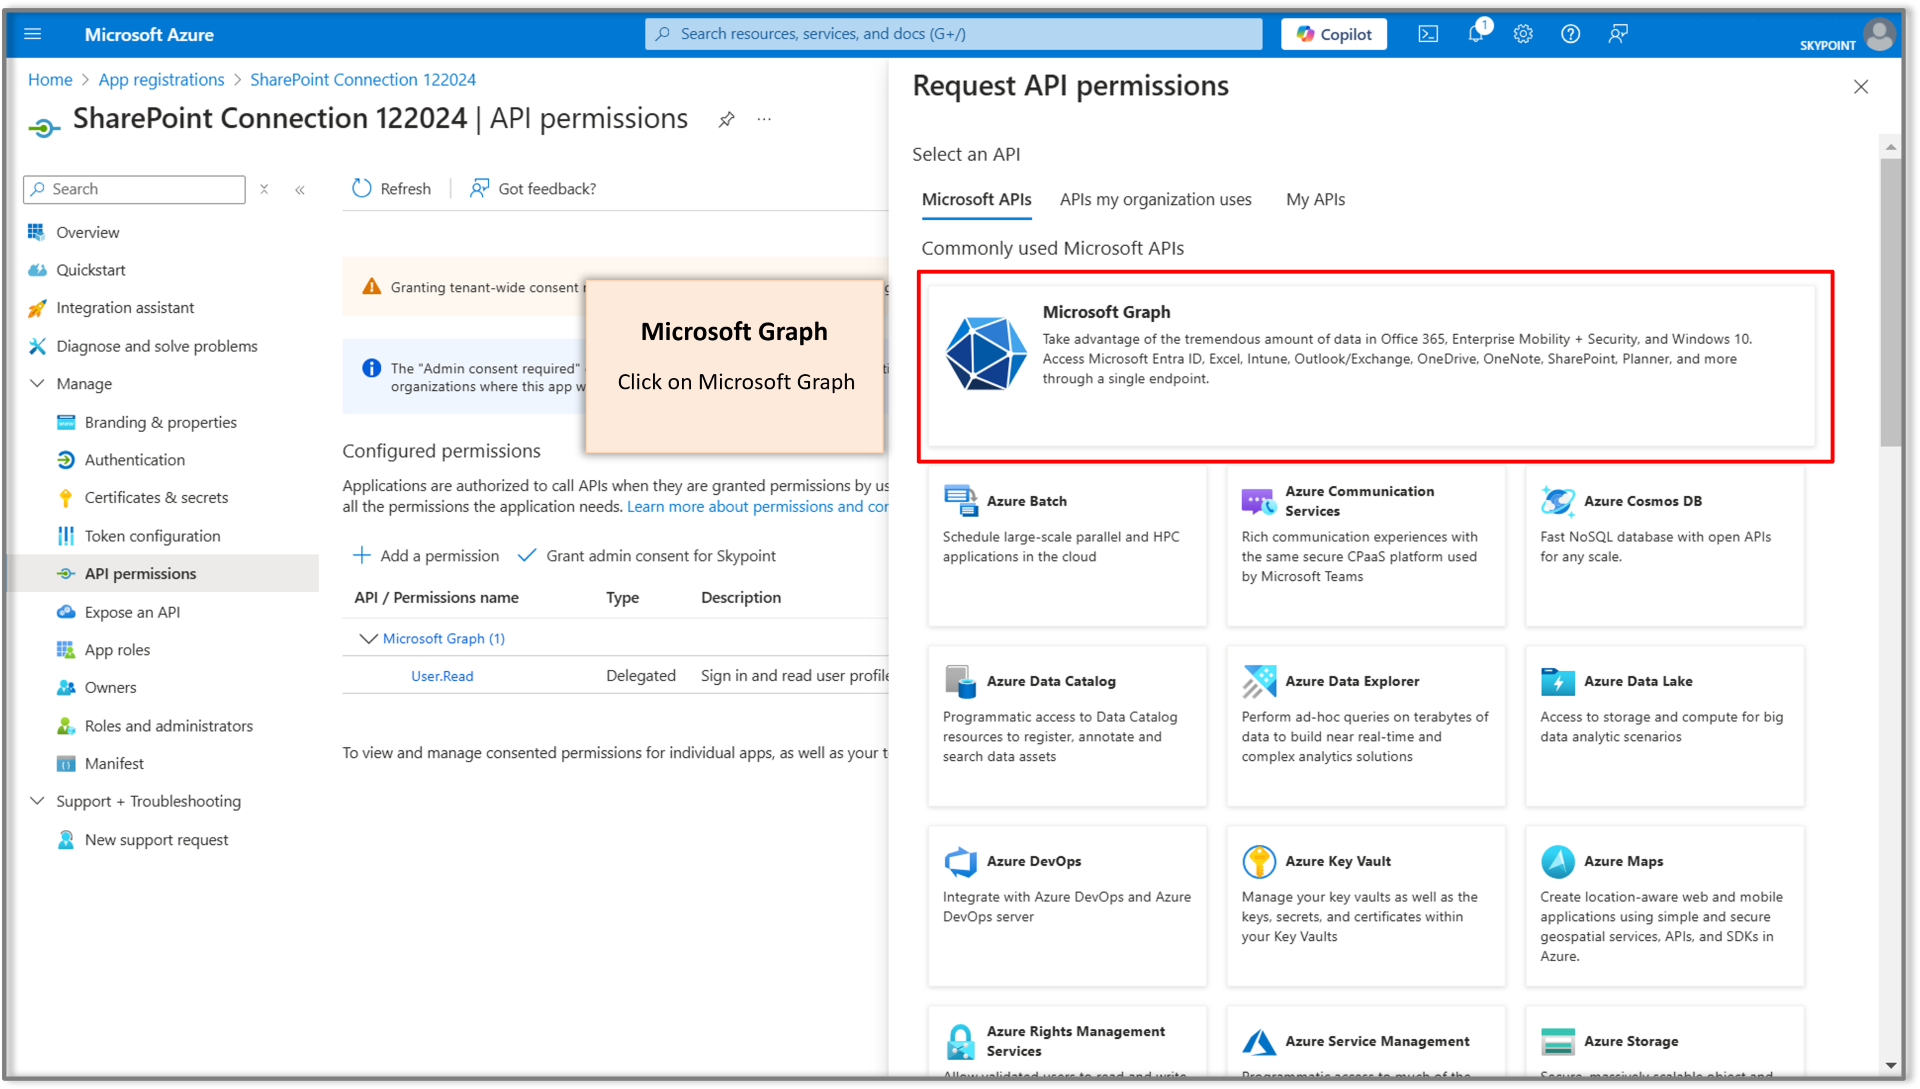
9. Click on **Microsoft Graph** to continue.
This action triggers a pop-up that appears on the right side of the webpage.
9. Click on **Microsoft Graph** to continue.
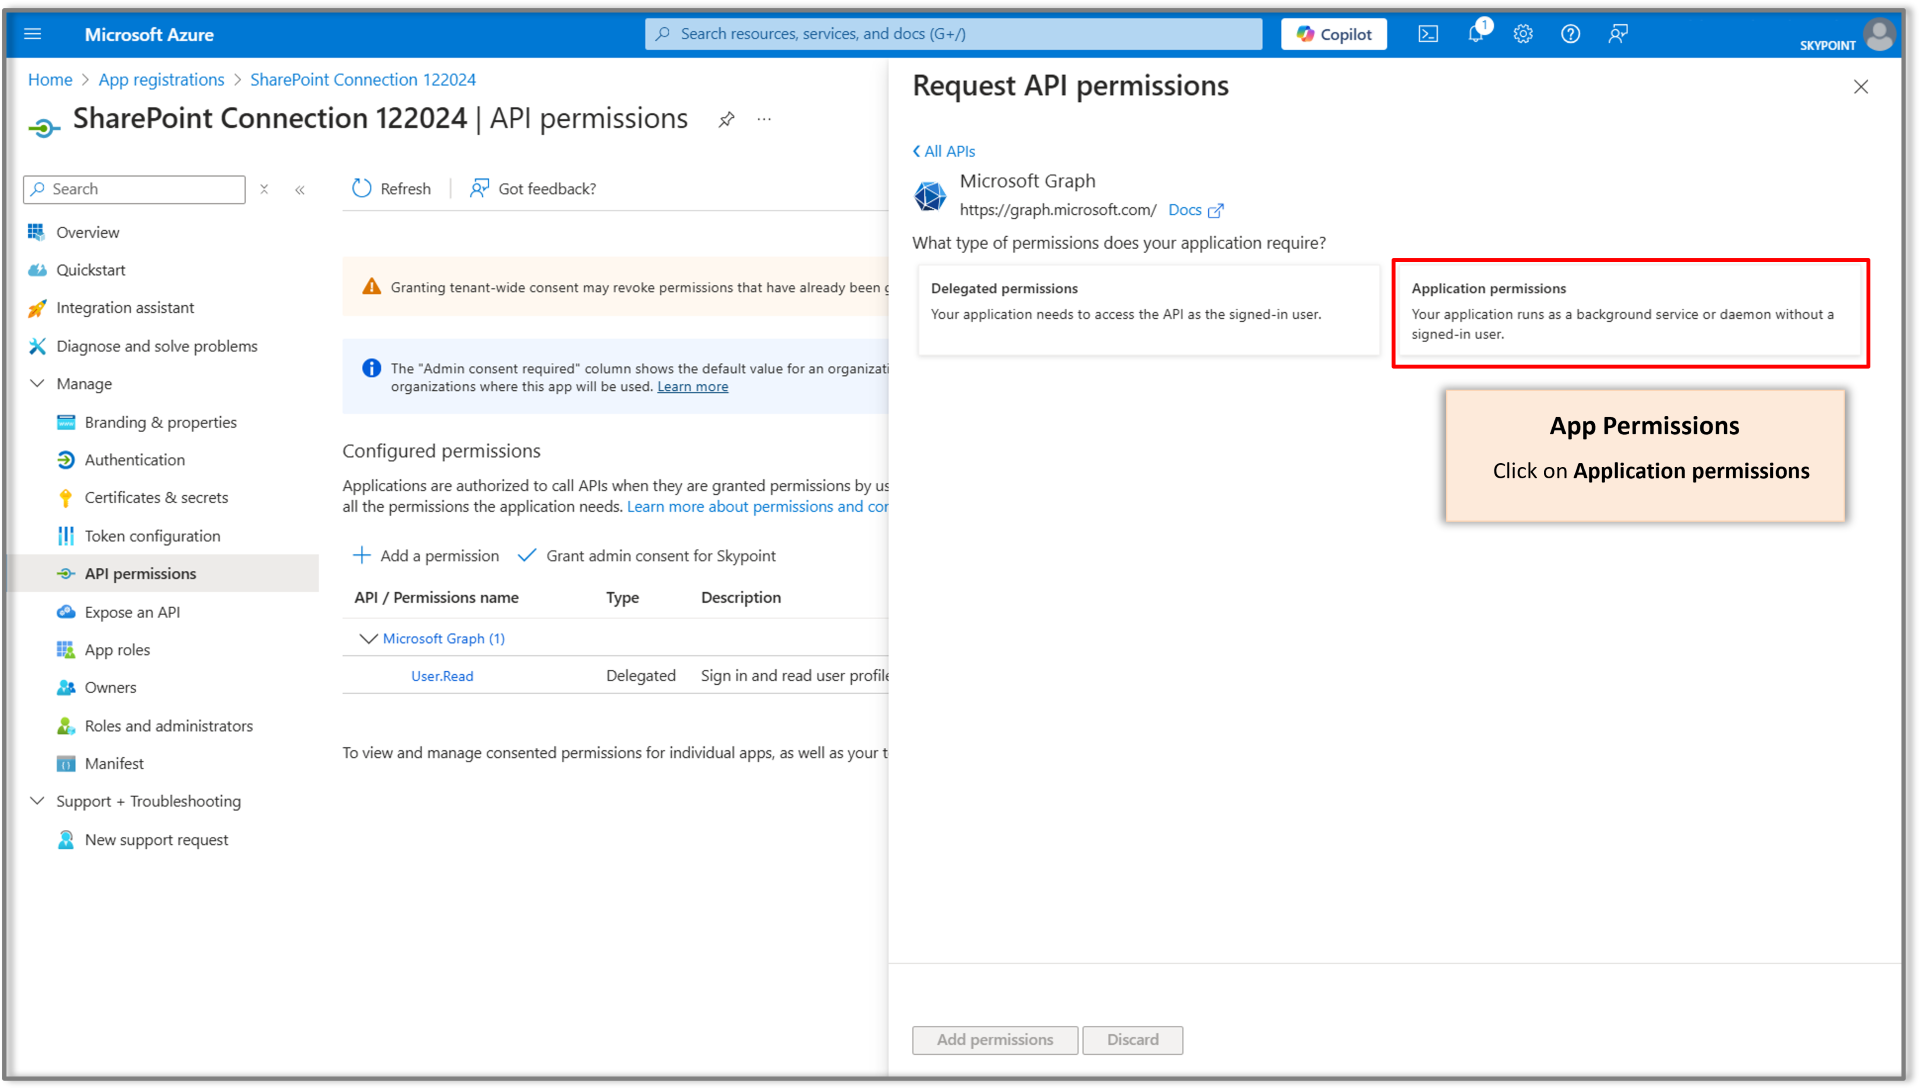
 10. Select **Application Permissions.**
 11. Use the search bar to look up for **Sites.**
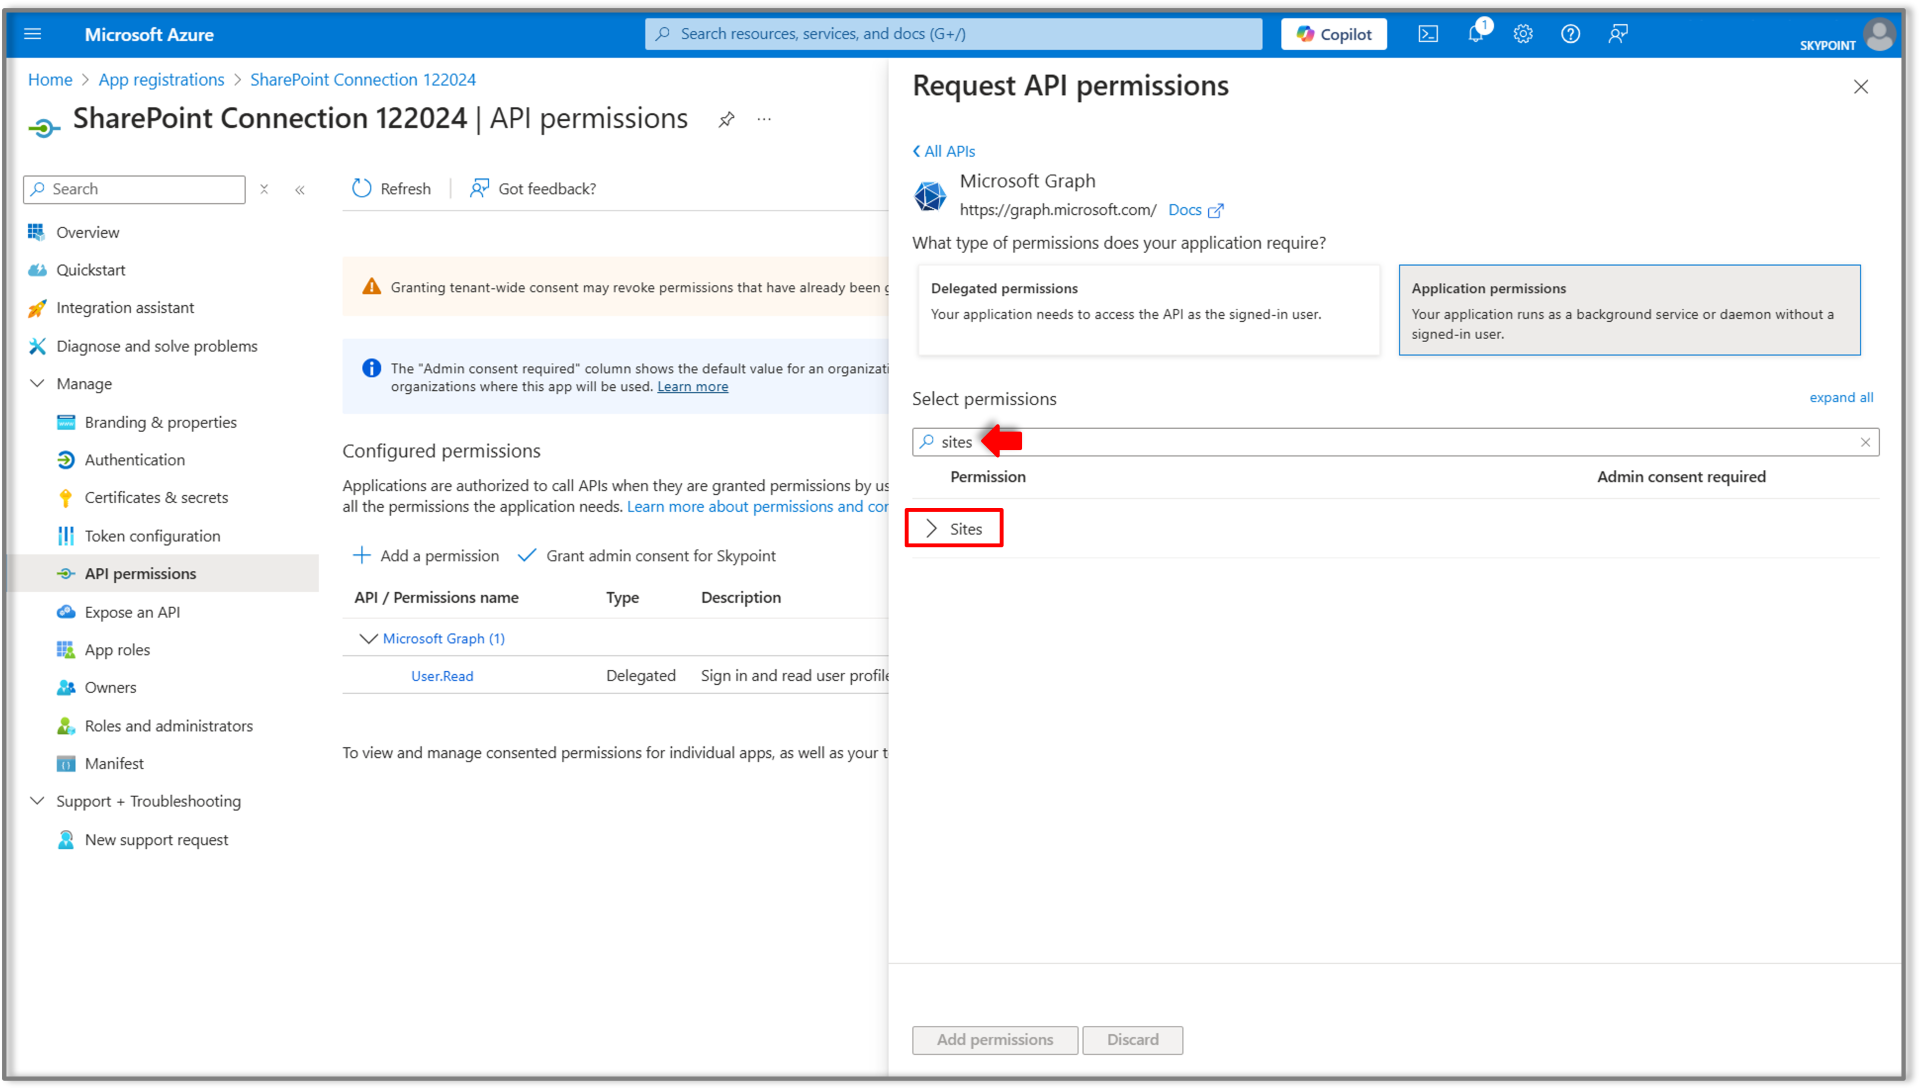 12. Click on **Sites** to expand the menu options, and select the checkboxes for the required permissions.
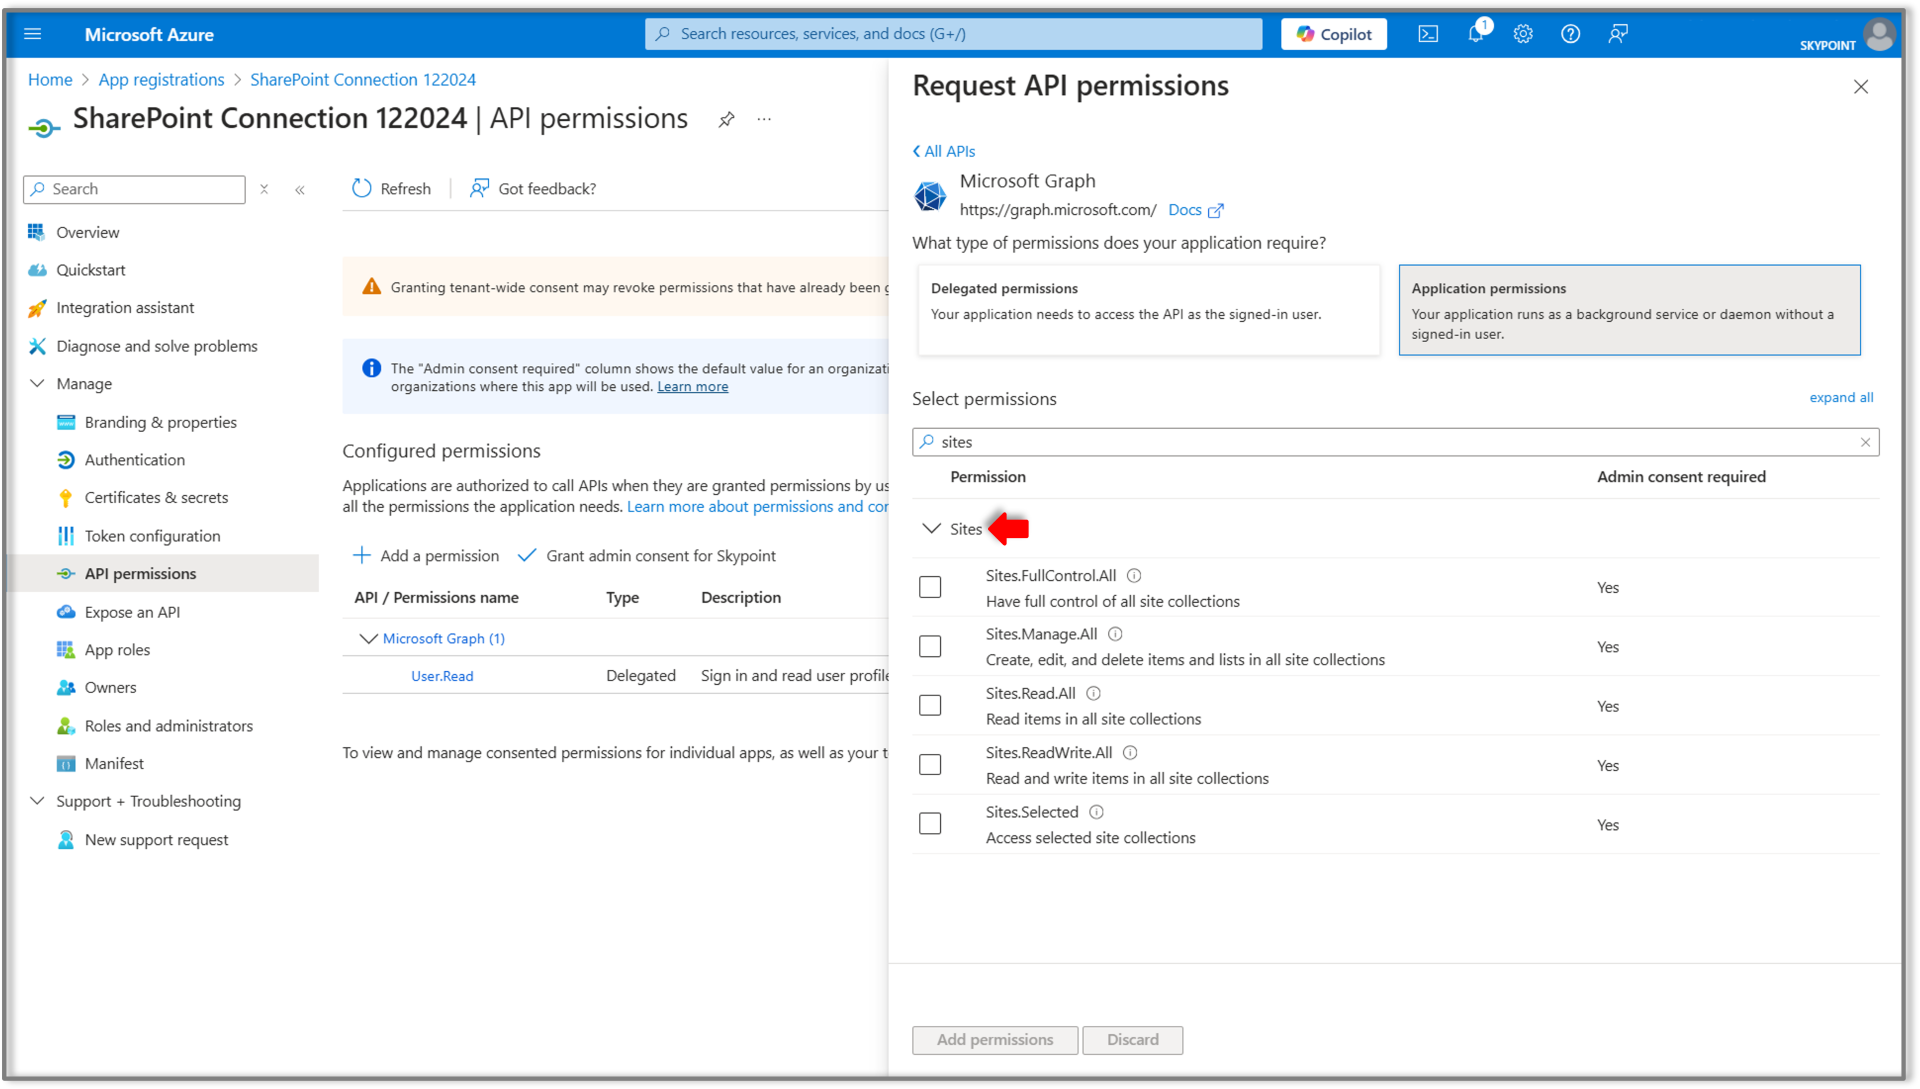 13. To grant read access permission to skyDataP on the SharePoint datasource, select the checkbox as illustrated in the figure below:
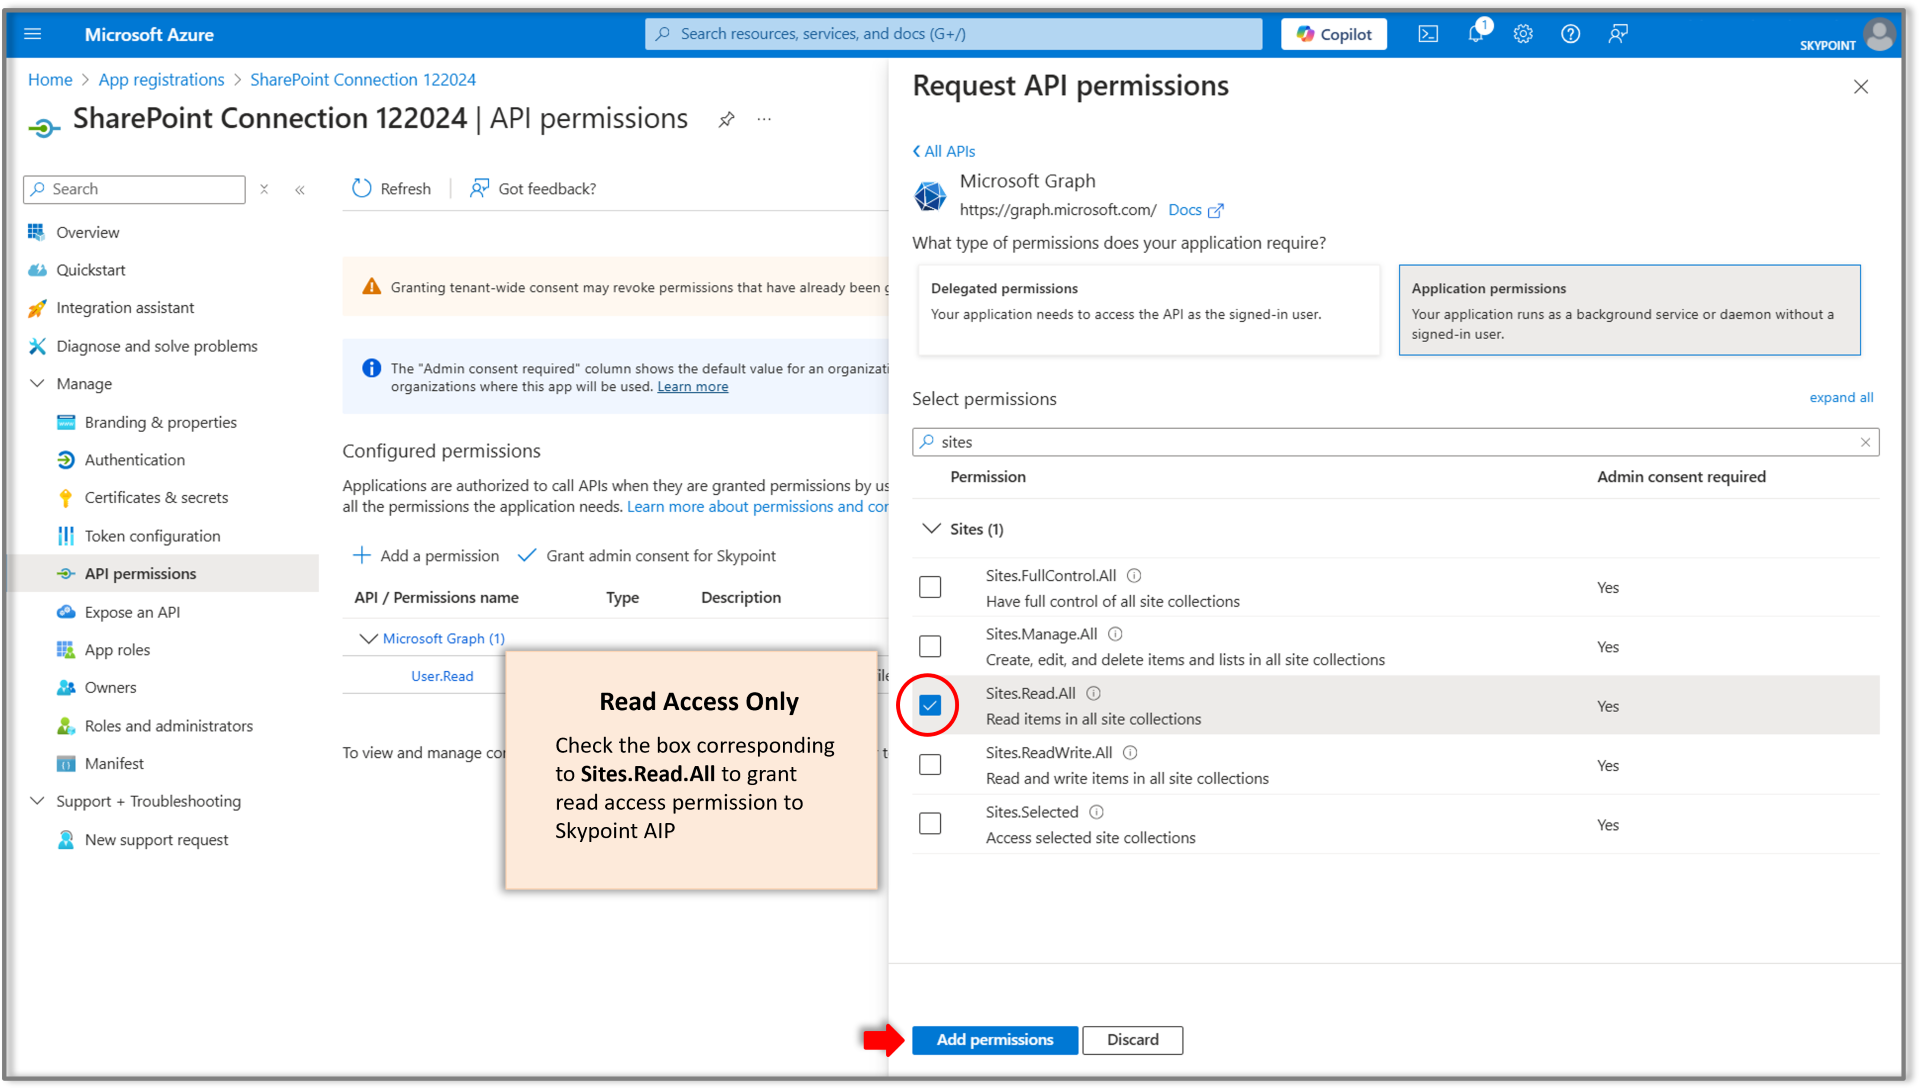 14. Next, click on **Add Permissions.**
15. The permissions will be added and displayed under the **Configured permissions** as shown in the figure below:
14. Next, click on **Add Permissions.**
15. The permissions will be added and displayed under the **Configured permissions** as shown in the figure below:
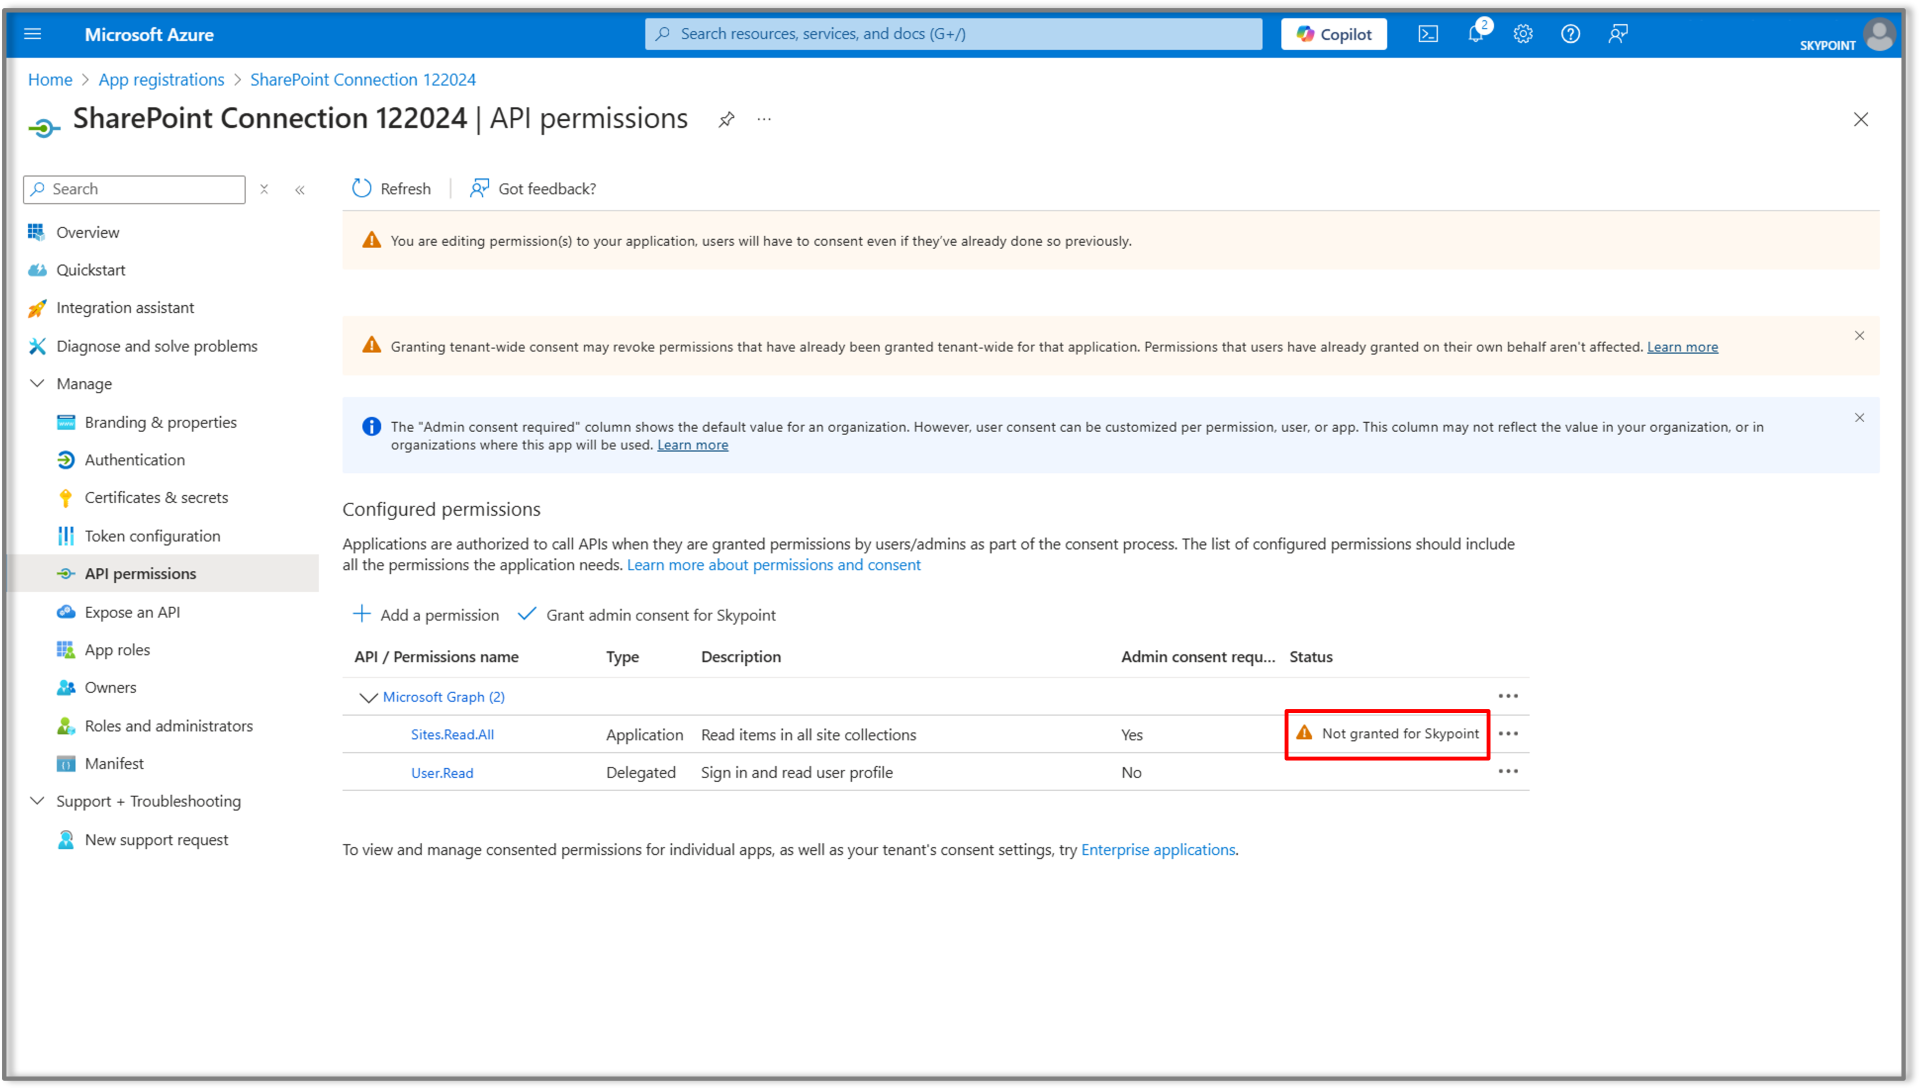
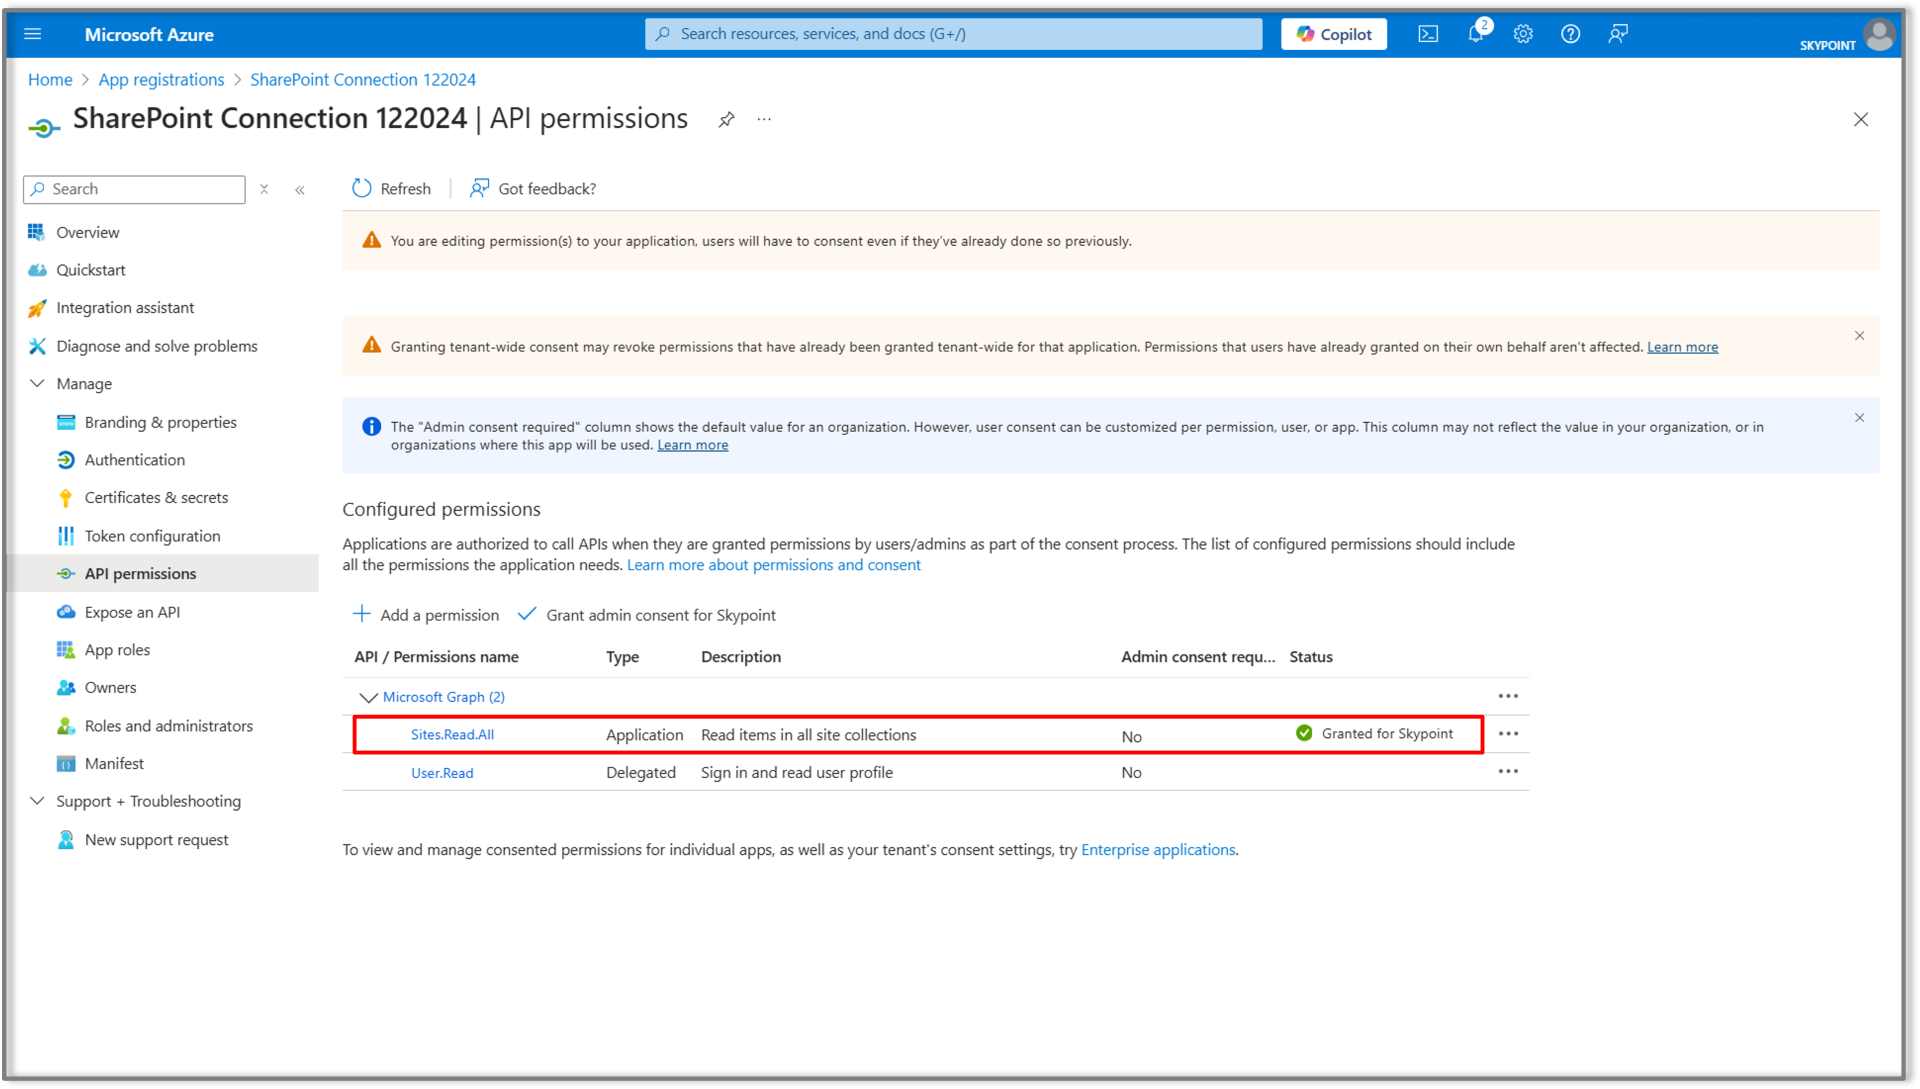 16. If the permissions' status displays as **Not granted for Skypoint,** users should request approval from a global administrator.
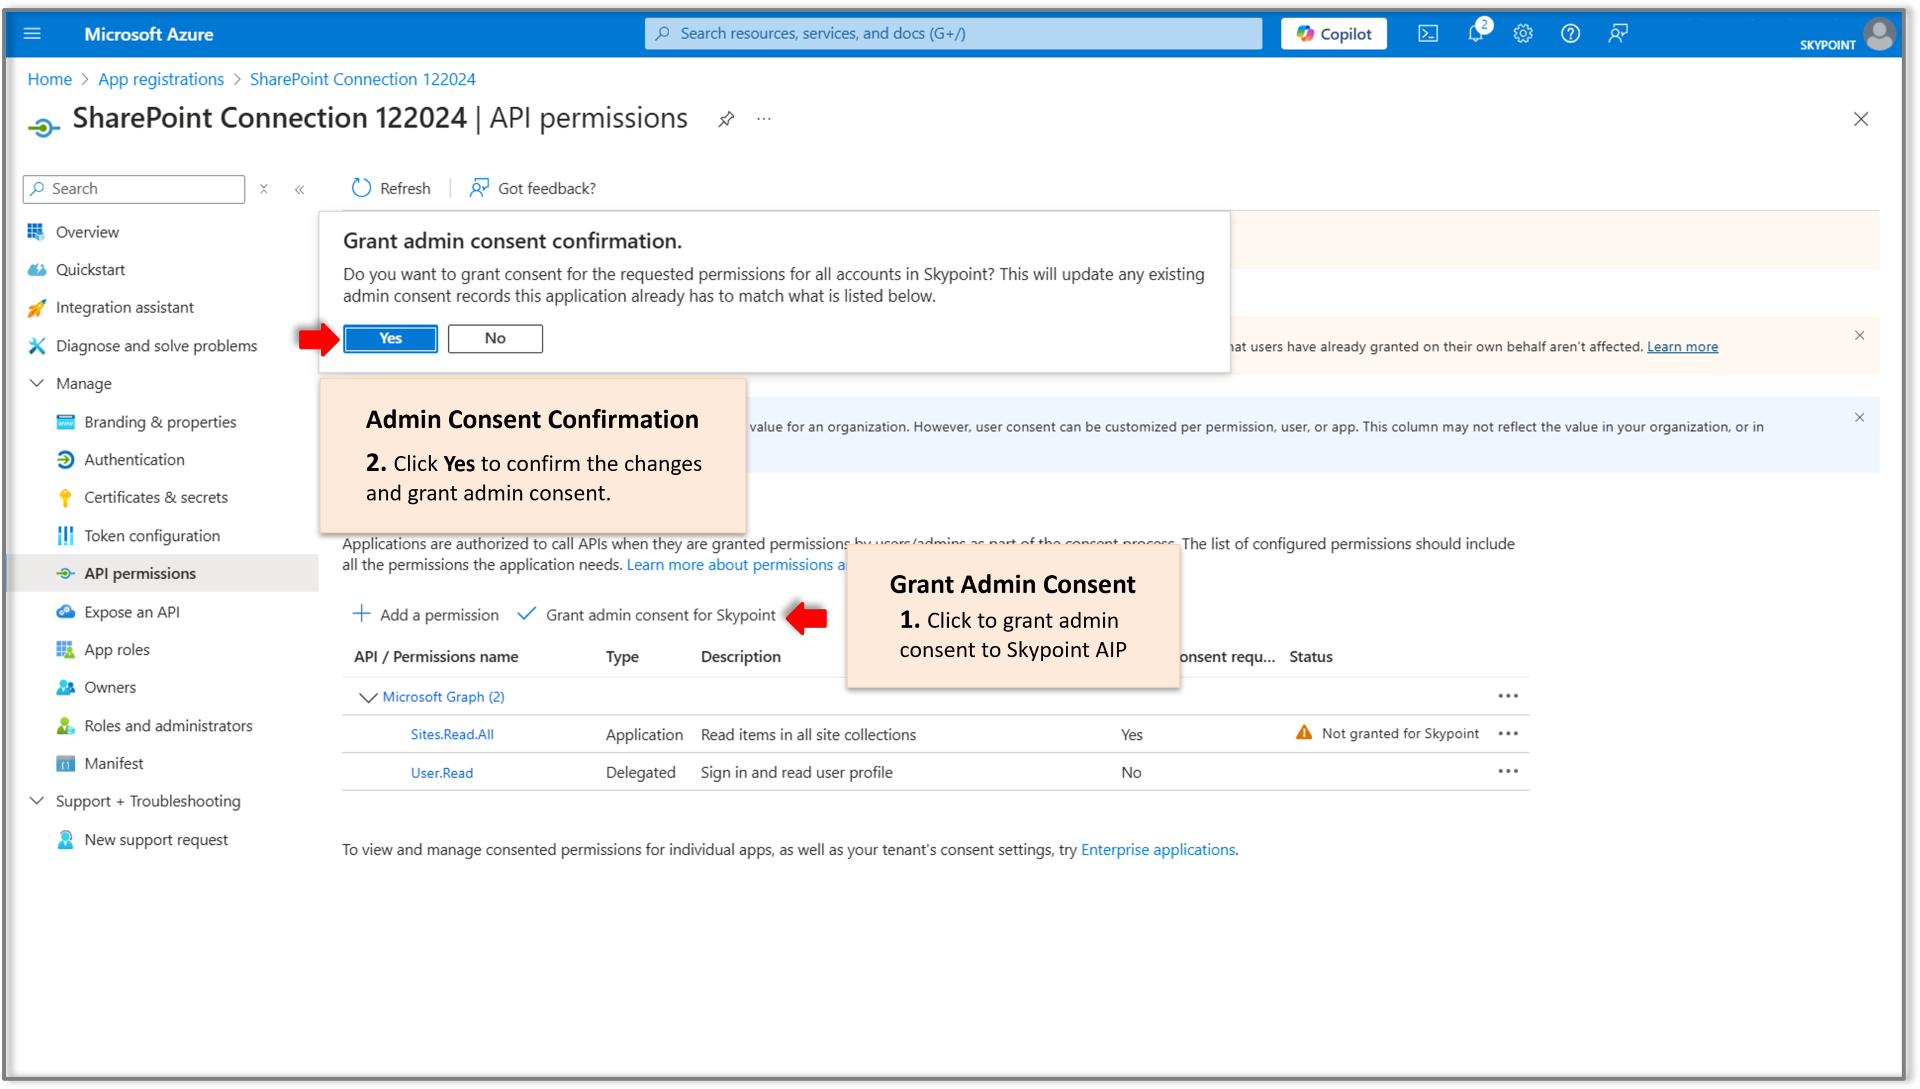
 17. To grant admin consent for Skypoint, users with group admin access should:
a. Click the designated tab indicated by the arrow.
b. Then by clicking on the **Yes** button, confirm the changes and grant admin consent.
17. To grant admin consent for Skypoint, users with group admin access should:
a. Click the designated tab indicated by the arrow.
b. Then by clicking on the **Yes** button, confirm the changes and grant admin consent.
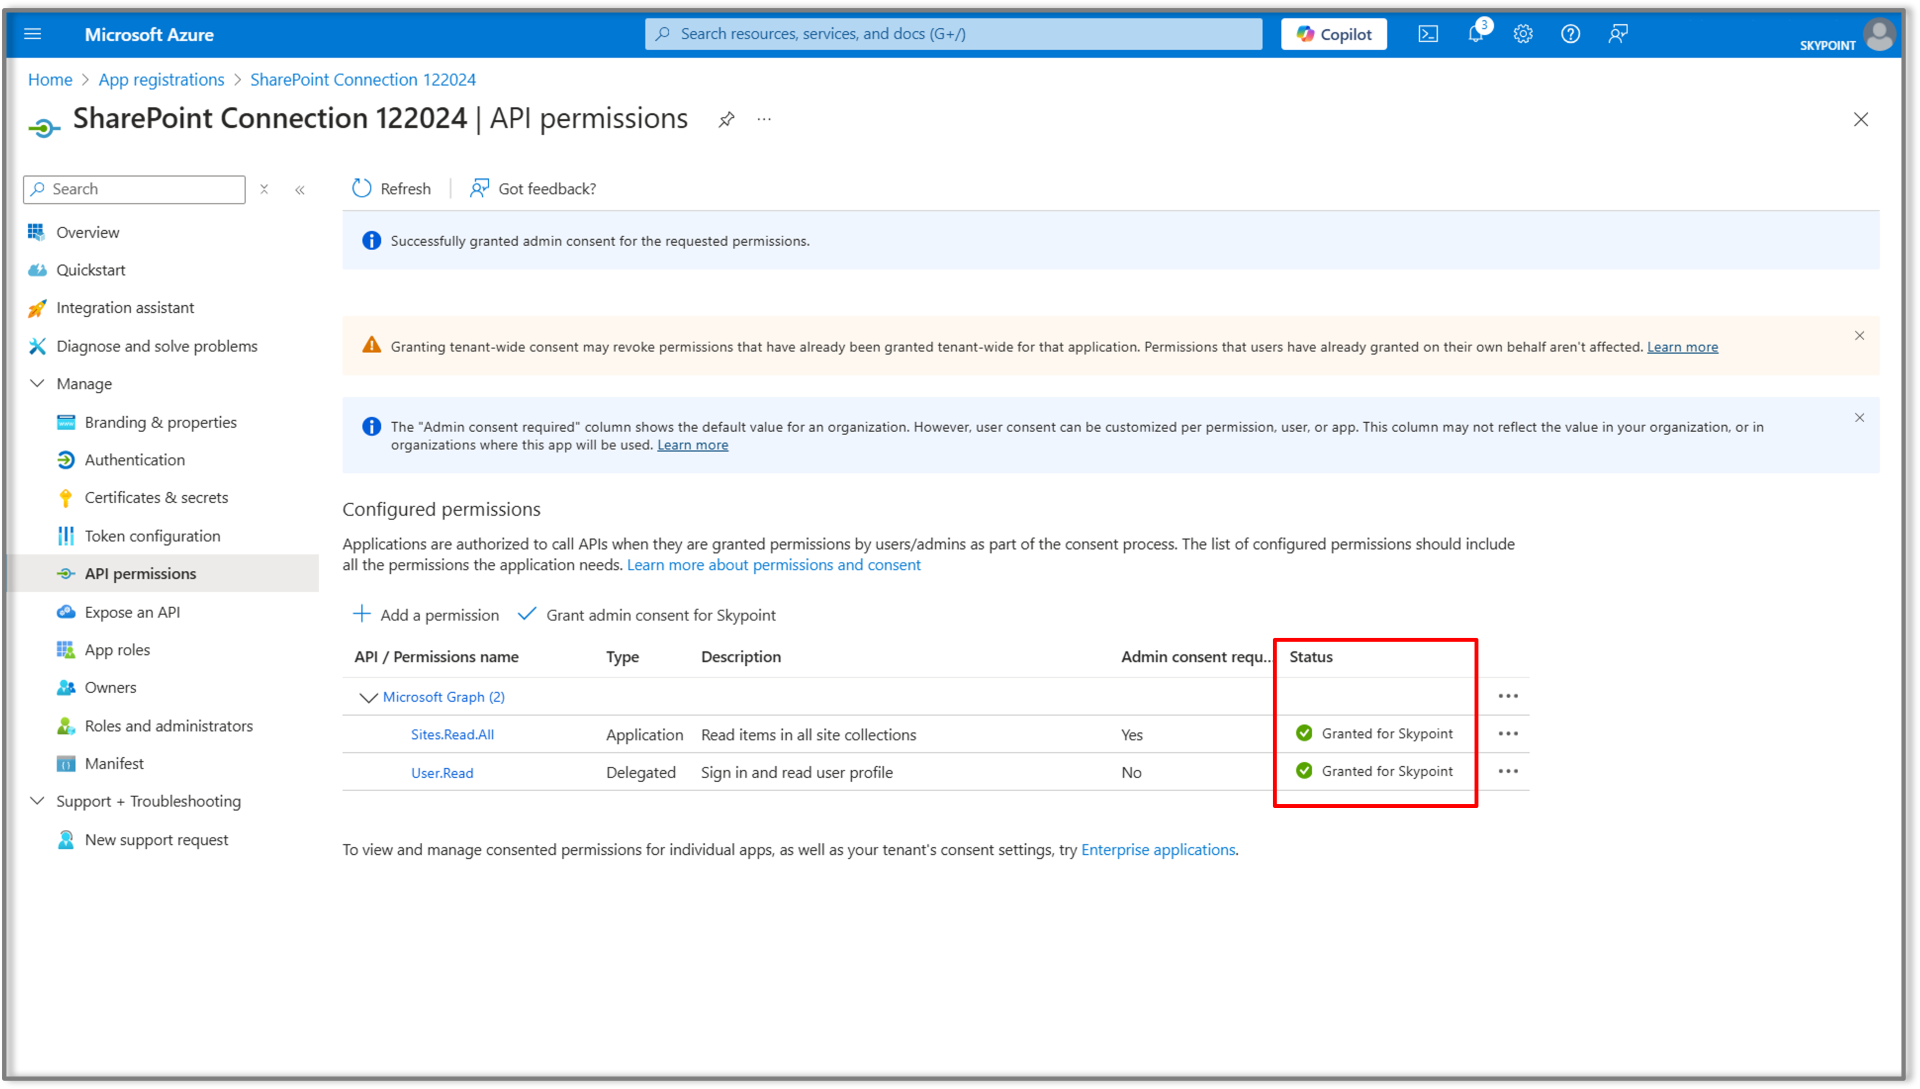
 18. Post granting admin consent, status gets updated as shown in the figure below:
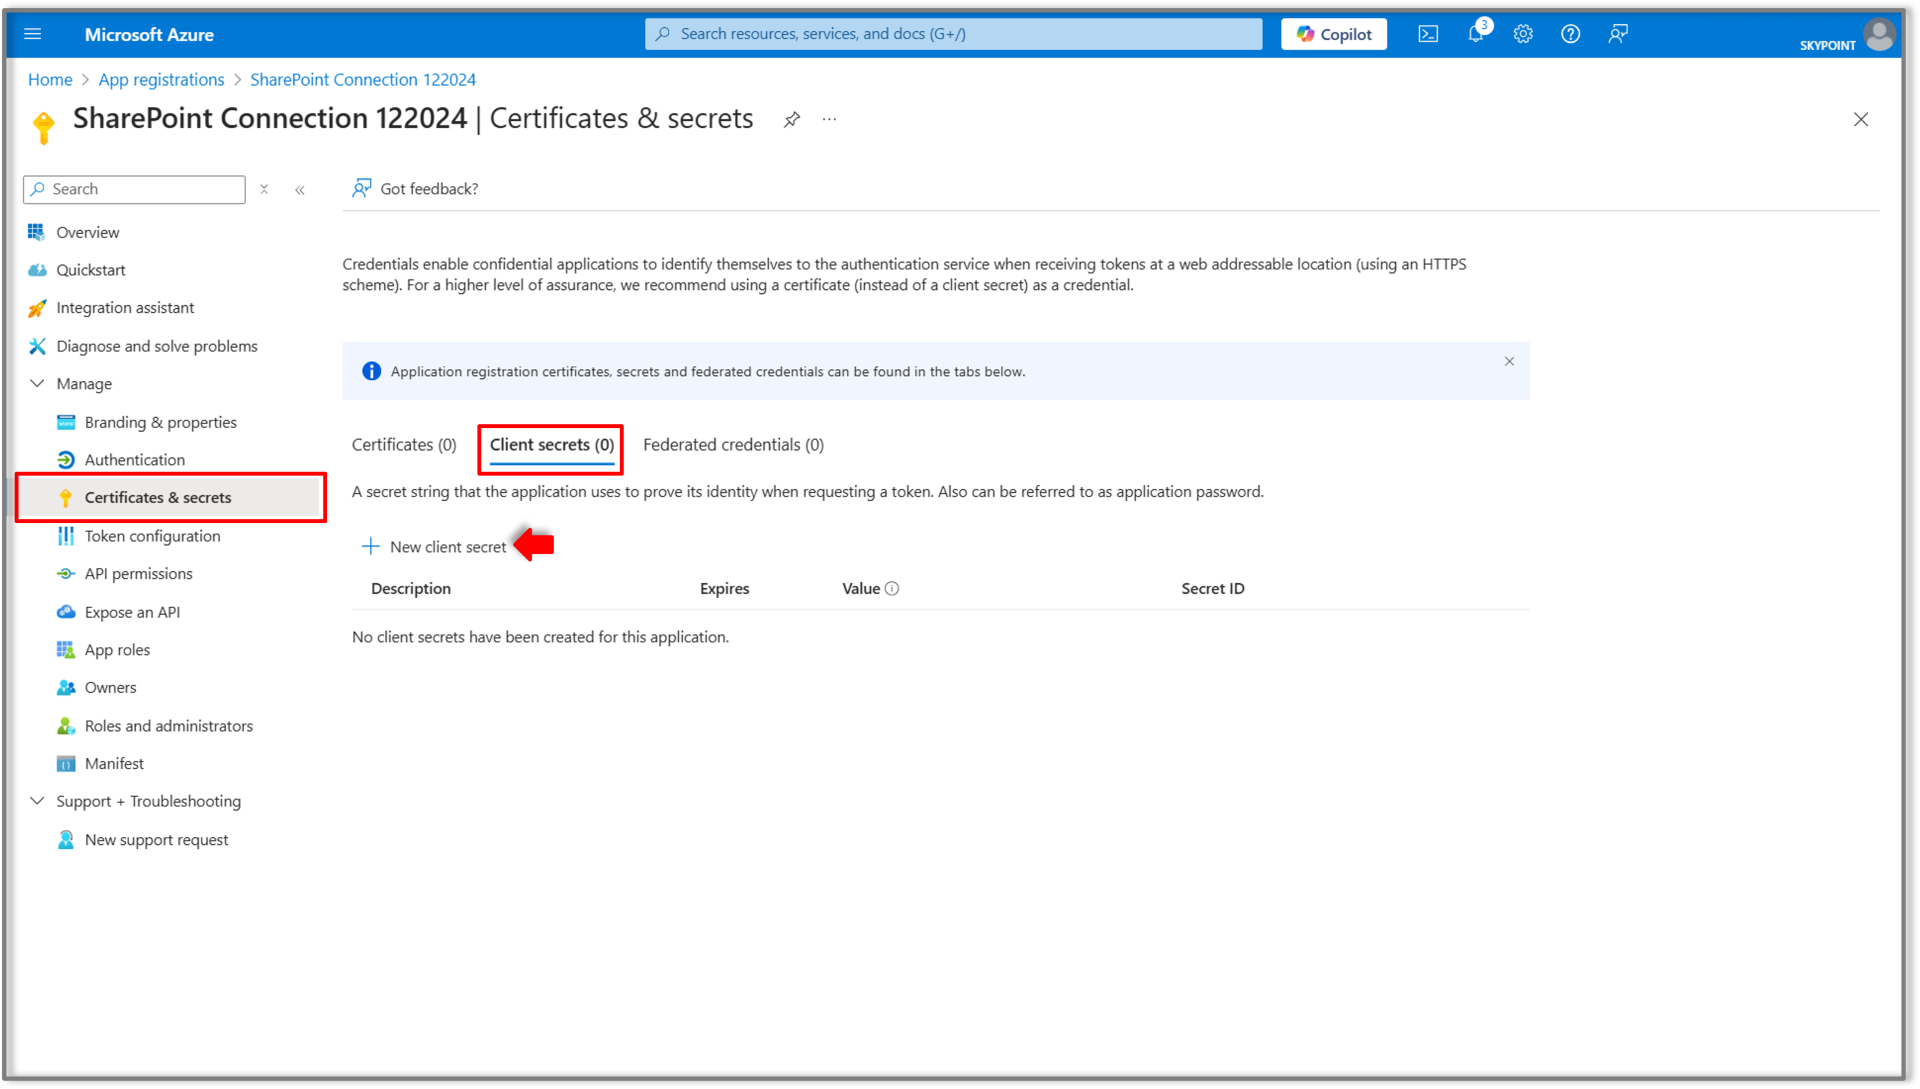
 19. Next, navigate to the **Certificates & secrets** module and select **New client secret** under the **Client secrets** tab.
 20. A form pops up to the right to add/generate a client secret value. Provide a description or just type **Client Secret** in the description field and set the expiration period according to your requirements or select the recommended duration of 180 days from the drop down.
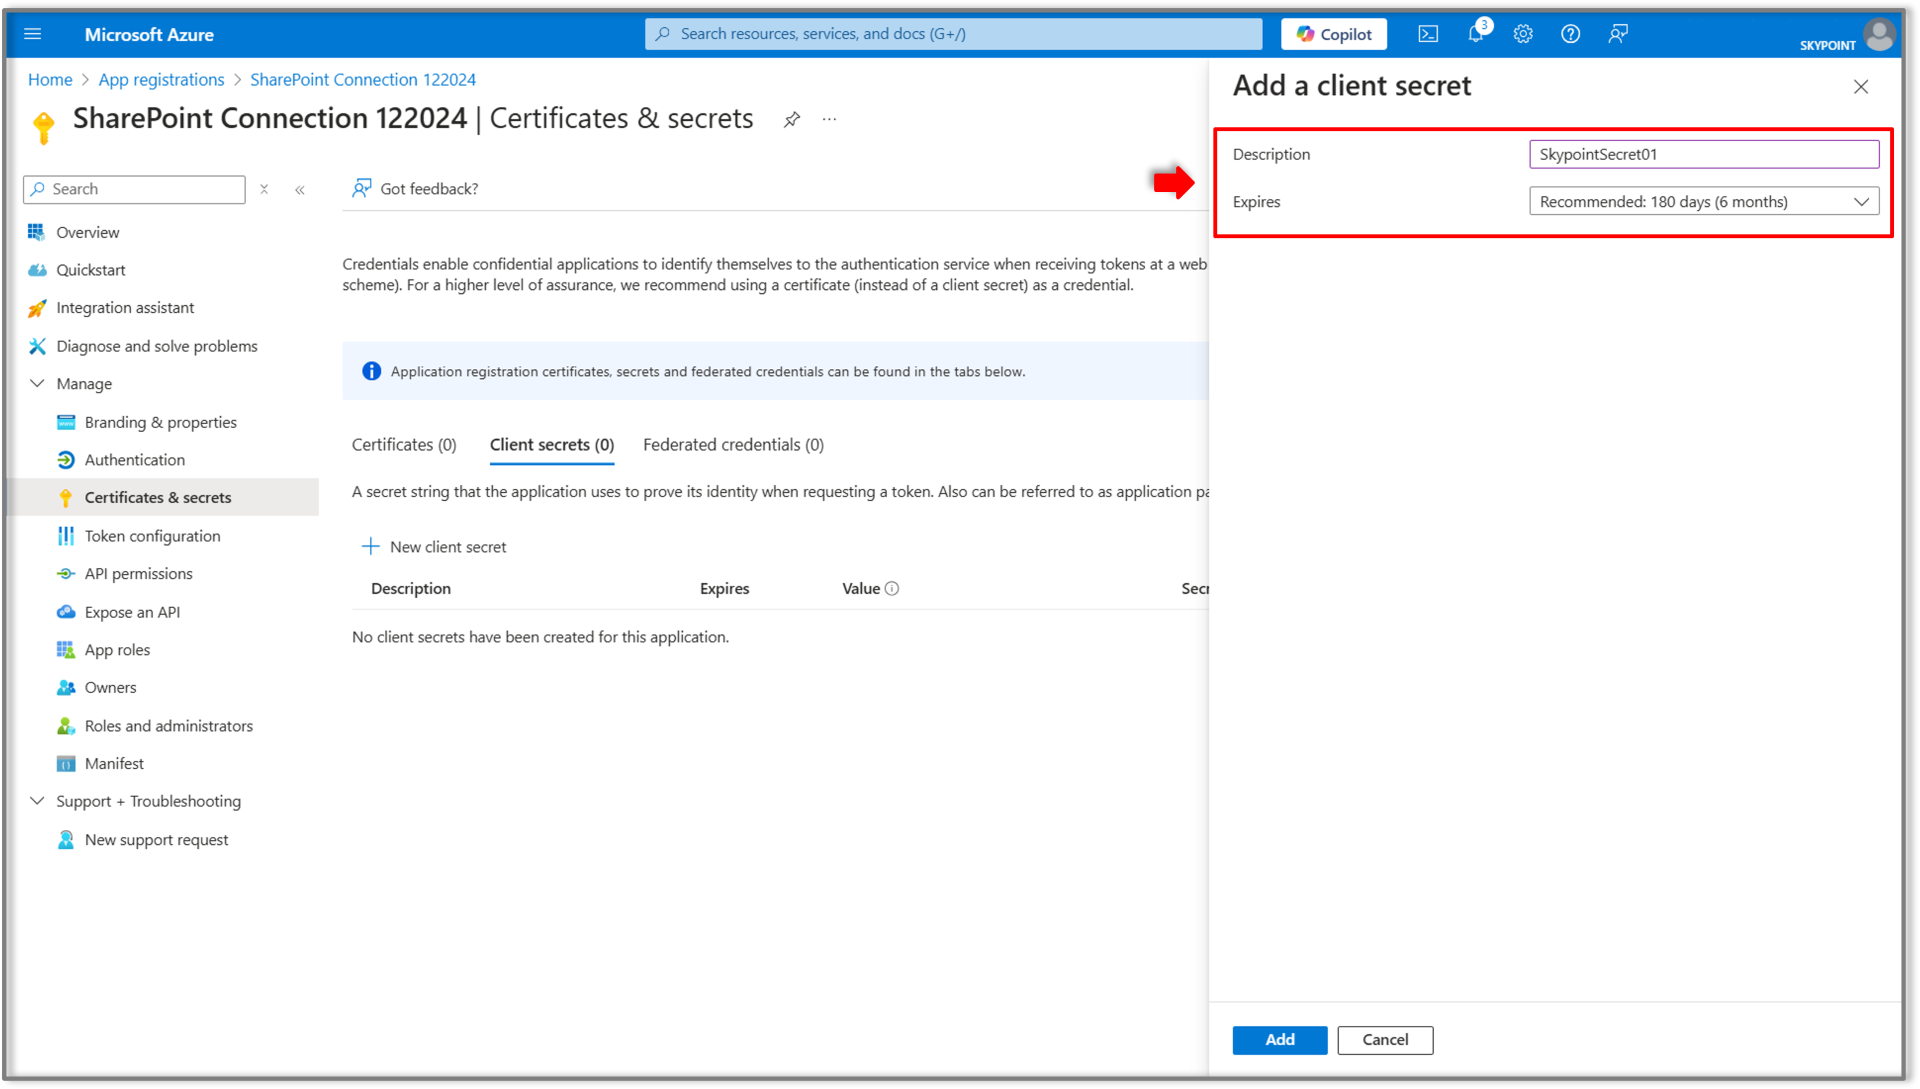 21. Click the **Add** button to generate the client secret.
22. Copy the **Client Secret** by clicking the copy icon under the **Value** tab, as illustrated in the figure below.
* Ensure to immediately copy the client secret value, as it will be hidden once you navigate away from the page and cannot be retrieved later.
* If you forget to copy the client secret value, you can delete the existing client secret and generate a new one by repeating the above steps.
21. Click the **Add** button to generate the client secret.
22. Copy the **Client Secret** by clicking the copy icon under the **Value** tab, as illustrated in the figure below.
* Ensure to immediately copy the client secret value, as it will be hidden once you navigate away from the page and cannot be retrieved later.
* If you forget to copy the client secret value, you can delete the existing client secret and generate a new one by repeating the above steps.
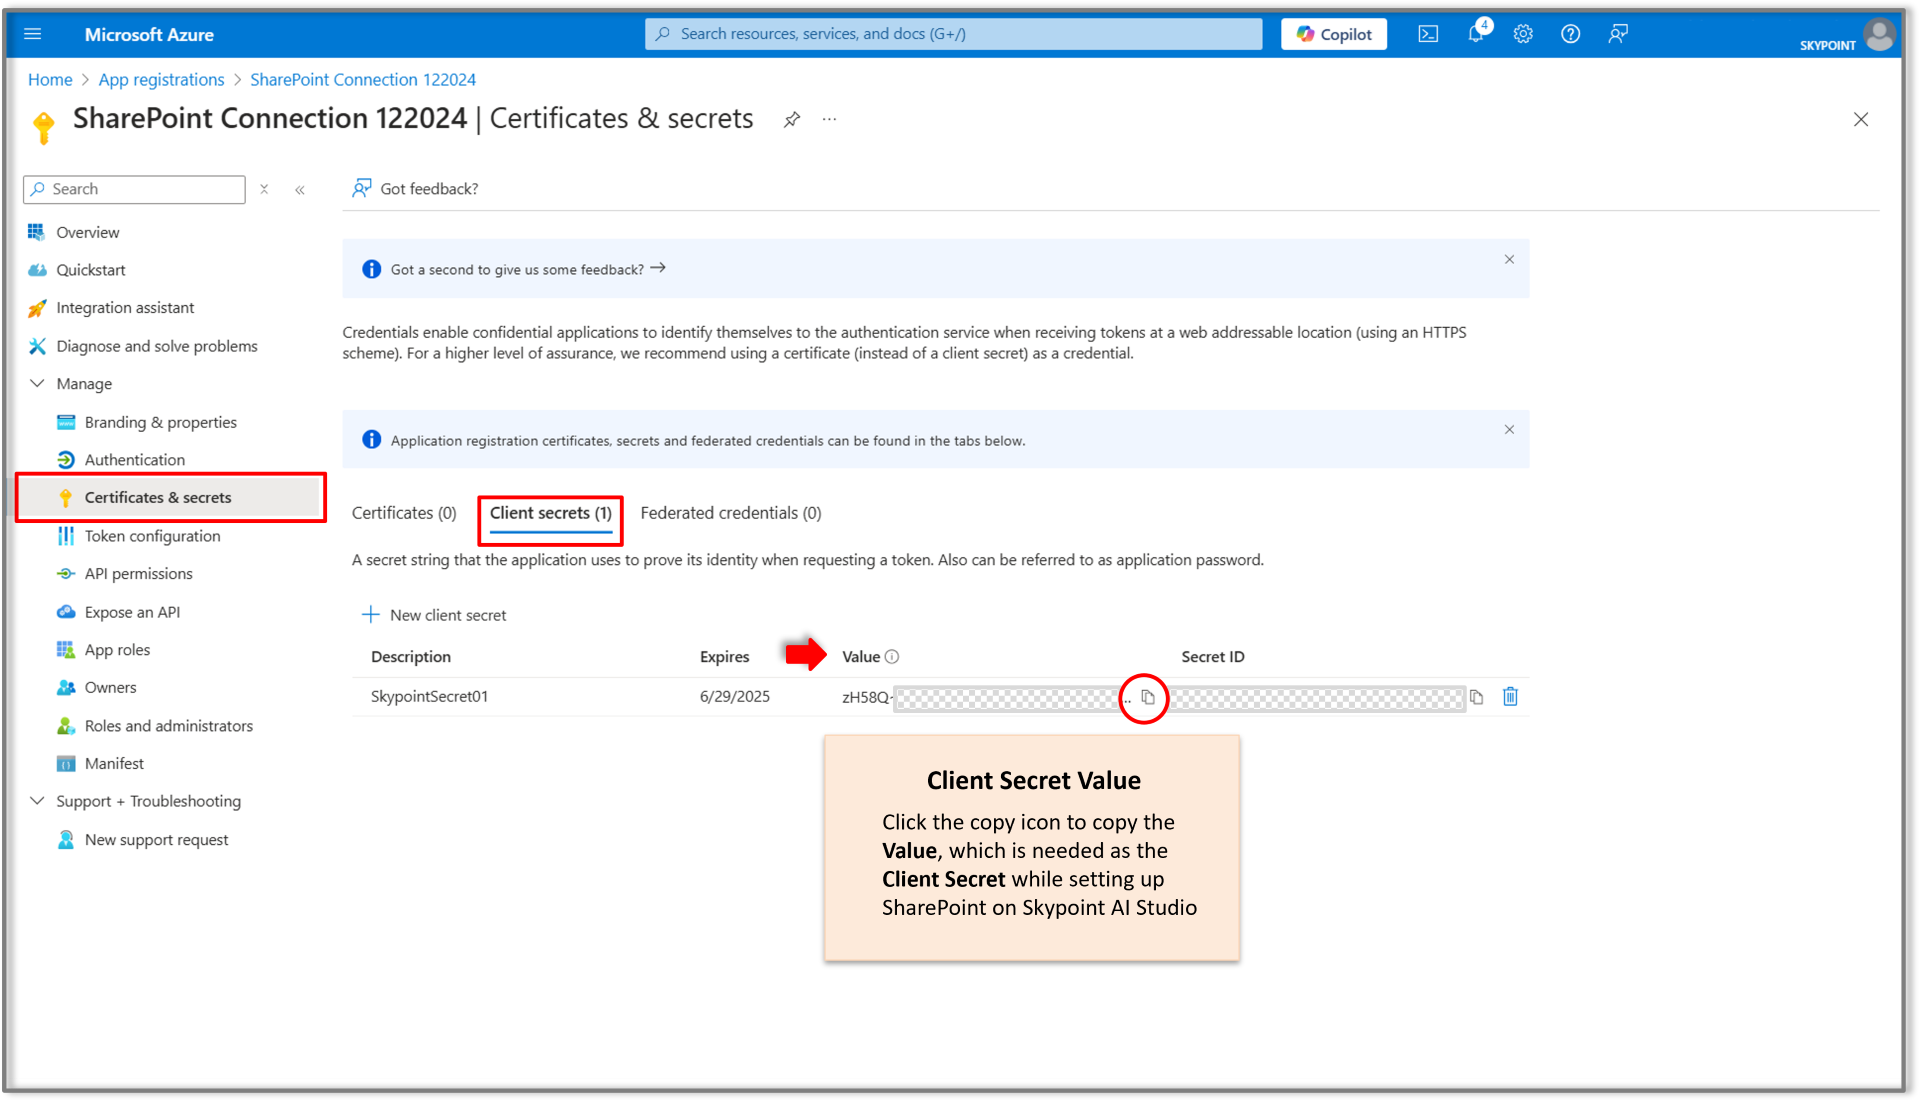 23. Next, navigate to the **Overview** module to copy credentials such as the **Application (Client) ID and Directory (Tenant) ID.**
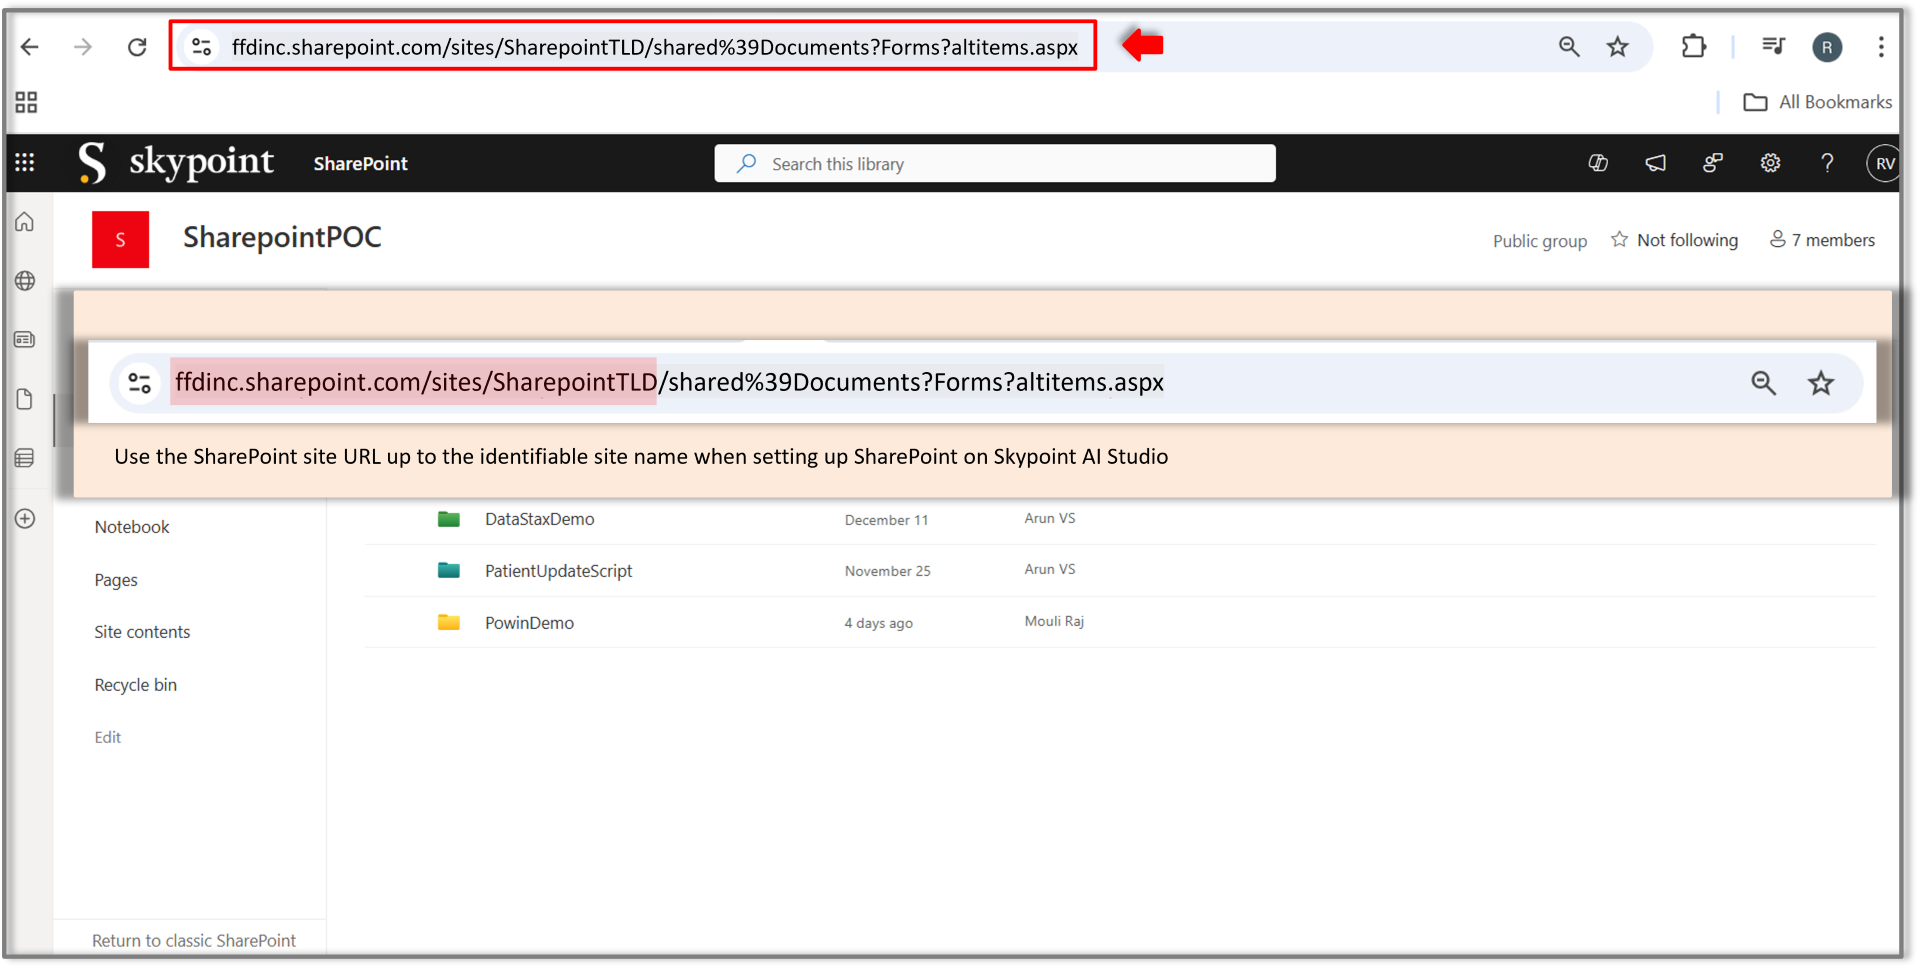
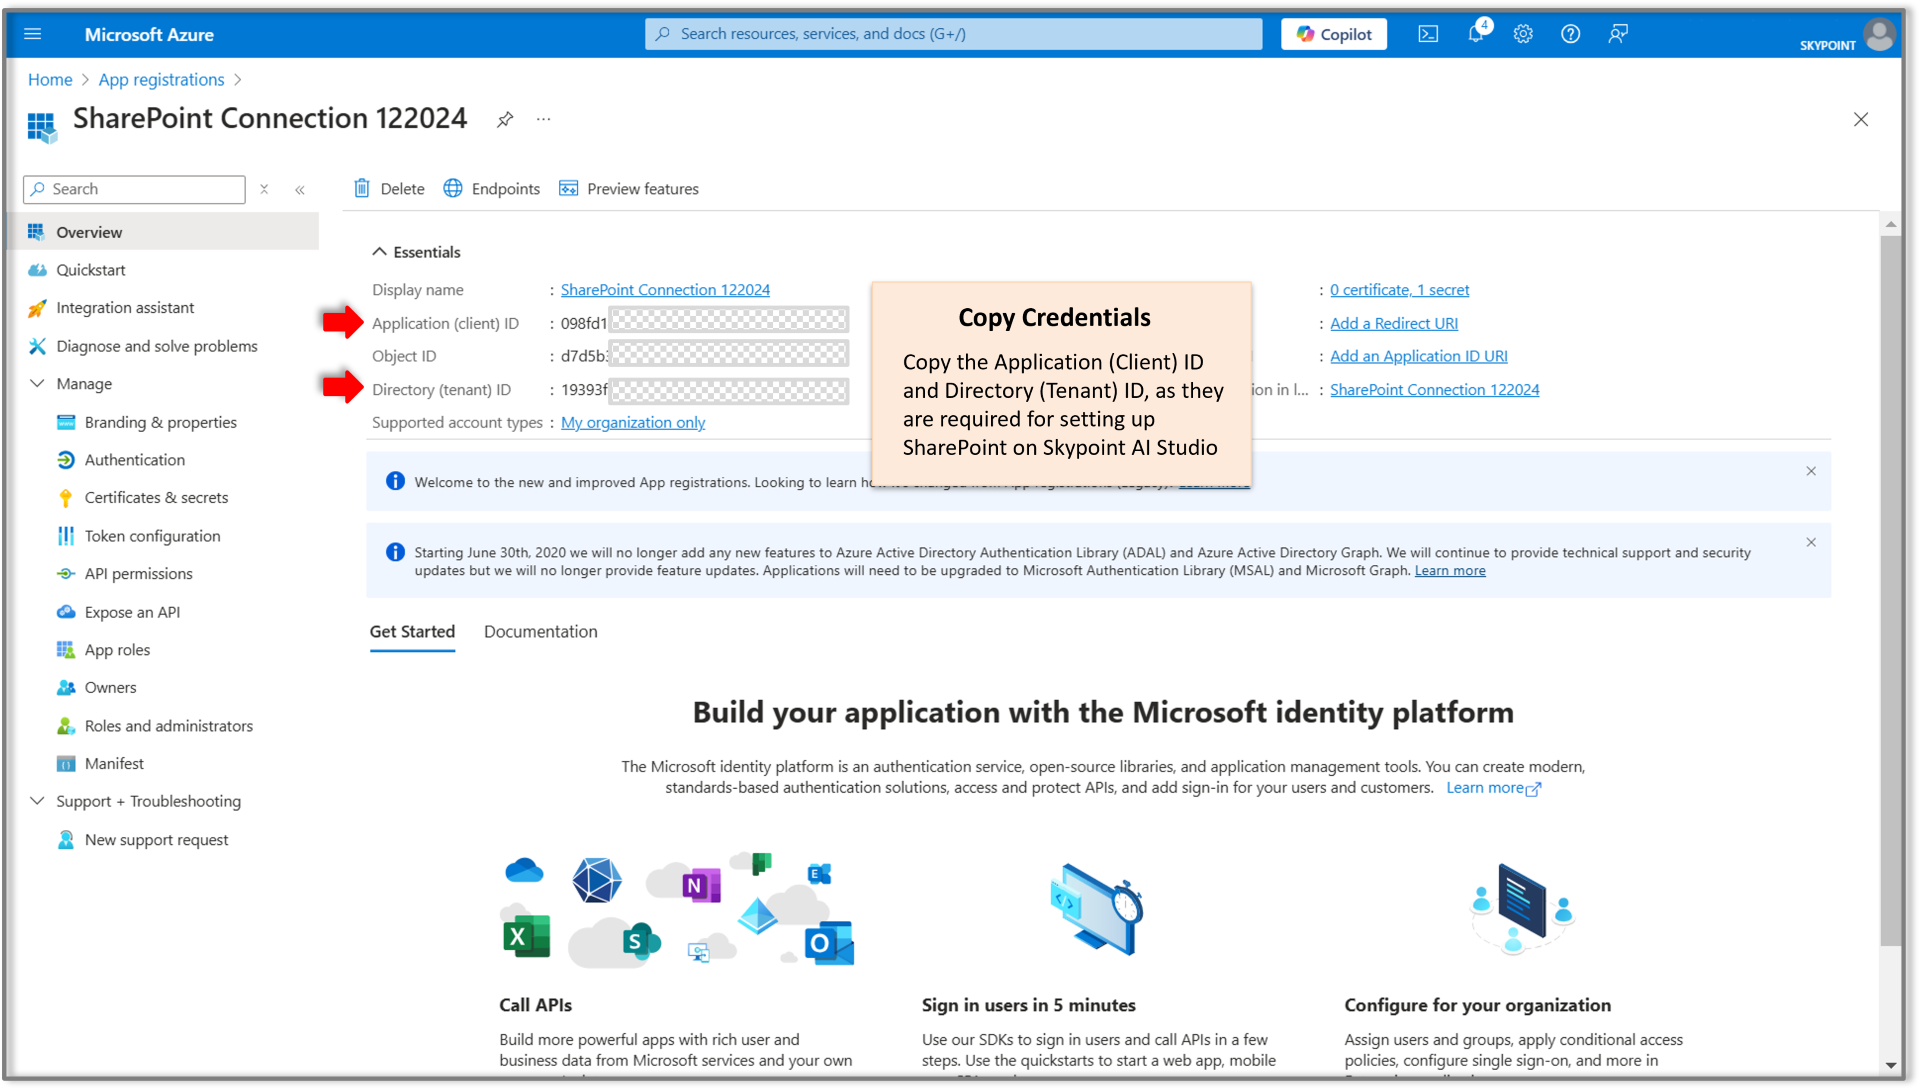 24. Then, copy The **SharePoint site URL** up to the identifiable **site name,** to be used as the site URL in the form when setting up SharePoint on skyData Studio. (Refer the figure below)
For example, if the SharePoint site URL is structured as follows: [https://ffdinc.sharepoint.com/sites/SharepointTLD/shared%39Documents?Forms?altitems.aspx](https://ffdinc.sharepoint.com/sites/SharepointTLD/shared%39Documents?Forms?altitems.aspx)
Use the SharePoint site URL up to the identifiable site name: [https://ffdinc.sharepoint.com/sites/SharepointTLD](https://ffdinc.sharepoint.com/sites/SharepointTLD)
24. Then, copy The **SharePoint site URL** up to the identifiable **site name,** to be used as the site URL in the form when setting up SharePoint on skyData Studio. (Refer the figure below)
For example, if the SharePoint site URL is structured as follows: [https://ffdinc.sharepoint.com/sites/SharepointTLD/shared%39Documents?Forms?altitems.aspx](https://ffdinc.sharepoint.com/sites/SharepointTLD/shared%39Documents?Forms?altitems.aspx)
Use the SharePoint site URL up to the identifiable site name: [https://ffdinc.sharepoint.com/sites/SharepointTLD](https://ffdinc.sharepoint.com/sites/SharepointTLD)
 Copy and secure the **Client Secret**, **Application (Client) ID**, **Directory (Tenant) ID** from the **Azure Portal**, along with the **SharePoint site URL**, for connecting SharePoint data in **SkyPoint AI Studio**.
## skyData Studio Setup
Users can setup SharePoint datasource on skyData studio by following the below steps:
### A. Initiate setting up SharePoint on skyData Studio
1. Sign in to **skyData Studio.**
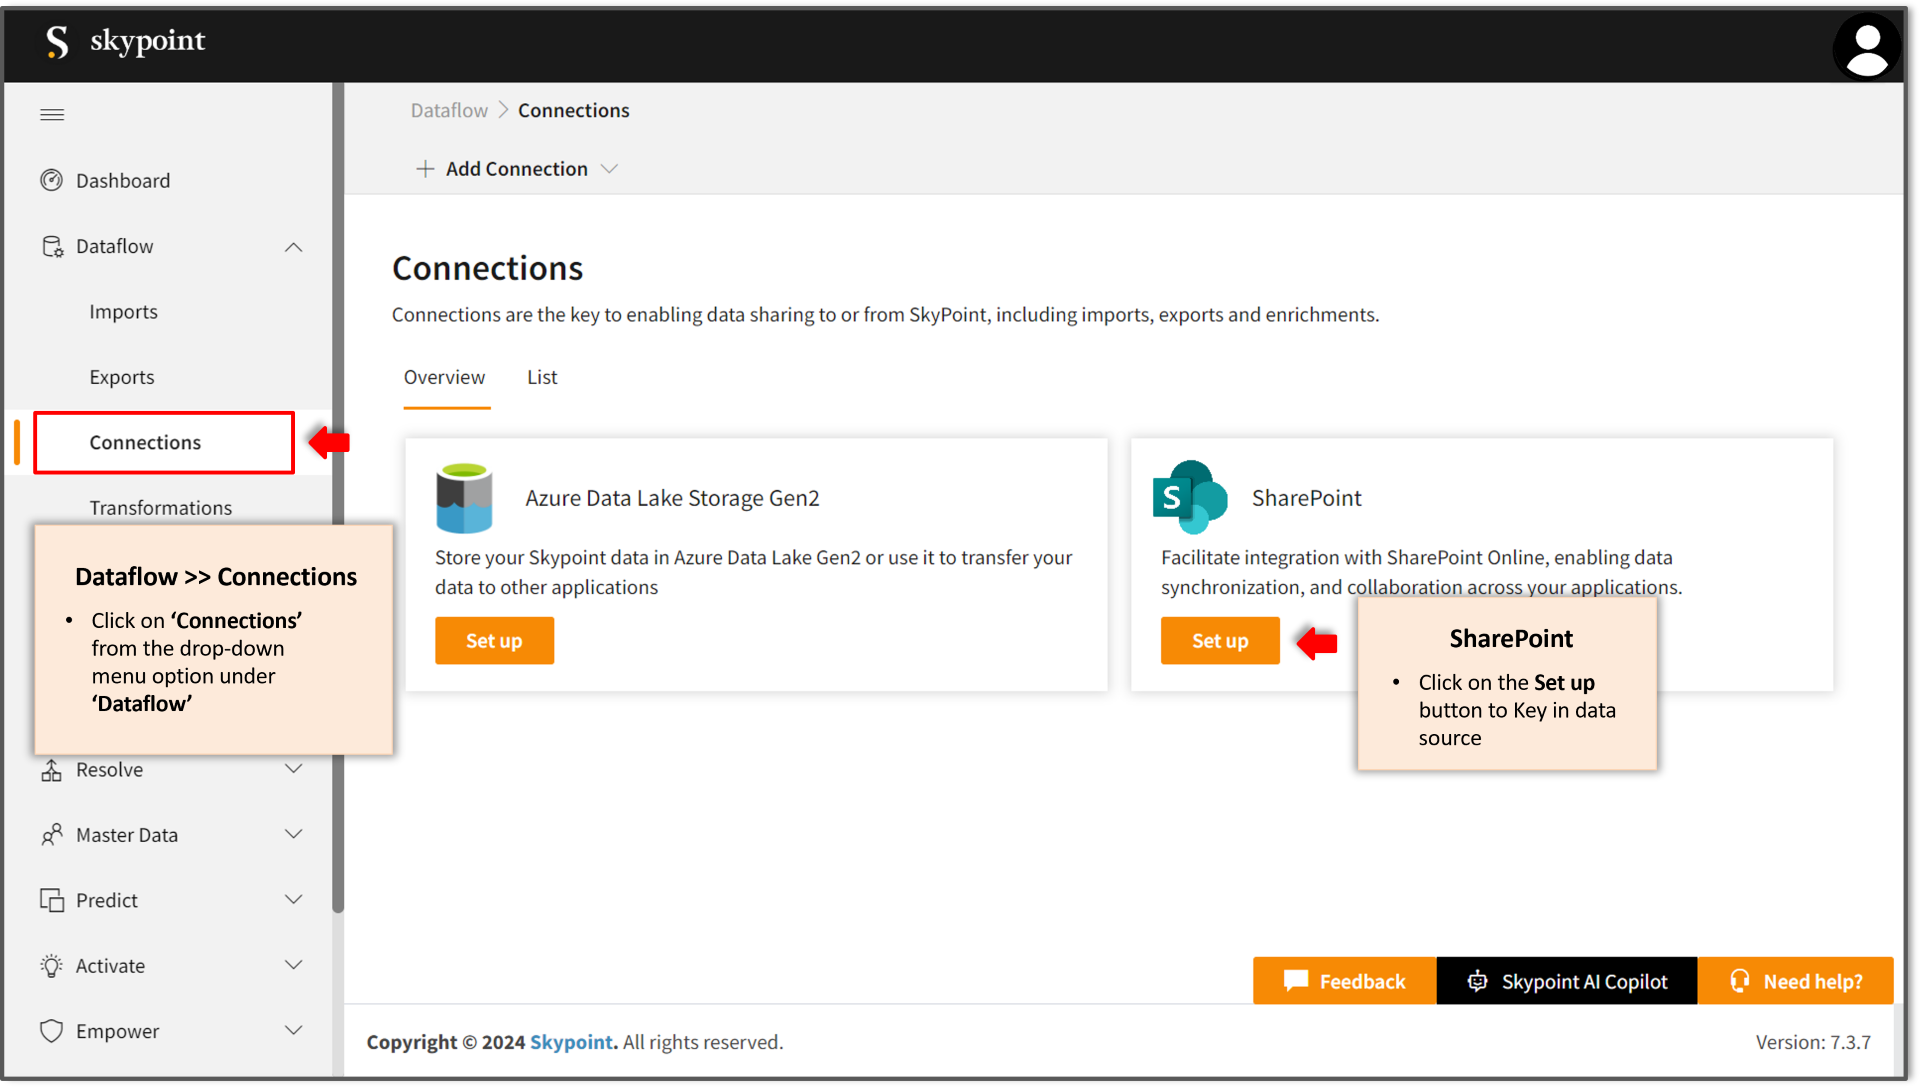
2. Navigate to **Dataflow** and choose **Connections.**
3. Click on **Set up** for SharePoint datasource.
Copy and secure the **Client Secret**, **Application (Client) ID**, **Directory (Tenant) ID** from the **Azure Portal**, along with the **SharePoint site URL**, for connecting SharePoint data in **SkyPoint AI Studio**.
## skyData Studio Setup
Users can setup SharePoint datasource on skyData studio by following the below steps:
### A. Initiate setting up SharePoint on skyData Studio
1. Sign in to **skyData Studio.**
2. Navigate to **Dataflow** and choose **Connections.**
3. Click on **Set up** for SharePoint datasource.
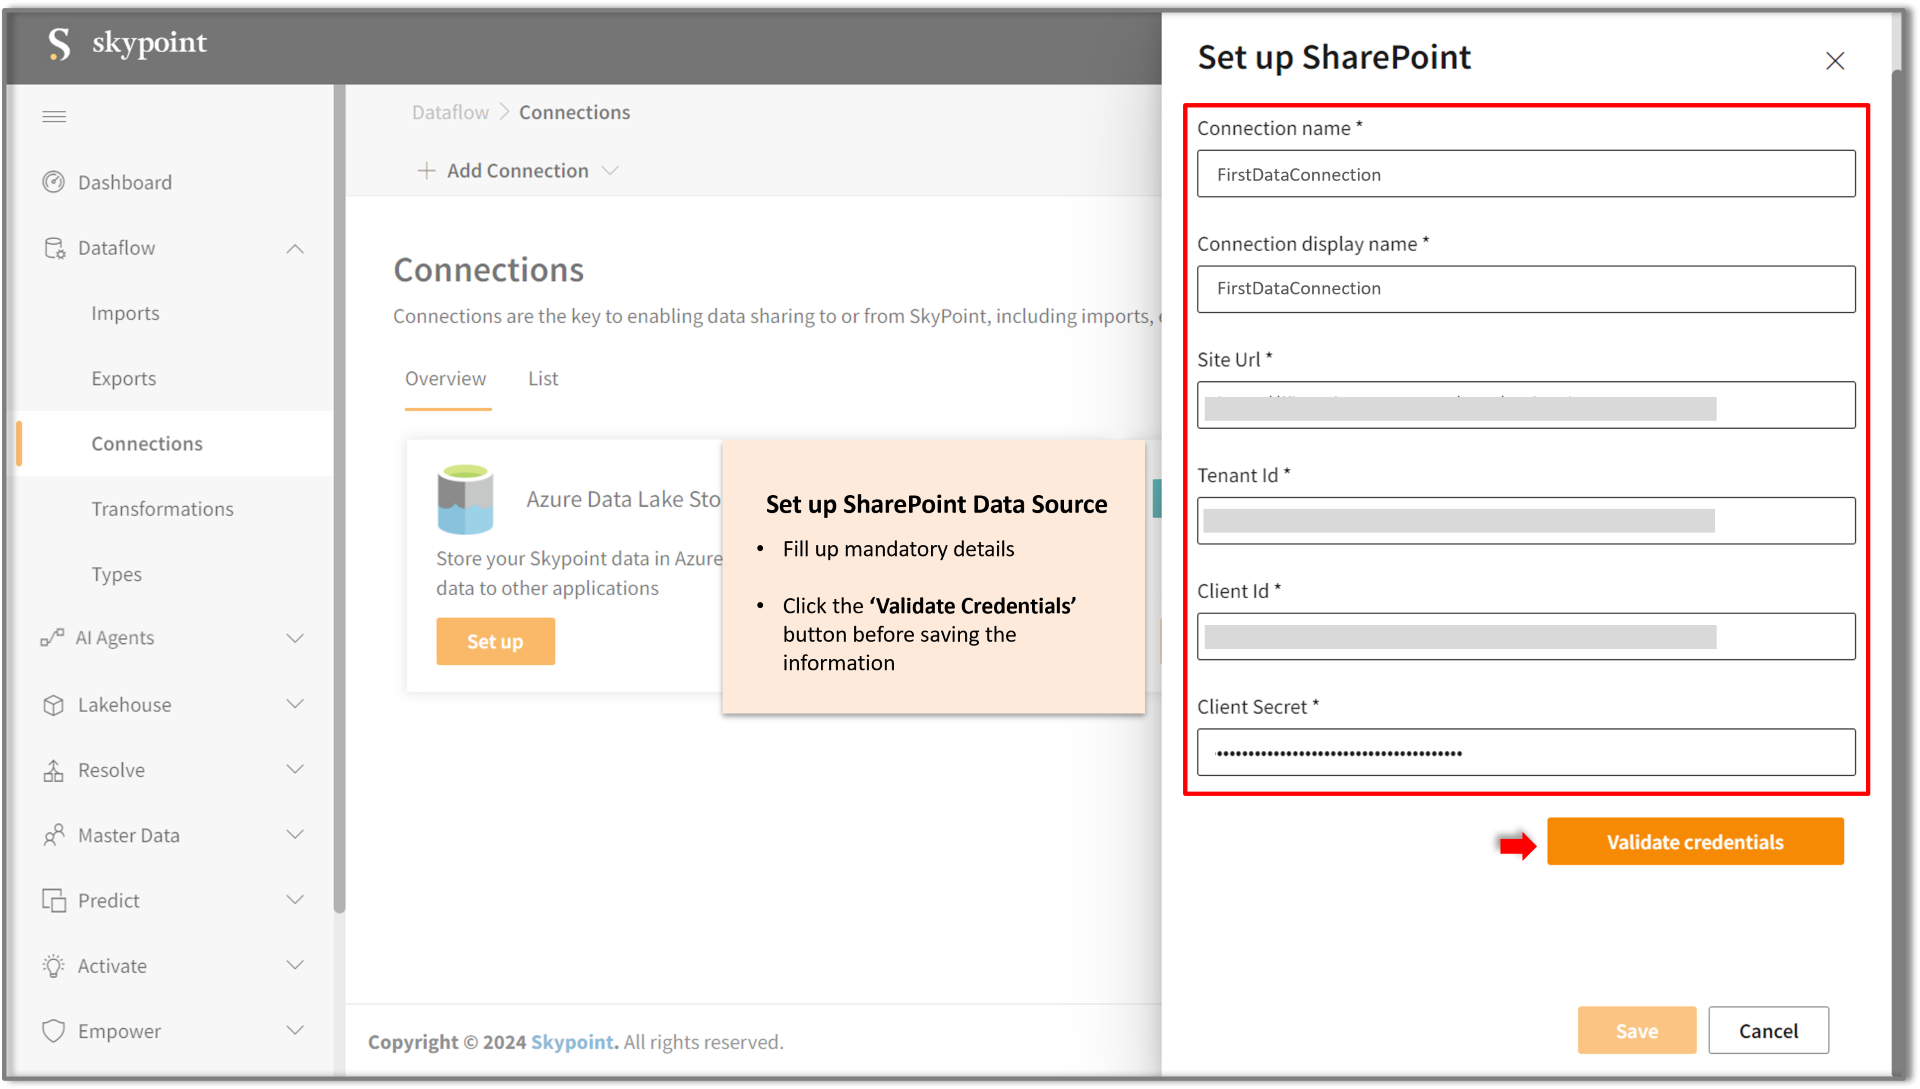
 4. Fill in the required connection details and validate credentials.
 5. Click **SAVE** button to confirm the changes, once the credentials are verified.
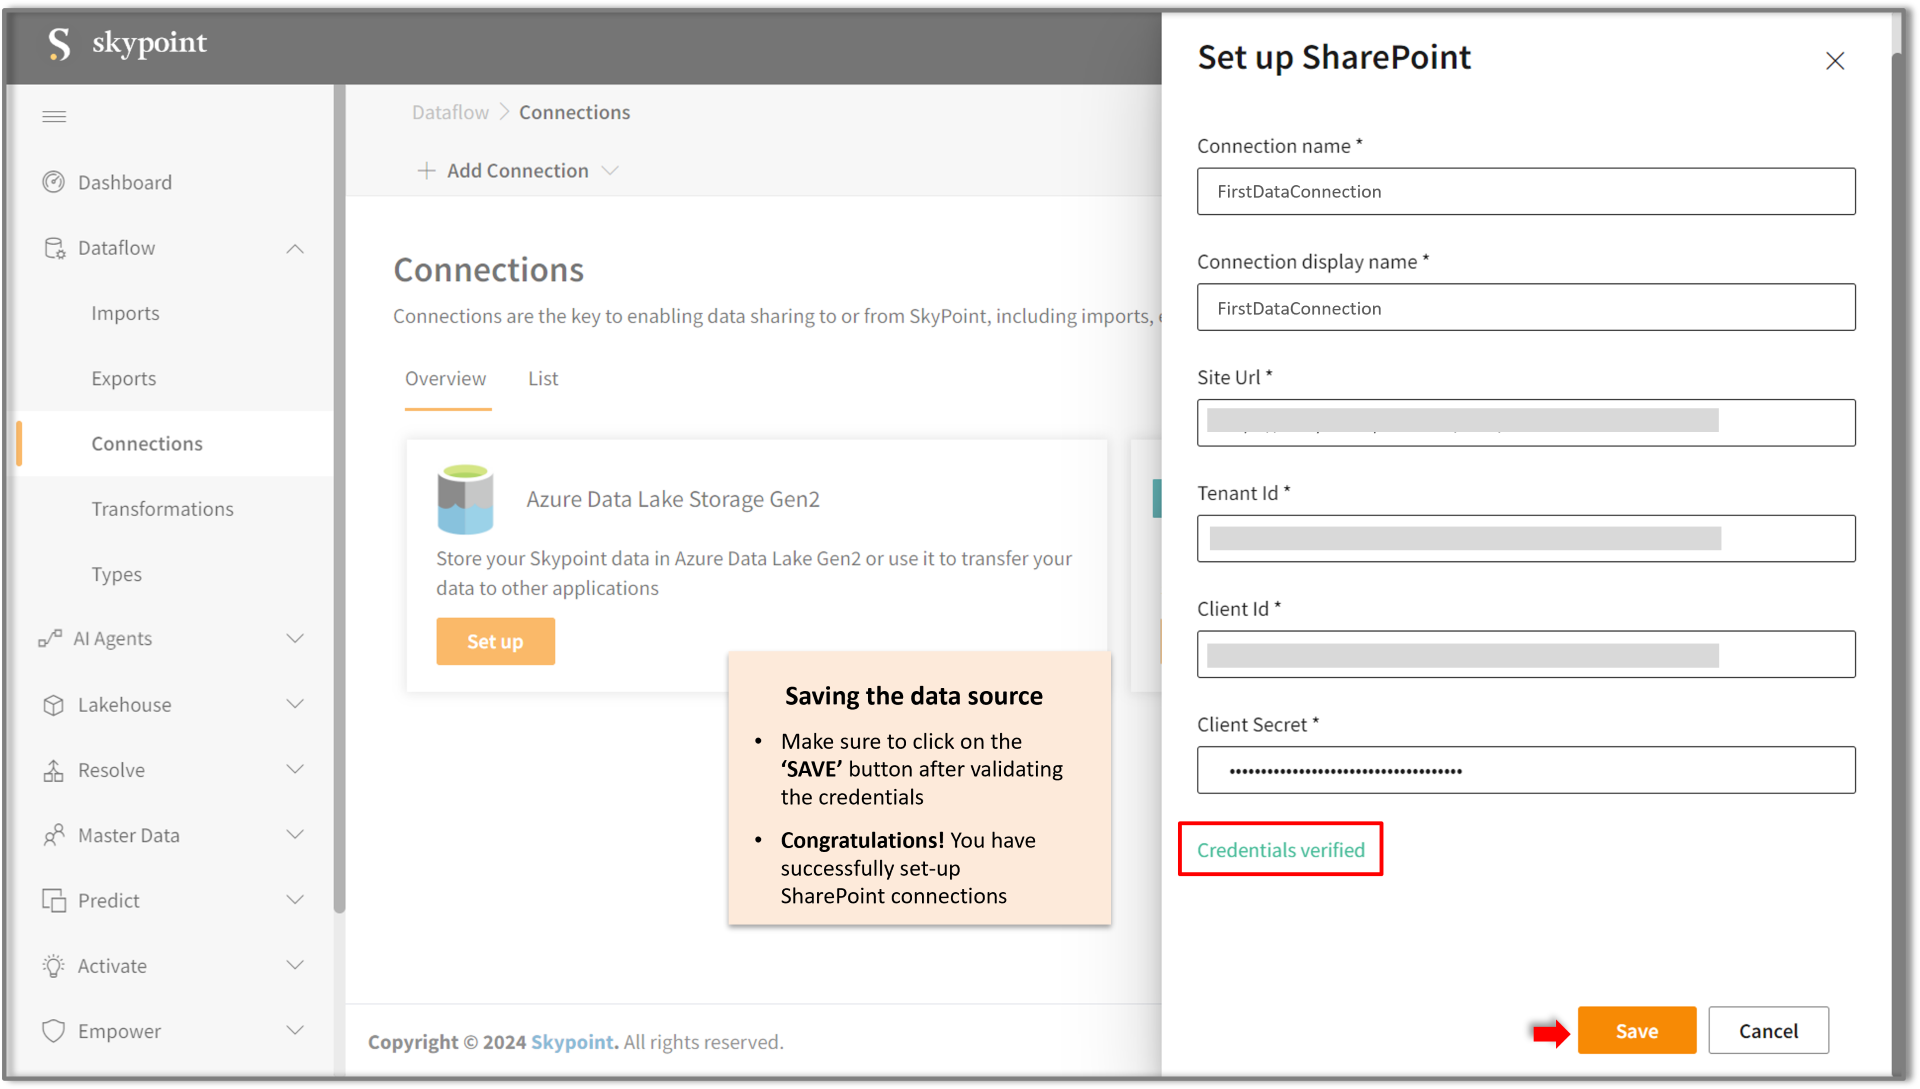 **Congratulations!** You have successfully set up SharePoint data connections.
### B. Add SharePoint data source to ingestion pipeline on skyData Studio
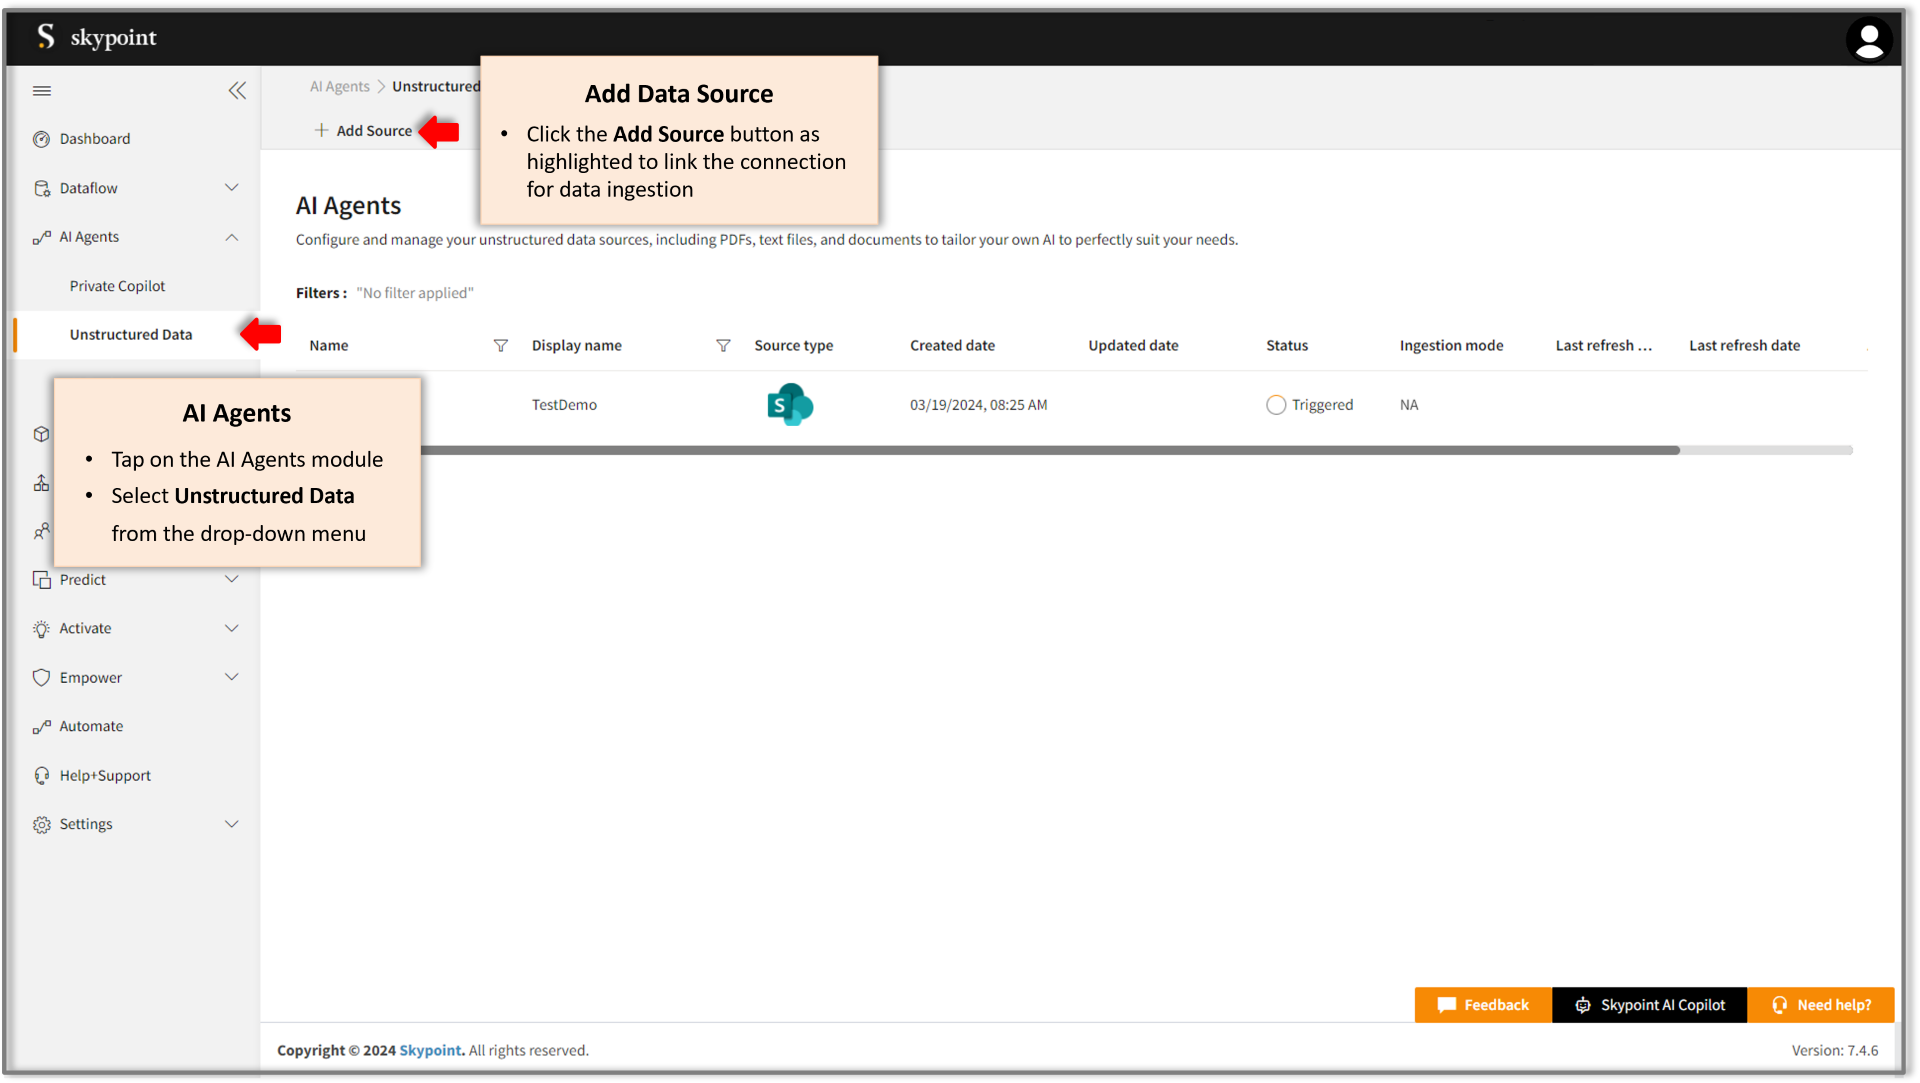
1. Go to **AI Agents** and choose **Unstructured Data.**
2. Click on **Add Source.**
**Congratulations!** You have successfully set up SharePoint data connections.
### B. Add SharePoint data source to ingestion pipeline on skyData Studio
1. Go to **AI Agents** and choose **Unstructured Data.**
2. Click on **Add Source.**
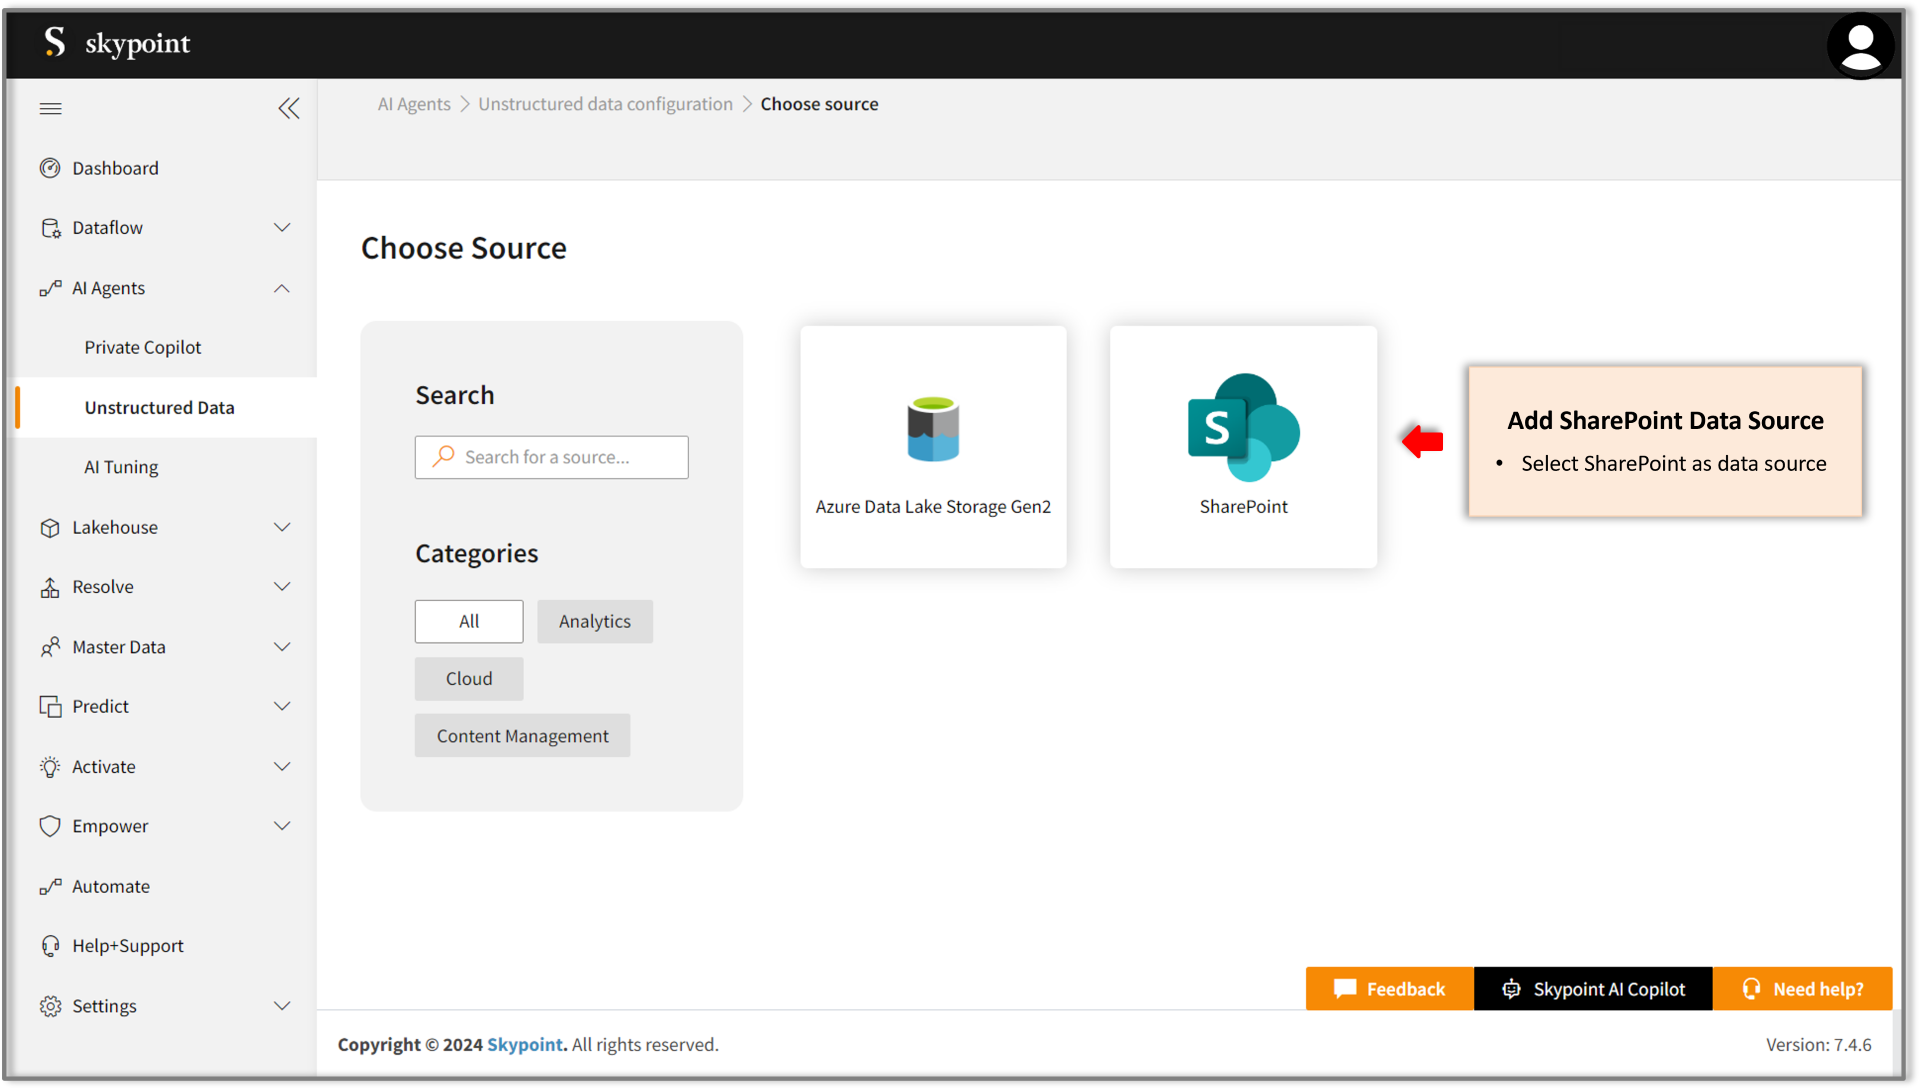
 3. Choose SharePoint as the type of data source.
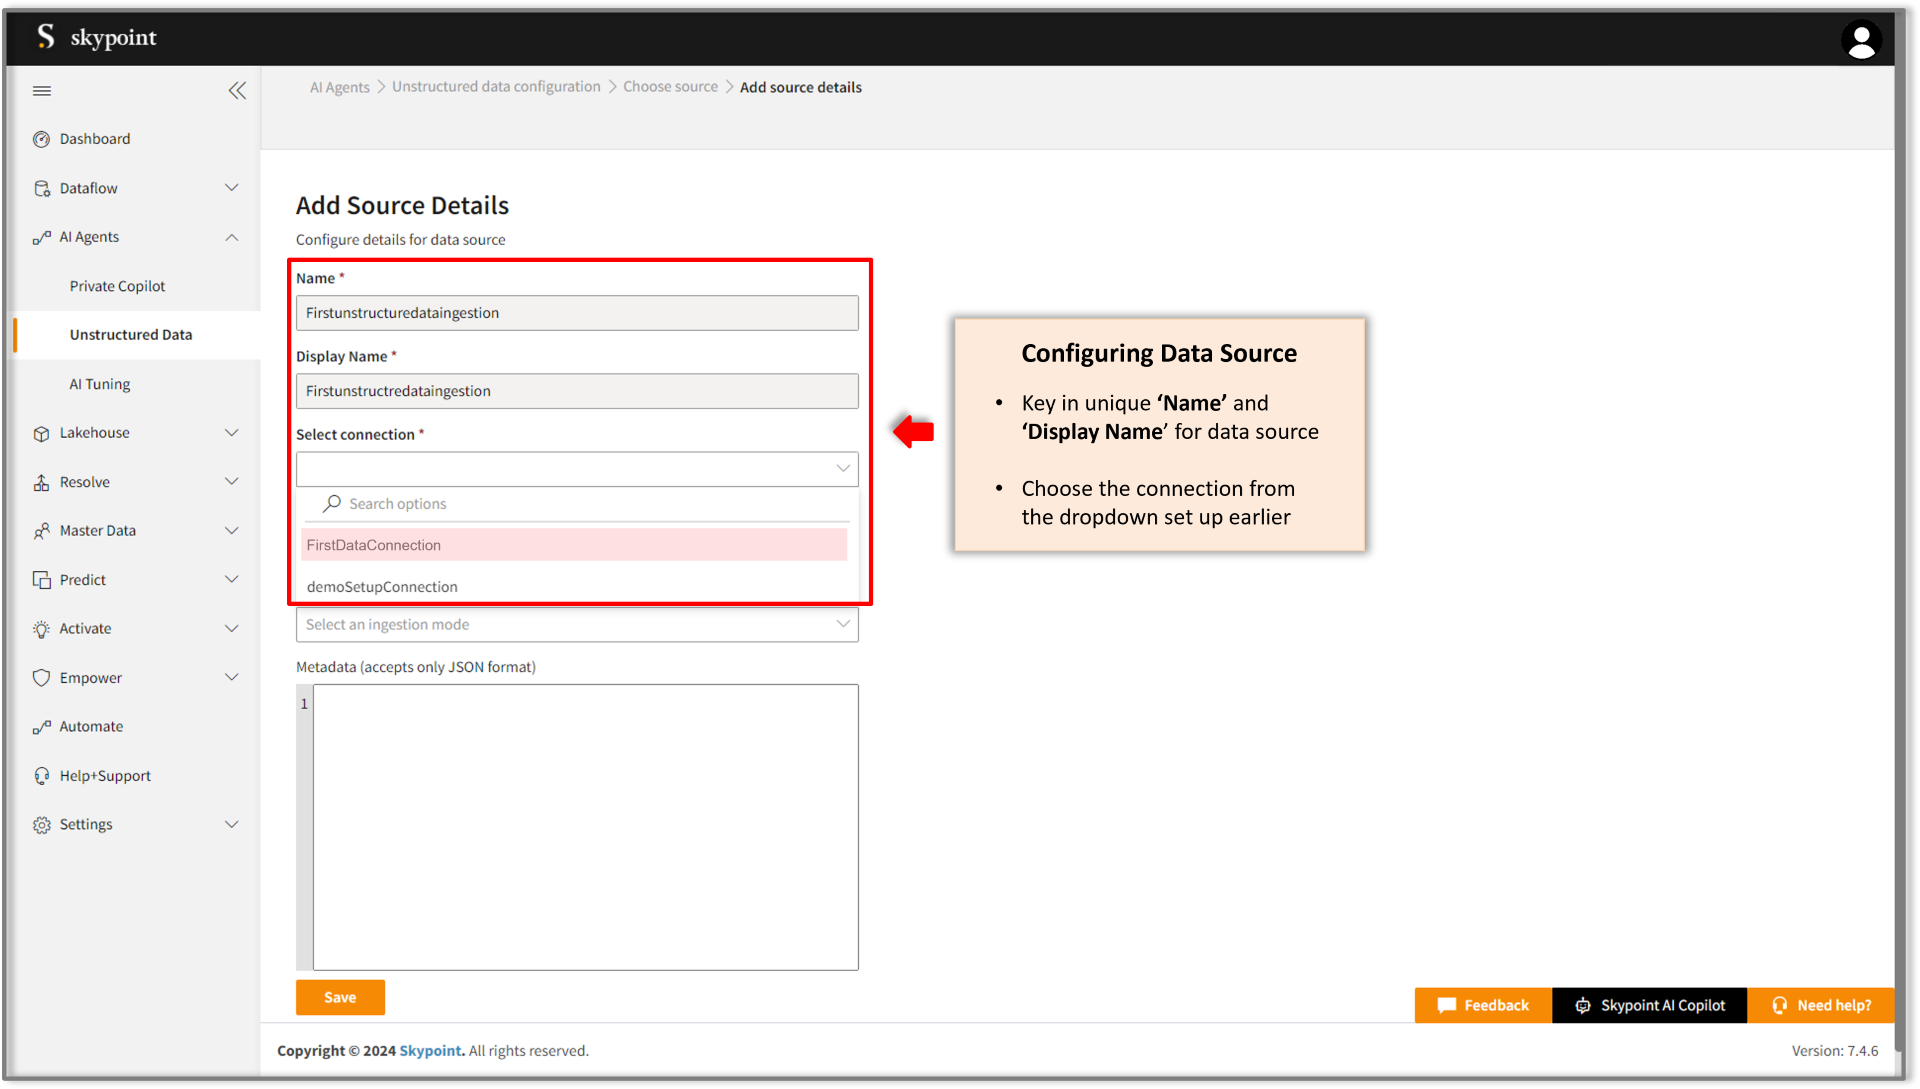
 4. Add name and display name.
5. Select connection from the drop-down menu setup earlier.
4. Add name and display name.
5. Select connection from the drop-down menu setup earlier.
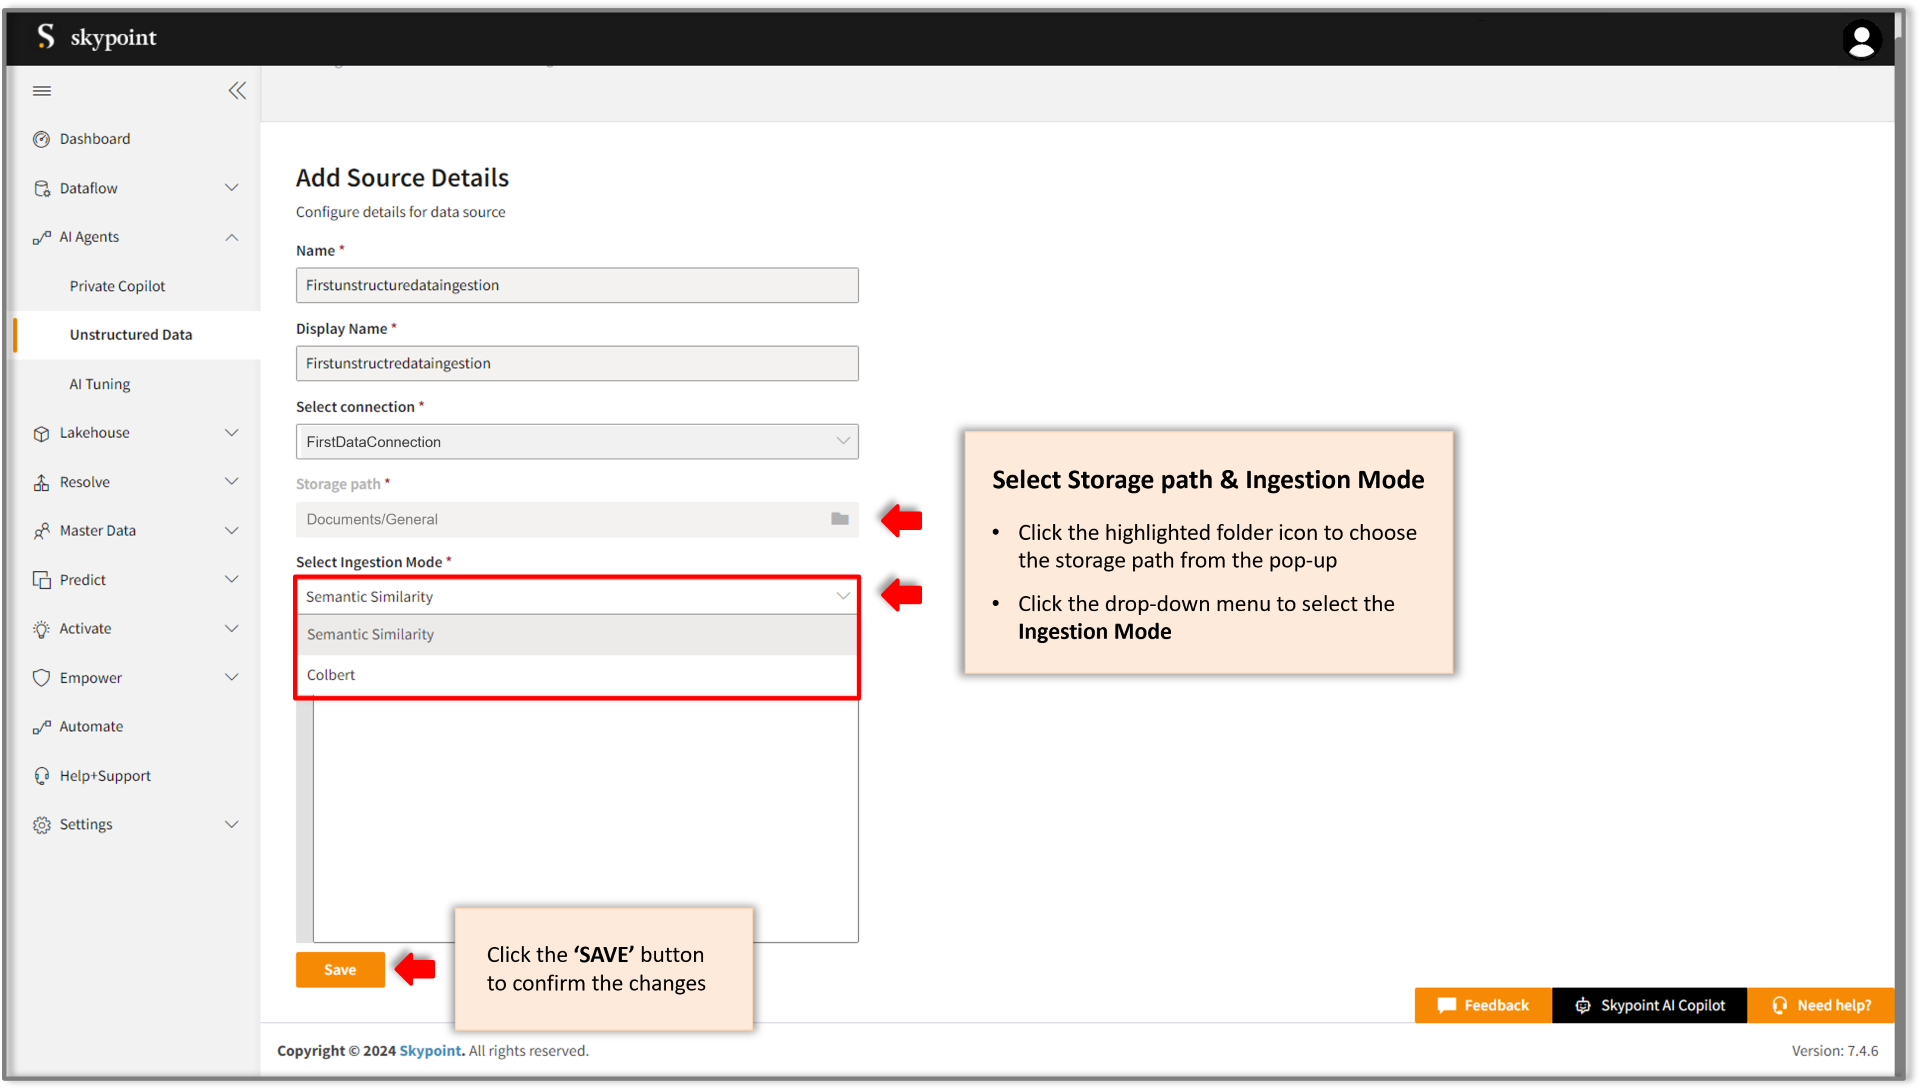
 6. Select the storage path by clicking on the folder icon.
7. Click the drop-down menu to select the ingestion mode.
8. Next, hit the **SAVE** button.
6. Select the storage path by clicking on the folder icon.
7. Click the drop-down menu to select the ingestion mode.
8. Next, hit the **SAVE** button.
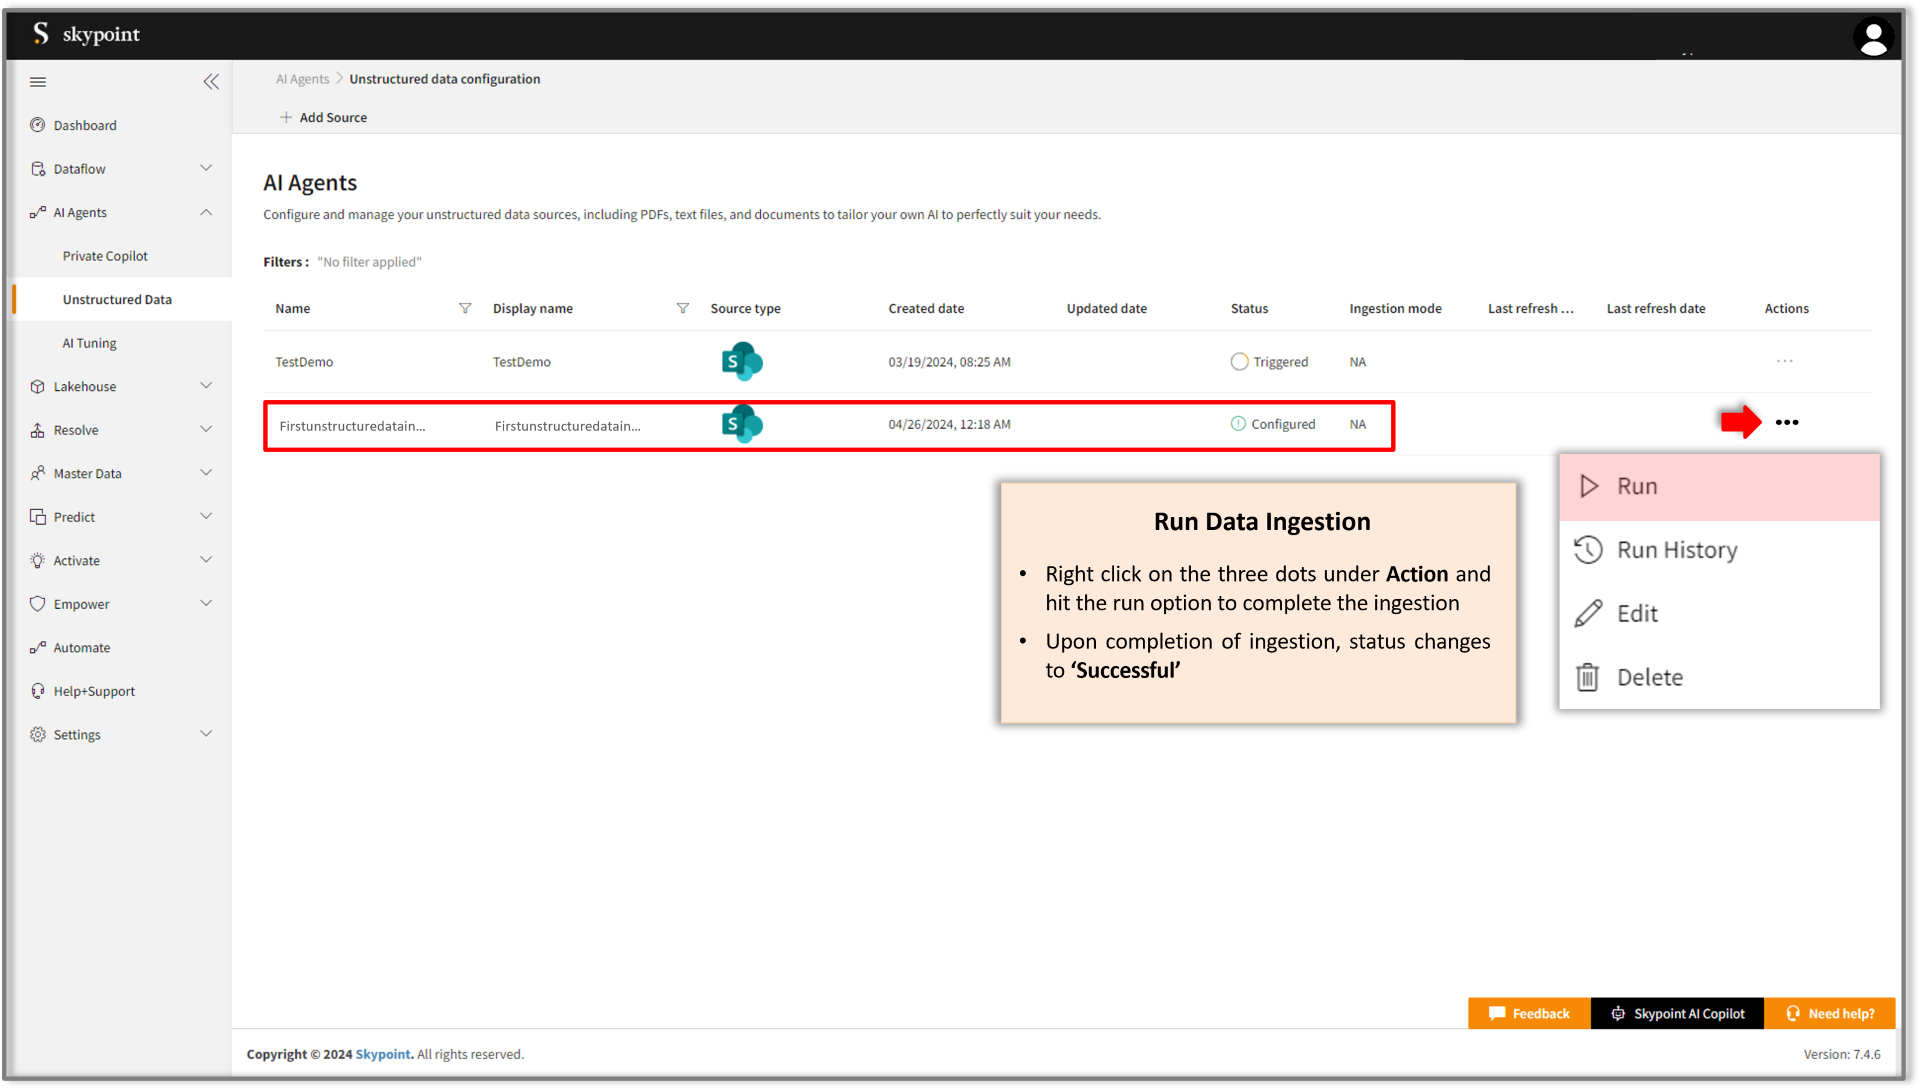
 8. View saved SharePoint datasource under AI Agents as highlighted in the figure below.
9. Right click on the horizontal ellipsis against the saved data source to complete data ingestion.
8. View saved SharePoint datasource under AI Agents as highlighted in the figure below.
9. Right click on the horizontal ellipsis against the saved data source to complete data ingestion.
 **Awesome!** You have successfully configured the SharePoint datasource on skyData.