> ## Documentation Index
> Fetch the complete documentation index at: https://docs.skypoint.ai/llms.txt
> Use this file to discover all available pages before exploring further.
#
# Connecting to MRINexcore
This guide provides a step-by-step approach to effortlessly connecting MRINexcore with skyData.
MRINexCore is a platform by MRI Software designed for managing real estate operations, including lease administration, accounting, and property management. It provides flexible tools for handling complex portfolios and supports integration with other systems to streamline workflows and enhance data-driven decision-making.
The MRINexCore connector in skyData enables seamless integration with MRI Software’s NexCore platform, commonly used in property and real estate management. It allows organizations to efficiently ingest and sync data from NexCore using secure methods like APIs. With support for service account credentials, automated scheduling, and data transformation, the connector streamlines data integration into Skypoint’s unified models for enhanced analytics and AI applications.
## Prerequisite
You need the following details to configure and import data using the MRINexcore⇗ connector:
* Username
* Display name
* Password
* Default Activity Start Date
## To import data using the MRINexcore connector
Follow the below steps to create and configure a new dataflow for the MRINexcore import connector:
1. Navigate to **Dataflow > Imports**.
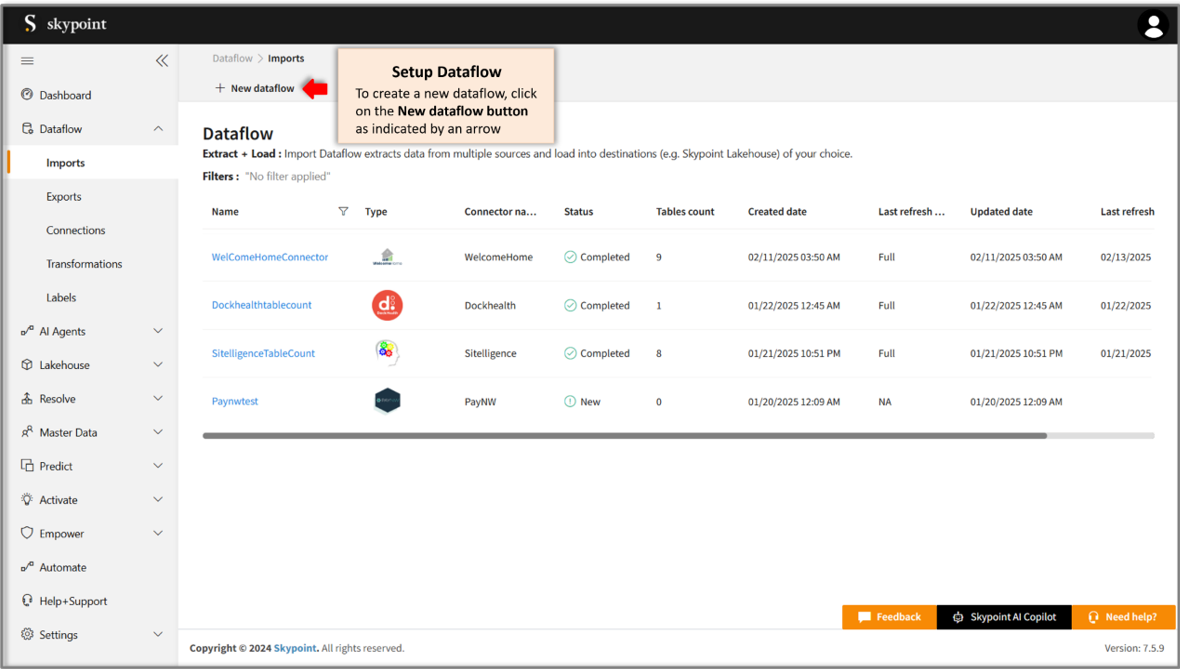 2. Click **New dataflow** as indicated by an arrow.
The **Set dataflow name** page appears.
2. Click **New dataflow** as indicated by an arrow.
The **Set dataflow name** page appears.
 3. Enter the desired name for the dataflow in the **Name** text field.
4. Click **Next** to proceed.
The **Choose connector** page appears.
3. Enter the desired name for the dataflow in the **Name** text field.
4. Click **Next** to proceed.
The **Choose connector** page appears.
 ## Add MRINexcore connector
1. On the **Choose Connector** page, use the **Search** feature to locate and select the **MRINexcore** Connector.
2. Enter the **Display Name** for your dataflow in the provided text field.
3. Optionally, add a **Description** in the designated text area.
## Add MRINexcore connector
1. On the **Choose Connector** page, use the **Search** feature to locate and select the **MRINexcore** Connector.
2. Enter the **Display Name** for your dataflow in the provided text field.
3. Optionally, add a **Description** in the designated text area.
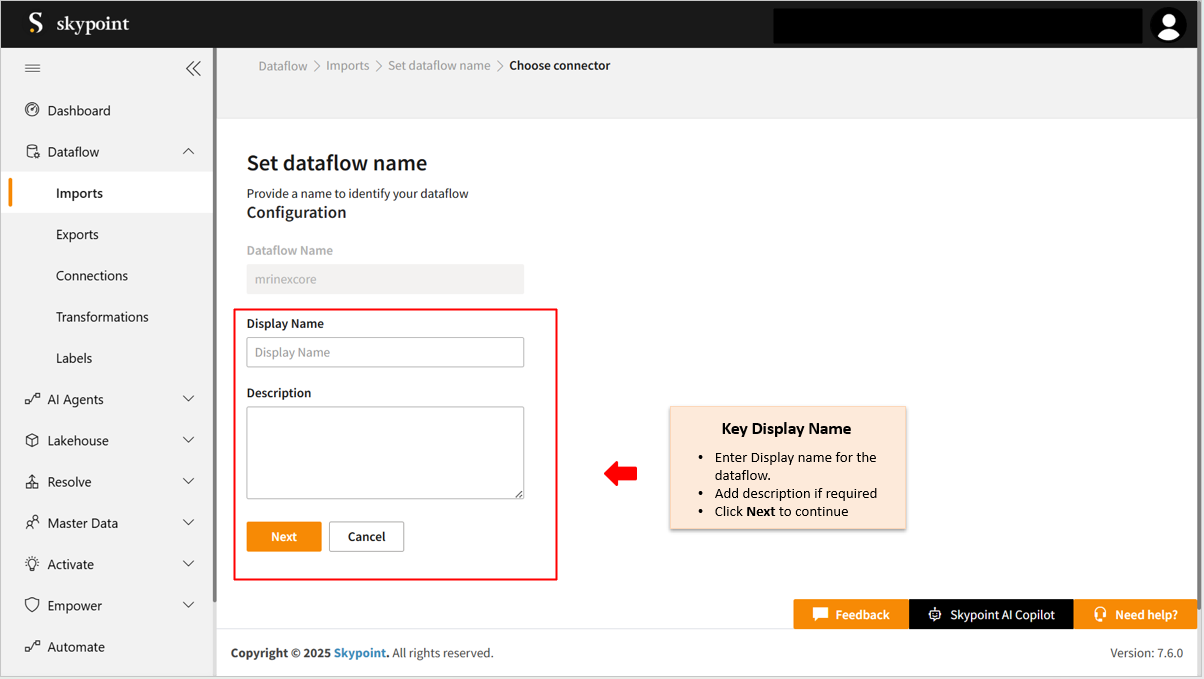 4. Click **Next** to proceed.
The **Configuration** page appears.
4. Click **Next** to proceed.
The **Configuration** page appears.
 ## Connect to the MRINexcore account
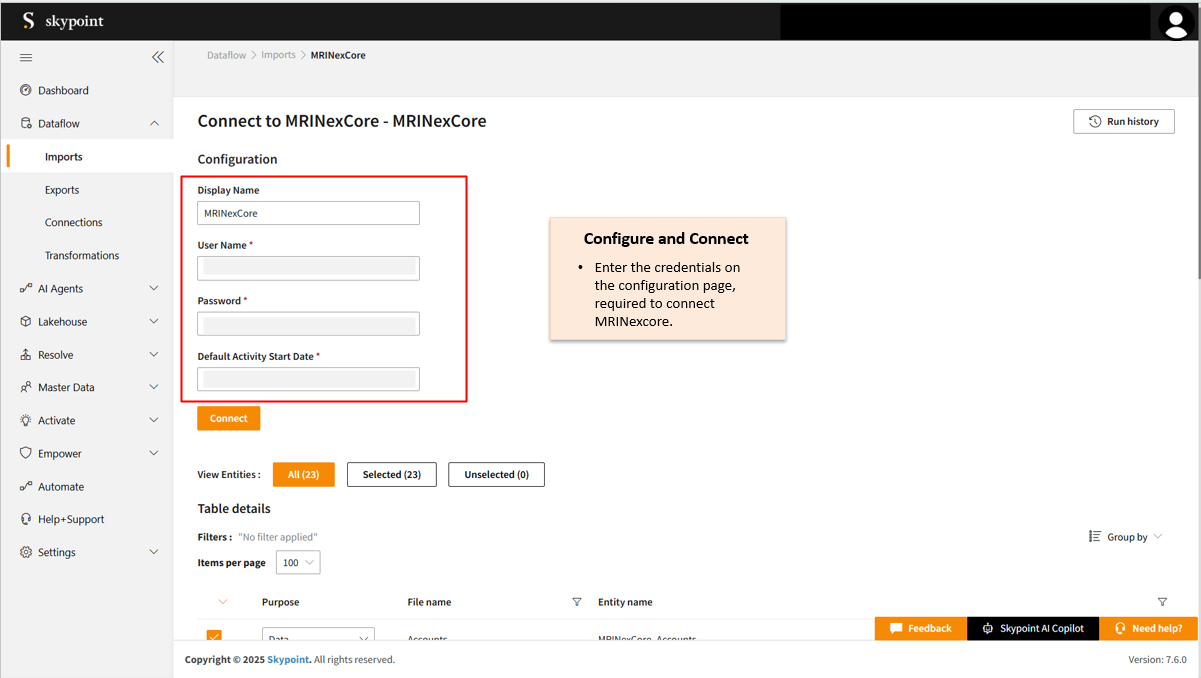
1. Fill in the required details on the Configuration page.
2. Click **Connect**.
## Connect to the MRINexcore account
1. Fill in the required details on the Configuration page.
2. Click **Connect**.
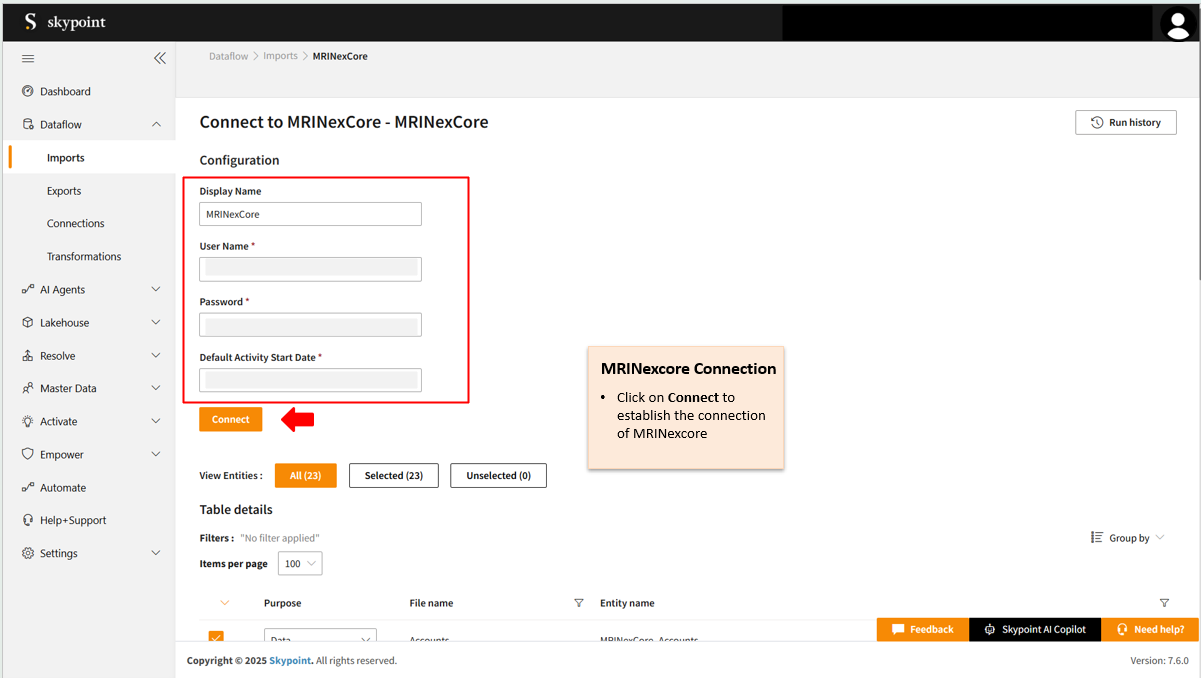 Once the connection is established, the connector can be used to import data from MRINexcore tables.
3. Scroll down to the **Table Details** section, select the checkboxes for the tables you wish to import, and use the dropdown menu to label them as either **Data** or **Metadata.**
Once the connection is established, the connector can be used to import data from MRINexcore tables.
3. Scroll down to the **Table Details** section, select the checkboxes for the tables you wish to import, and use the dropdown menu to label them as either **Data** or **Metadata.**
 By default, all tables in the **Table Details** section are selected. You can choose to import only specific tables that are relevant to your data processing needs. For example, to import customer data, select tables containing details like name, email, address, and contact information.
| Item | Description |
| :---------- | :-------------------------------------------------------------------------- |
| Purpose | Option to assign a purpose (Data or Metadata) for each table. |
| Data | Loads customer data |
| Metadata | Loads Metadata |
| File name | Displays the name of the file that you imported. |
| Entity name | Displays the imported table name by default. You can rename it if required. |
4. Click **Save** to apply the changes.
By default, all tables in the **Table Details** section are selected. You can choose to import only specific tables that are relevant to your data processing needs. For example, to import customer data, select tables containing details like name, email, address, and contact information.
| Item | Description |
| :---------- | :-------------------------------------------------------------------------- |
| Purpose | Option to assign a purpose (Data or Metadata) for each table. |
| Data | Loads customer data |
| Metadata | Loads Metadata |
| File name | Displays the name of the file that you imported. |
| Entity name | Displays the imported table name by default. You can rename it if required. |
4. Click **Save** to apply the changes.
 Congratulations ! for saving the MRINexcore connector dataflow, which appears on the **Dataflow > Imports** page.
## Run, Edit, and Delete the imported data
Once the table is imported, you can execute, modify, and remove the imported table from the Dataflow. Follow the below steps:
1. Go to the **Dataflow** > **Imports** page.
Congratulations ! for saving the MRINexcore connector dataflow, which appears on the **Dataflow > Imports** page.
## Run, Edit, and Delete the imported data
Once the table is imported, you can execute, modify, and remove the imported table from the Dataflow. Follow the below steps:
1. Go to the **Dataflow** > **Imports** page.
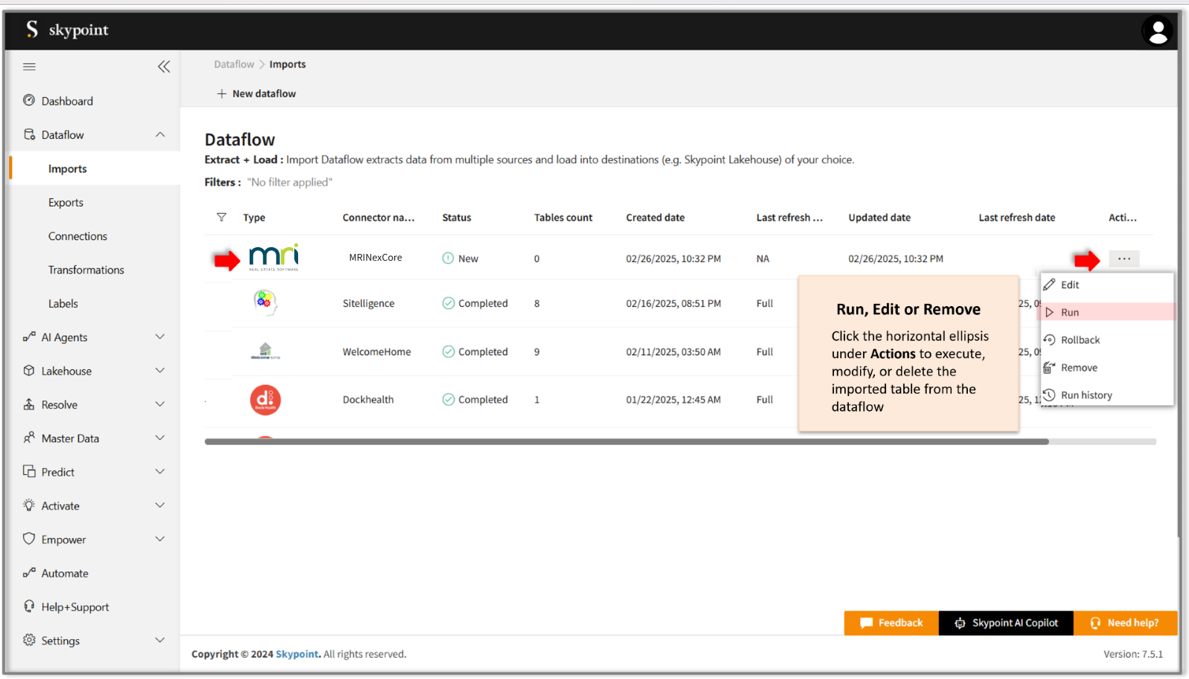 | Item | Description |
| :---------------- | :------------------------------------------------------------------------------ |
| Name | Displays the name of the imported Dataflow. |
| Type | Displays connector type symbol. |
| Connector Name | Displays connector name. |
| Status | Indicates whether the data is imported successfully. |
| Tables Count | Displays the number of tables imported. |
| Created Date | Displays date of creation. |
| Last Refresh Type | Displays the refresh value: Full or Incremental. |
| Updated Date | Displays last modified date. |
| Last Refresh | Displays the latest refresh date, which updates each time you refresh the data. |
| Actions | Provides multiple options for managing dataflows. |
2. Select the horizontal ellipsis under the **Actions** column and do the following:
| If you want to | Then |
| :----------------------------------- | :------------------------------------------------------------------------------------------------- |
| Modify the Dataflow | Select **Edit** and modify the Dataflow. Click **Save** to apply your changes. |
| Execute the Dataflow | Select **Run**. |
| Bring the data to its previous state | Select **Rollback**. |
| Delete the Dataflow | Select **Remove** and then click the **Delete** button. All tables in the data source get deleted. |
| See the run history of the dataflow | Select **Run history**. |
3. Click **Run** to execute the dataflow. Once the execution is successful, the data pipeline status will update to **Completed**, as illustrated in the figure below.
| Item | Description |
| :---------------- | :------------------------------------------------------------------------------ |
| Name | Displays the name of the imported Dataflow. |
| Type | Displays connector type symbol. |
| Connector Name | Displays connector name. |
| Status | Indicates whether the data is imported successfully. |
| Tables Count | Displays the number of tables imported. |
| Created Date | Displays date of creation. |
| Last Refresh Type | Displays the refresh value: Full or Incremental. |
| Updated Date | Displays last modified date. |
| Last Refresh | Displays the latest refresh date, which updates each time you refresh the data. |
| Actions | Provides multiple options for managing dataflows. |
2. Select the horizontal ellipsis under the **Actions** column and do the following:
| If you want to | Then |
| :----------------------------------- | :------------------------------------------------------------------------------------------------- |
| Modify the Dataflow | Select **Edit** and modify the Dataflow. Click **Save** to apply your changes. |
| Execute the Dataflow | Select **Run**. |
| Bring the data to its previous state | Select **Rollback**. |
| Delete the Dataflow | Select **Remove** and then click the **Delete** button. All tables in the data source get deleted. |
| See the run history of the dataflow | Select **Run history**. |
3. Click **Run** to execute the dataflow. Once the execution is successful, the data pipeline status will update to **Completed**, as illustrated in the figure below.
 In the Dataflow's **Run History Description,** you can view error messages related to data import failures from a data source. Additionally, you can check the status, start time, and end time of the data pipeline execution.
## Next step
After completing the data import, start the [Master Data Management (MDM) - Resolve](https://docs.skypointcloud.com/docs/stitch.html) process to create a single, unified view of the data. With Skypoint MDM, you can ensure that your data is accurate, consistent, and reliable, making it easier to use for business processes, analytics, and reporting.
In the Dataflow's **Run History Description,** you can view error messages related to data import failures from a data source. Additionally, you can check the status, start time, and end time of the data pipeline execution.
## Next step
After completing the data import, start the [Master Data Management (MDM) - Resolve](https://docs.skypointcloud.com/docs/stitch.html) process to create a single, unified view of the data. With Skypoint MDM, you can ensure that your data is accurate, consistent, and reliable, making it easier to use for business processes, analytics, and reporting.