> ## Documentation Index
> Fetch the complete documentation index at: https://docs.skypoint.ai/llms.txt
> Use this file to discover all available pages before exploring further.
#
# Using skyData Insights
## Overview
skyData **Insights** feature integrates Power BI’s reporting capabilities into the Skypoint platform, providing a seamless and secure analytics experience. Instance Admins and above can create custom Insights, each accessible through a customized unique web URL.
By organising multiple Power BI reports under a single Insight, this feature delivers a centralized and efficient way to manage and present analytics. It streamlines data access, enables informed decision-making, and enhances operational efficiency across teams.
## How to configure and manage Insights on skyData Studio
User can create Insights on skyData studio by following the below steps:
## A. To setup a connection
1. Sign in to skyData Studio.
2. Navigate to Dataflow and choose **Connections**.
3. Click on **Set up** for Power Bi.
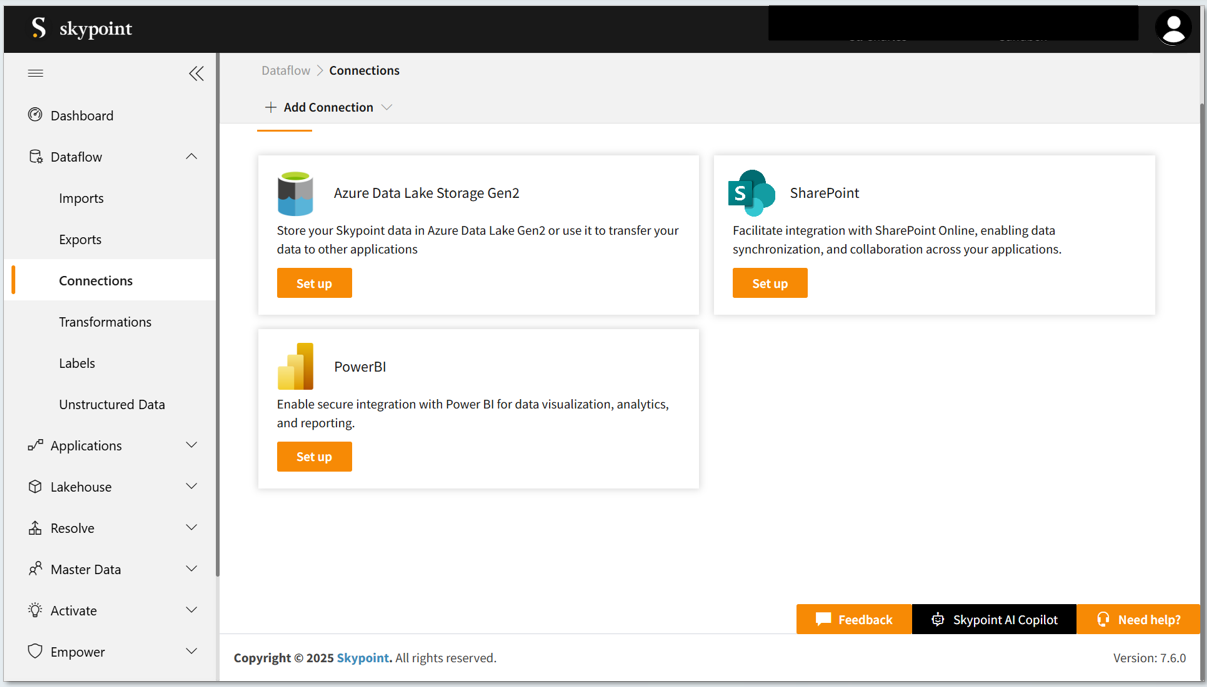 4. Fill in the required connection details and **validate credentials**.
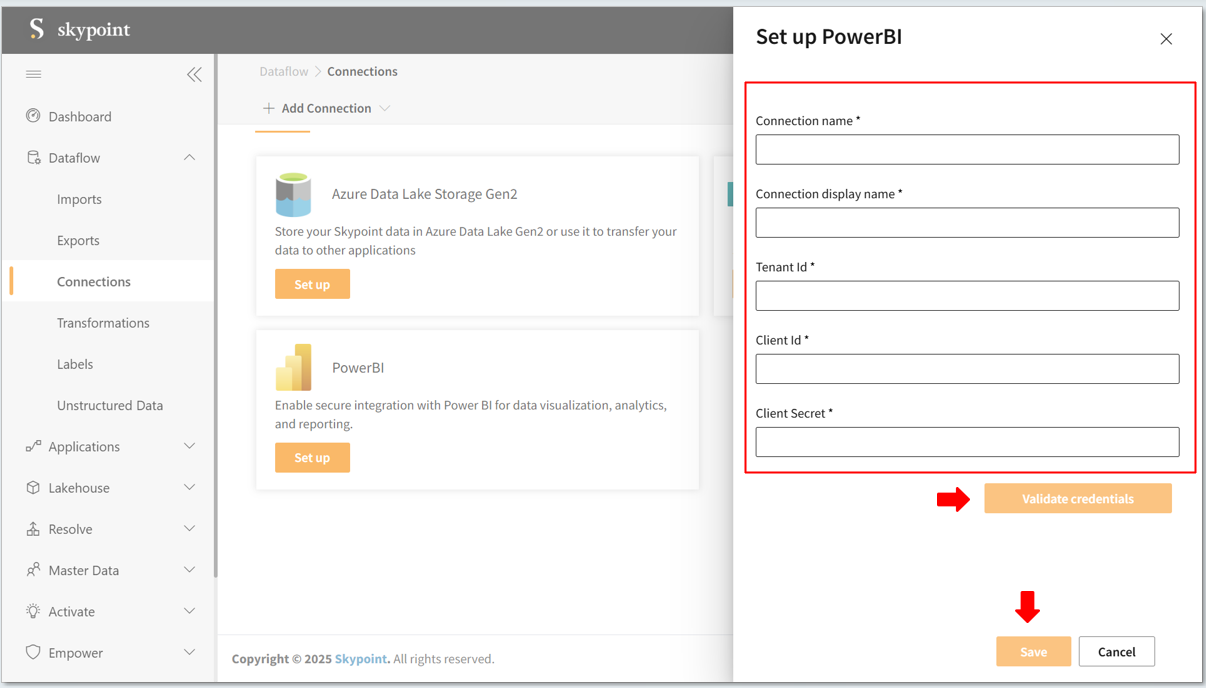 5. Click the **SAVE** button to confirm the changes.
A configured connection can be used to set up multiple Insights.
## B. To add new Insights
1. In the left pane, go to **Applications** > **Insights**.
The Insights window appears.
5. Click the **SAVE** button to confirm the changes.
A configured connection can be used to set up multiple Insights.
## B. To add new Insights
1. In the left pane, go to **Applications** > **Insights**.
The Insights window appears.
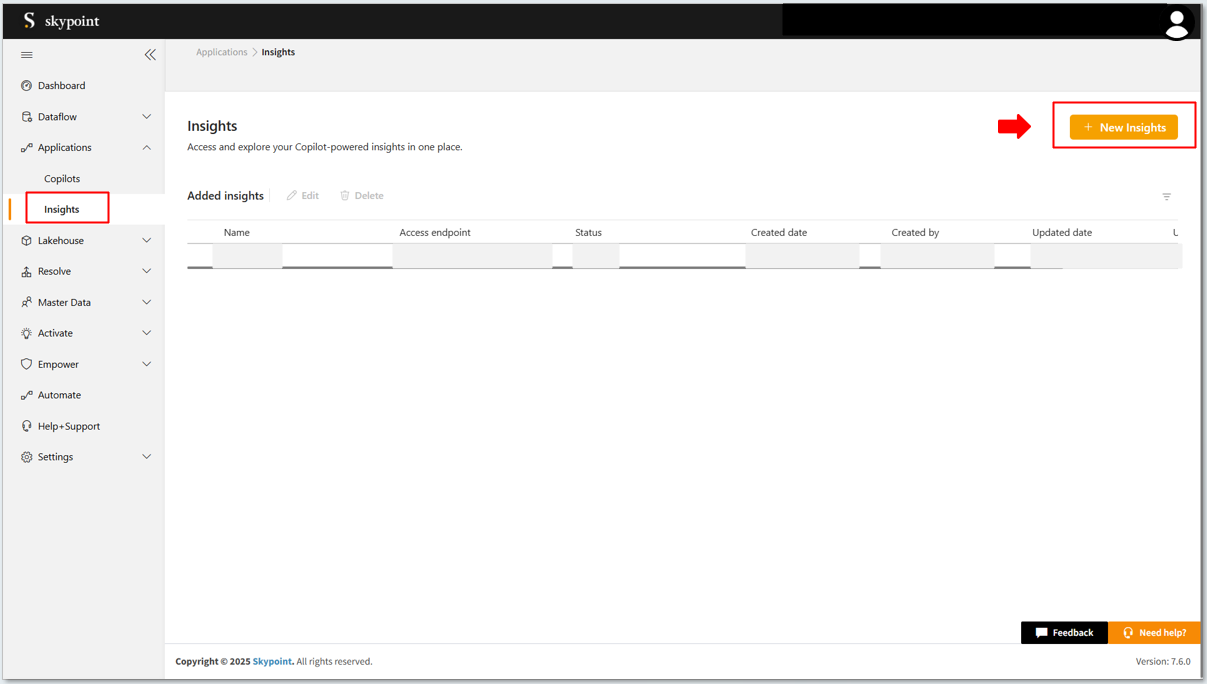 2. Click on **New Insights** to create new insight.
The Add Insights window appears
2. Click on **New Insights** to create new insight.
The Add Insights window appears
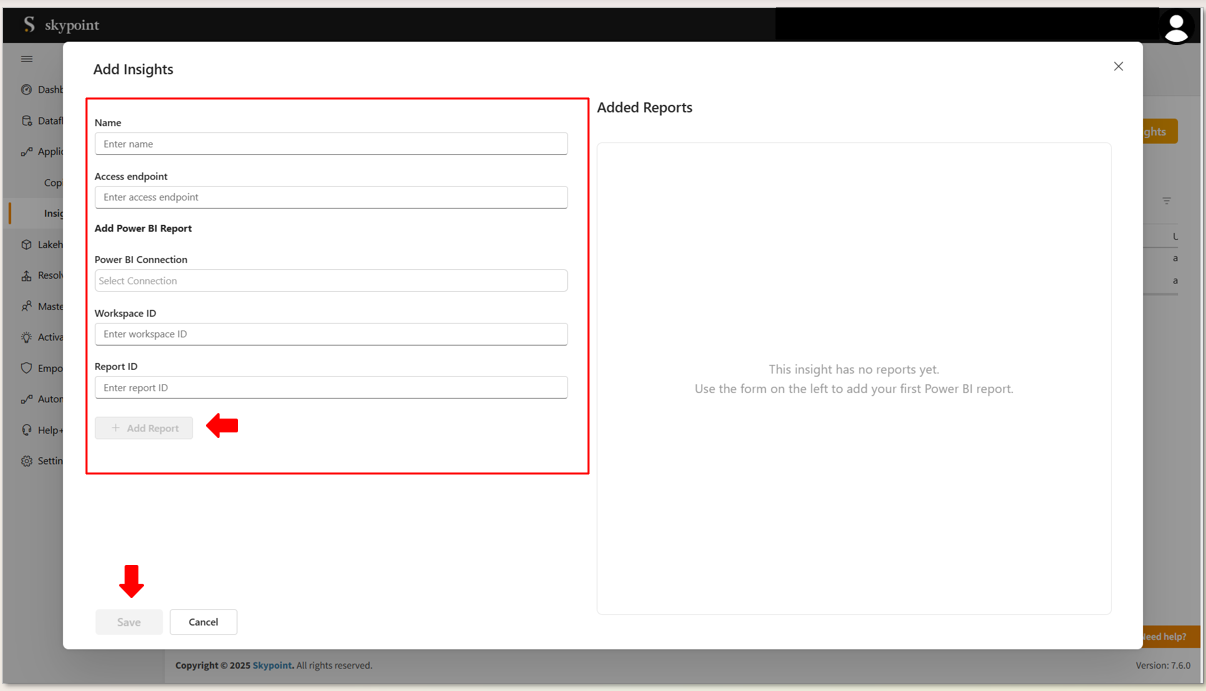 3. Enter the **name** for the Insight to appear across the platform.
4. Enter the **Access endpoint**(url).
To Add Power Bi Report:
1. Select the **Category** of power bi connection from the dropdown menu.
2. **Report Name** will be auto populated based on the category of connection.
3. Enter power bi **Workspace ID**.
4. Enter power bi **Report ID**.
5. Click on **Save** to add the report.
You can see the report in the **Added Reports** window.
Multiple reports can be added to an insight by instance admin.
7. Click on the **Add Report** button to add more reports,Follow the same steps to add reports.
## C. To edit existing Insights
Follow the steps below to change or edit the existing insights
1. Select an **Insight** from the list to make changes.
2. Click on **Edit** to edit the insight.
3. Enter the **name** for the Insight to appear across the platform.
4. Enter the **Access endpoint**(url).
To Add Power Bi Report:
1. Select the **Category** of power bi connection from the dropdown menu.
2. **Report Name** will be auto populated based on the category of connection.
3. Enter power bi **Workspace ID**.
4. Enter power bi **Report ID**.
5. Click on **Save** to add the report.
You can see the report in the **Added Reports** window.
Multiple reports can be added to an insight by instance admin.
7. Click on the **Add Report** button to add more reports,Follow the same steps to add reports.
## C. To edit existing Insights
Follow the steps below to change or edit the existing insights
1. Select an **Insight** from the list to make changes.
2. Click on **Edit** to edit the insight.
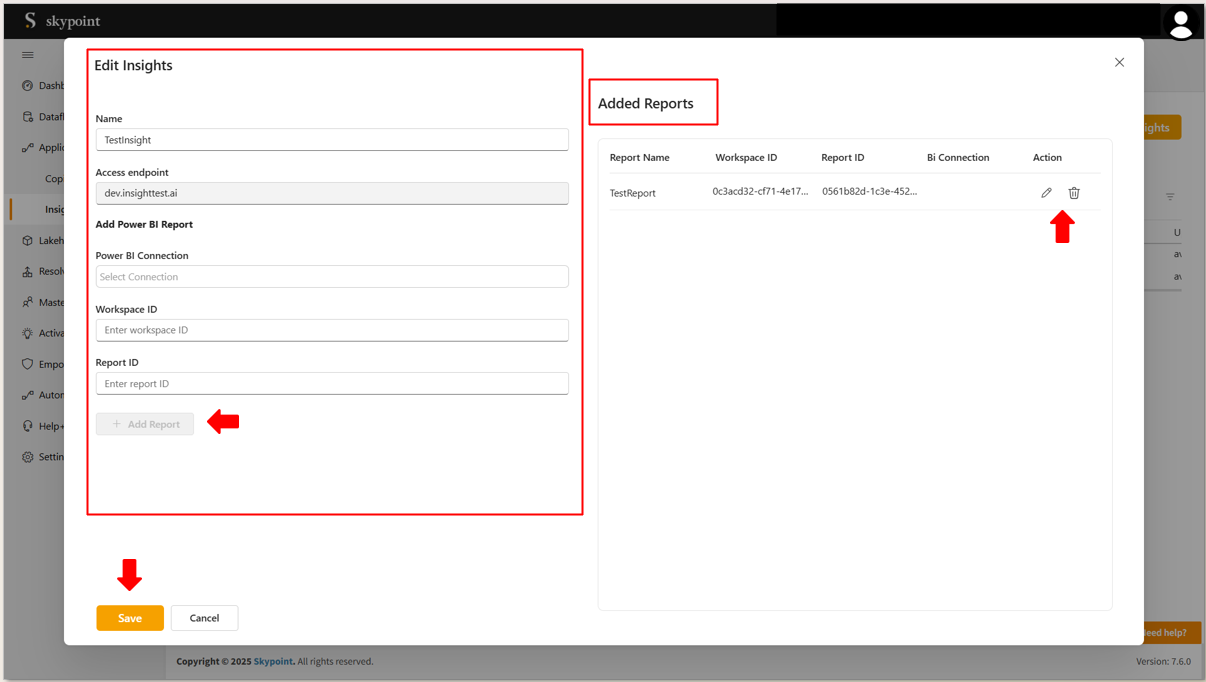 3. You can change the **Name** of existing Insight.
4. Add the new report to the **existing** Insight.
5. Delete the report by clicking the **delete** icon on the added report window.
| Item | Description |
| :------------ | :------------------------------------------------------------------------------------------------------------------------------------------- |
| Report Name | Name of the Report |
| Bi Connection | Category of the Power Bi connection |
| Workspace ID | The workspace id of the power bi report |
| Report ID | Report id of the power bi report |
| Action | Refers to the menu or control within the Insights where users can perform tasks such as **edit** or **delete** a report linked to an Insight |
The access endpoint will be inactive and cannot be edited once set. Ensure the correct endpoint is configured during initial setup.
## D. To delete existing Insights
Follow the steps below to delete the existing insights
1. Select the insight which you want to delete.
2. Click the **Delete** tab located at the top of the page.
3. You can change the **Name** of existing Insight.
4. Add the new report to the **existing** Insight.
5. Delete the report by clicking the **delete** icon on the added report window.
| Item | Description |
| :------------ | :------------------------------------------------------------------------------------------------------------------------------------------- |
| Report Name | Name of the Report |
| Bi Connection | Category of the Power Bi connection |
| Workspace ID | The workspace id of the power bi report |
| Report ID | Report id of the power bi report |
| Action | Refers to the menu or control within the Insights where users can perform tasks such as **edit** or **delete** a report linked to an Insight |
The access endpoint will be inactive and cannot be edited once set. Ensure the correct endpoint is configured during initial setup.
## D. To delete existing Insights
Follow the steps below to delete the existing insights
1. Select the insight which you want to delete.
2. Click the **Delete** tab located at the top of the page.
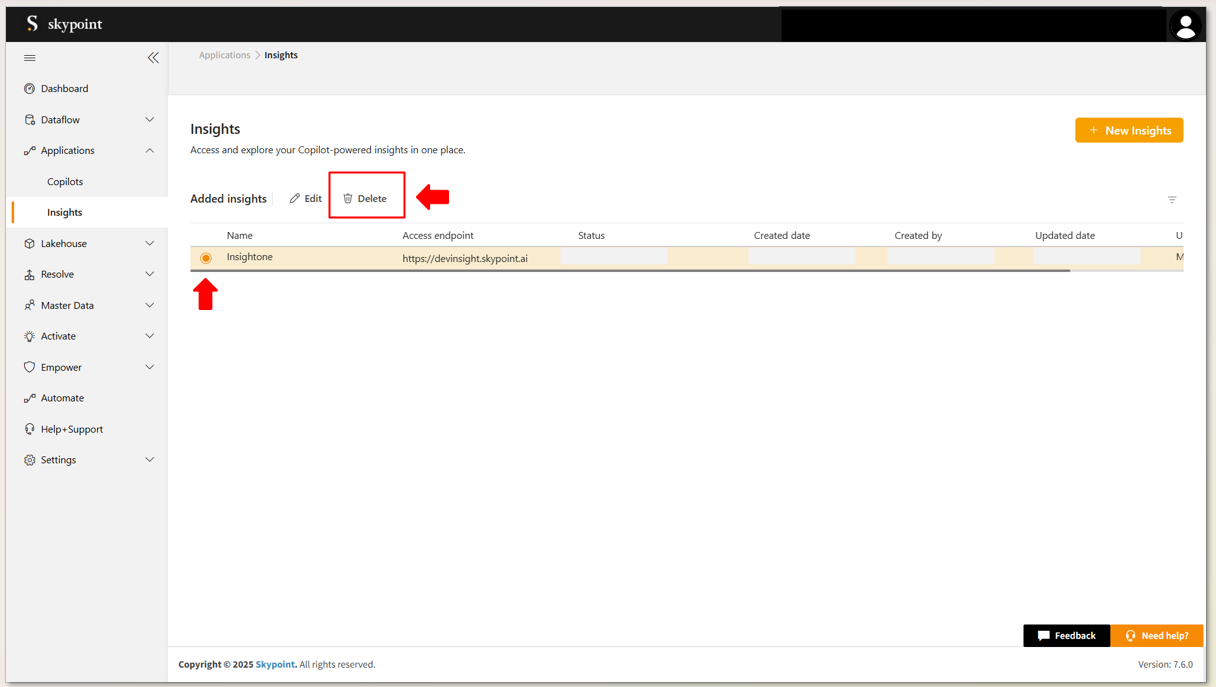 Confirmation page appears with the insight details
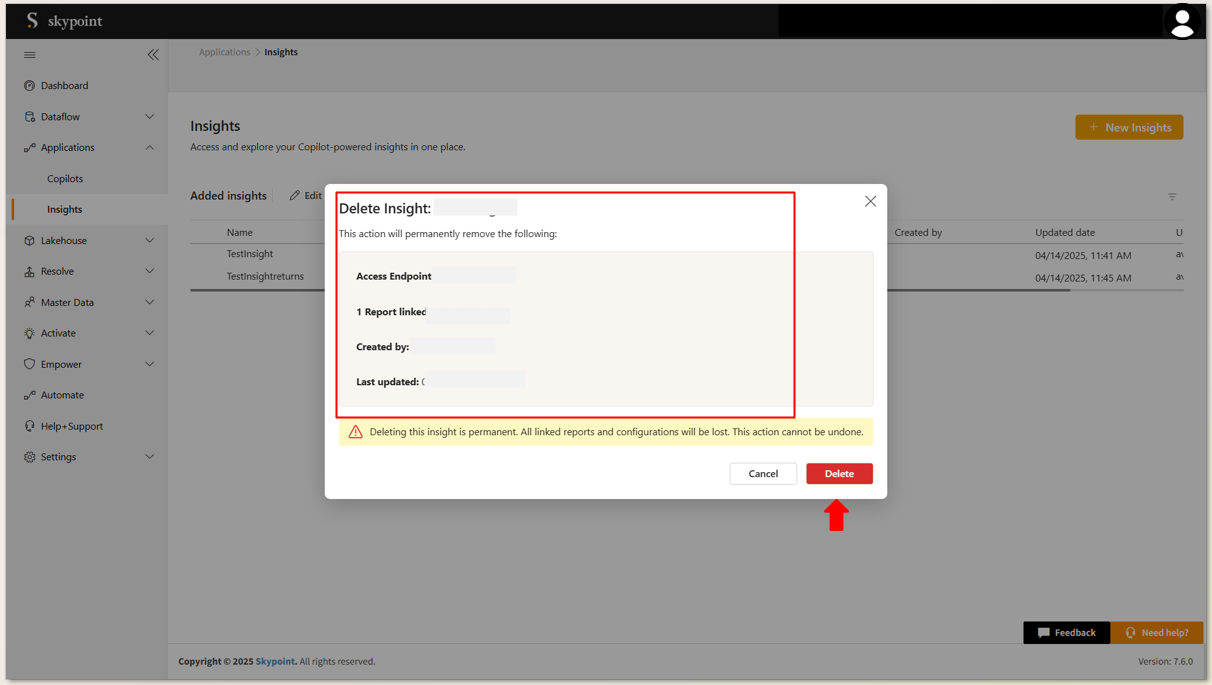 3. Click on the **delete** button to remove the insight.
Once an Insight is deleted, it is permanently removed and cannot be undone. Please proceed with caution.
## E. To Activate Access Endpoint for an Insight
This step is applicable for adminstrator only
This process links your Insight application to a custom domain by configuring and verifying DNS details.
1. Select the **Insight** from the list of Insights, select the newly added insight.
3. Click on the **delete** button to remove the insight.
Once an Insight is deleted, it is permanently removed and cannot be undone. Please proceed with caution.
## E. To Activate Access Endpoint for an Insight
This step is applicable for adminstrator only
This process links your Insight application to a custom domain by configuring and verifying DNS details.
1. Select the **Insight** from the list of Insights, select the newly added insight.
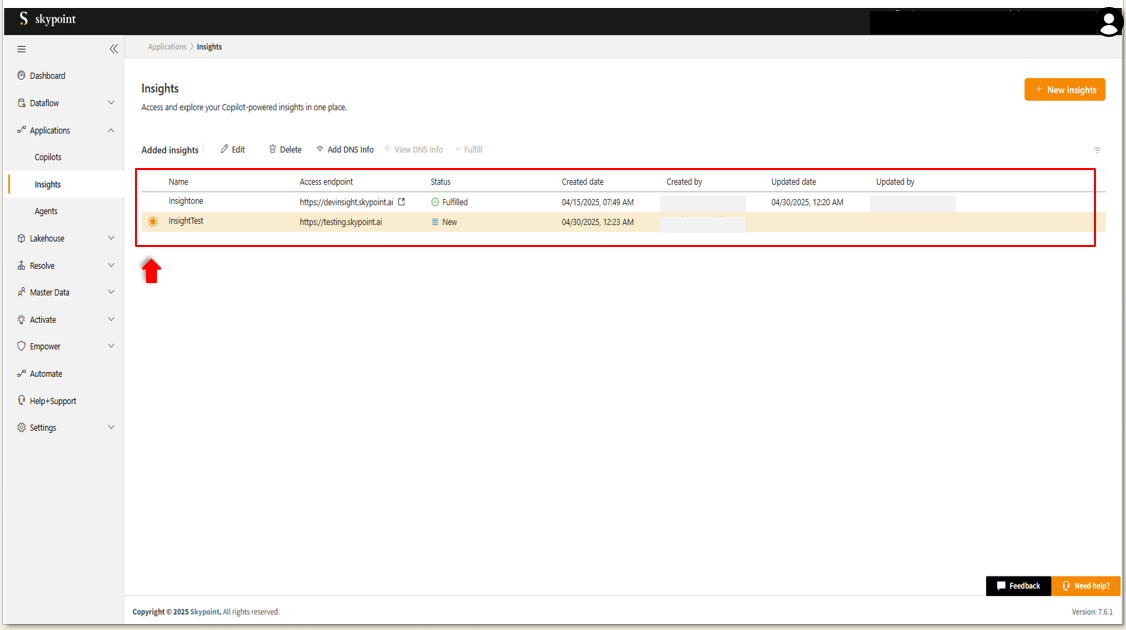 2. Click on **Add DNS Info** located in the top tab to open the Add DNS Information form.
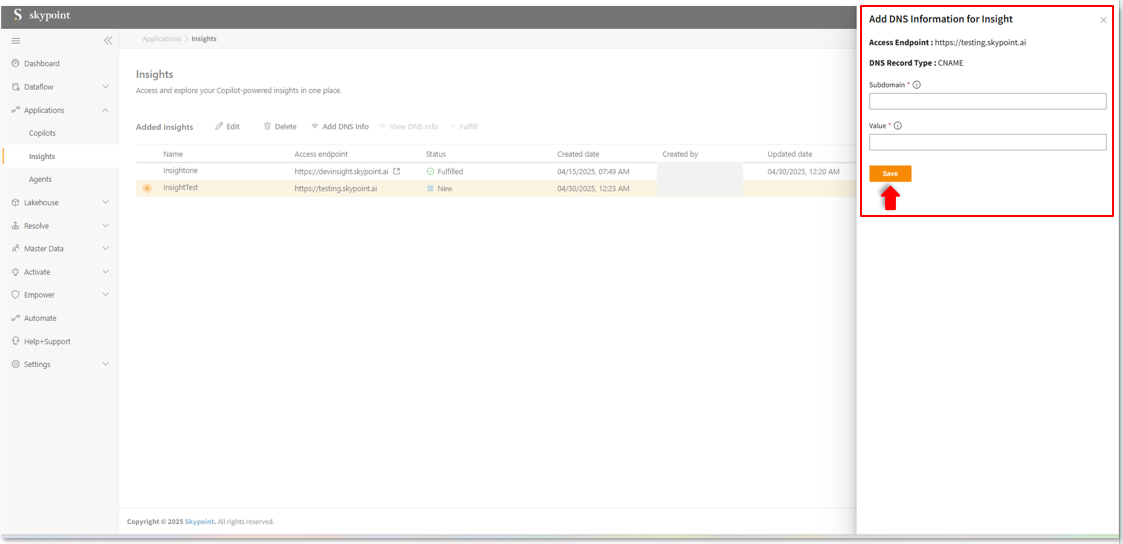 3. Enter **Subdomain** and **Value** in the provided space.
4. Click on **Save** to apply changes.
5. Click on **View DNS Info** from the top tab to open and verify the DNS Information form.
3. Enter **Subdomain** and **Value** in the provided space.
4. Click on **Save** to apply changes.
5. Click on **View DNS Info** from the top tab to open and verify the DNS Information form.
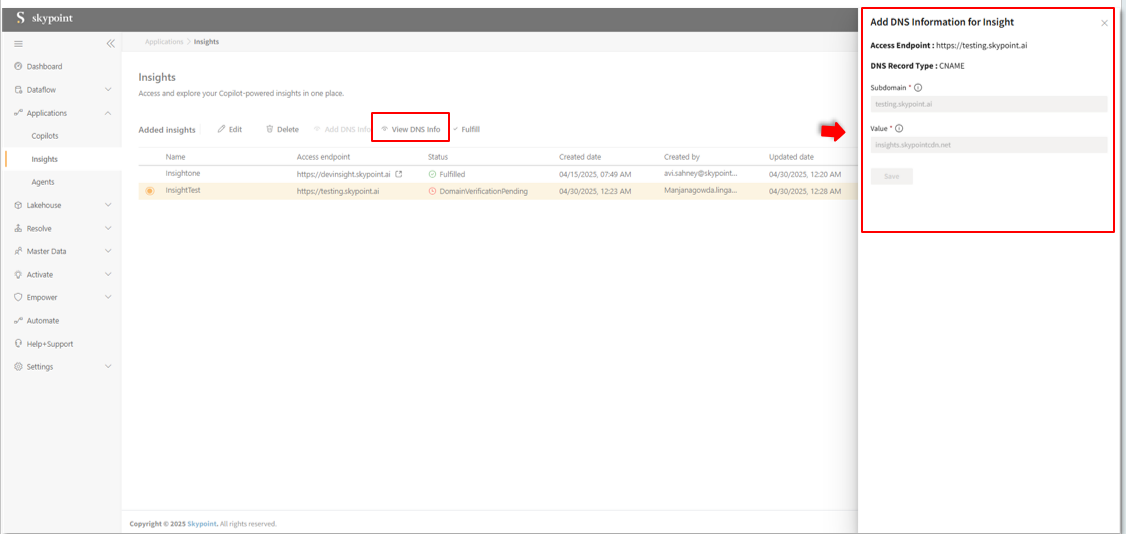 6. Verify **Subdomain** and **Value**.
7. Click the **Fulfill** button to finalize the DNS setup and activate the Access Endpoint.
6. Verify **Subdomain** and **Value**.
7. Click the **Fulfill** button to finalize the DNS setup and activate the Access Endpoint.
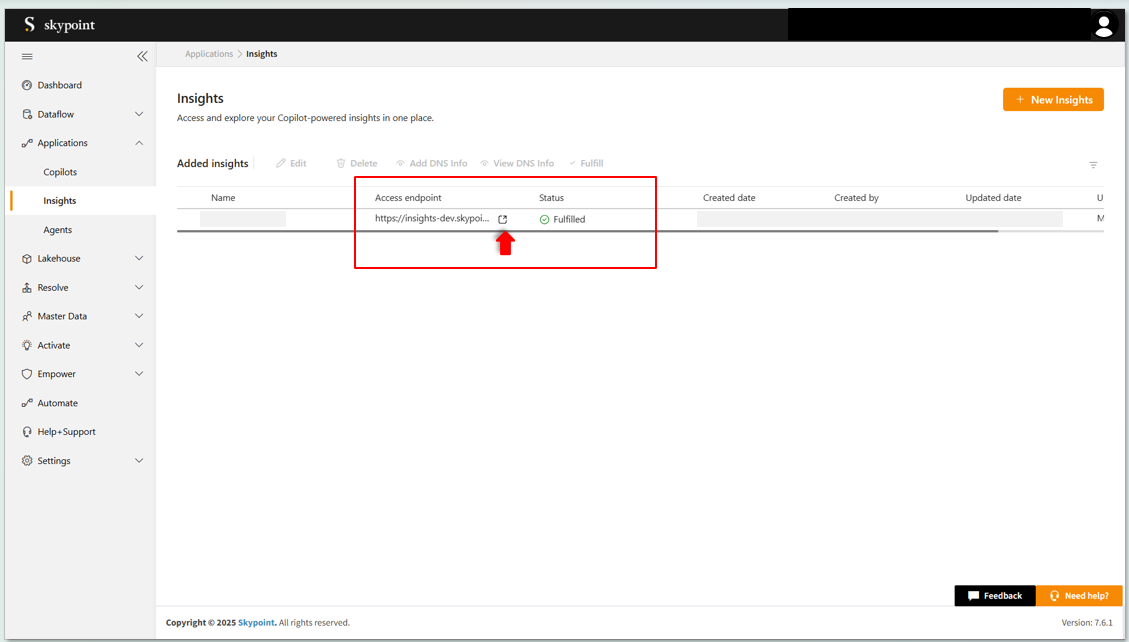 Once fulfilled, the **Access Endpoint** for the Insight application will be activated
## How to access skyData Insights Applications?
Follow the steps below to access Insights and view the required reports through two different methods:
* You can directly access the Insights application using the provided access endpoint (URL).
* You can access the Insights application through Studio under the Applications module. Simply click on the Insight access point (URL) to be redirected to the Insights application.
1. In the left pane, go to **Applications** > **Insights**,the Insights window appears.
Once fulfilled, the **Access Endpoint** for the Insight application will be activated
## How to access skyData Insights Applications?
Follow the steps below to access Insights and view the required reports through two different methods:
* You can directly access the Insights application using the provided access endpoint (URL).
* You can access the Insights application through Studio under the Applications module. Simply click on the Insight access point (URL) to be redirected to the Insights application.
1. In the left pane, go to **Applications** > **Insights**,the Insights window appears.
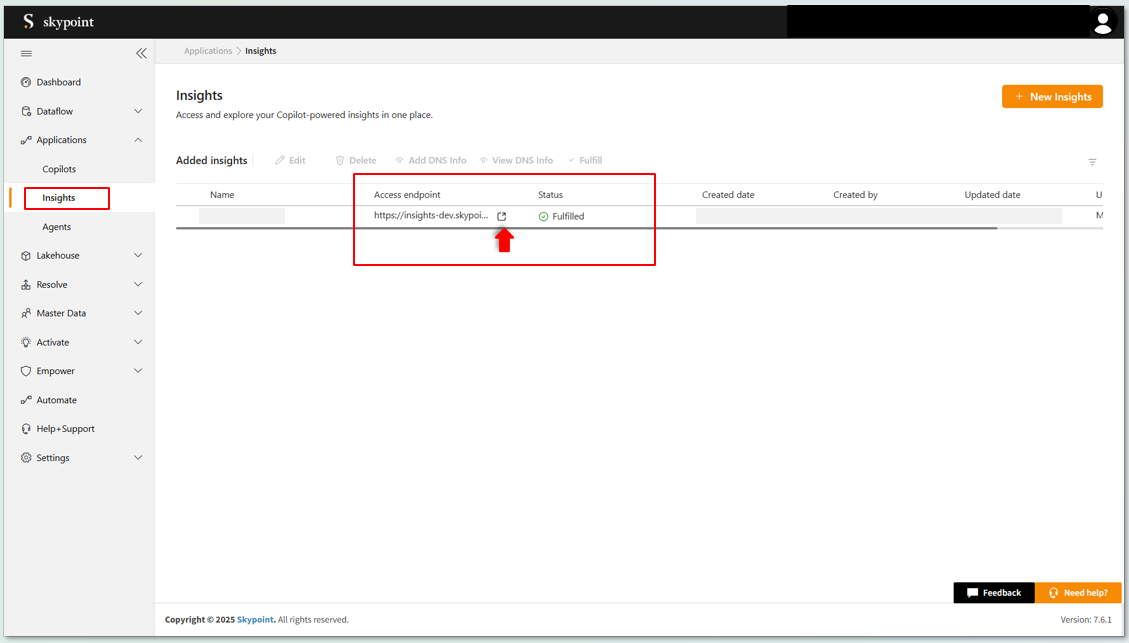 2. Click on the **Access endpoint (URL)** provided to navigate to the Insight application.
## How to access reports in skyData Insight Applications?
### A. To Navigate and View Reports
1. In the left panel, you can see a list of available reports.
2. Click on the **report** you need to open.
2. Click on the **Access endpoint (URL)** provided to navigate to the Insight application.
## How to access reports in skyData Insight Applications?
### A. To Navigate and View Reports
1. In the left panel, you can see a list of available reports.
2. Click on the **report** you need to open.
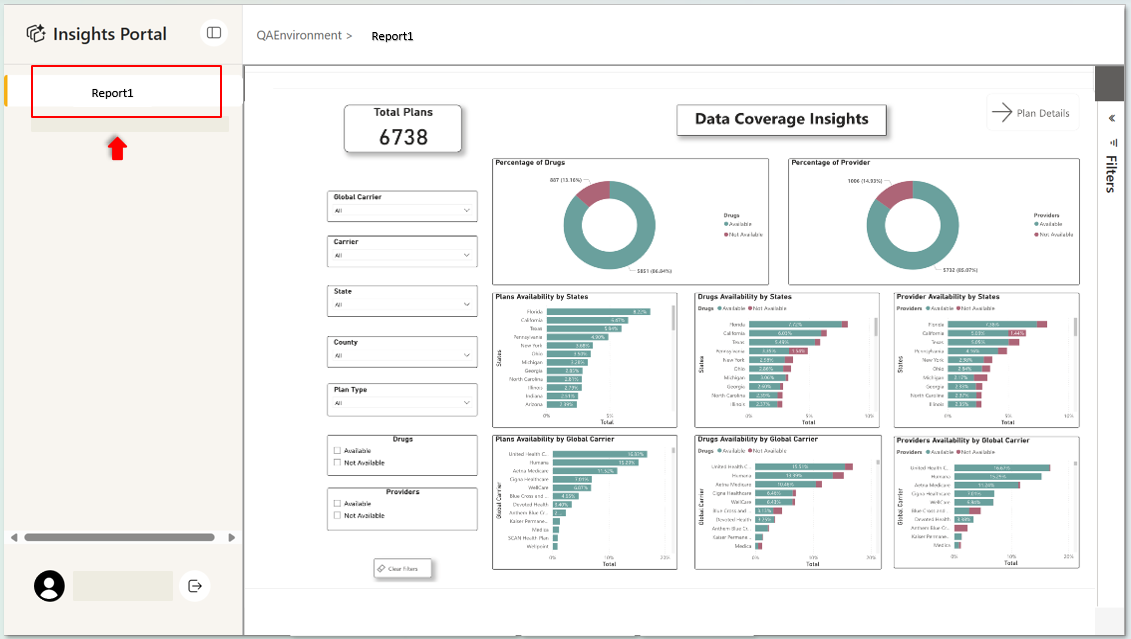 3. You can switch to another report by clicking on the reports listed in the left panel.
### B. To Interact with Reports
1. You can interact with the report by applying filters based on your needs.
3. You can switch to another report by clicking on the reports listed in the left panel.
### B. To Interact with Reports
1. You can interact with the report by applying filters based on your needs.
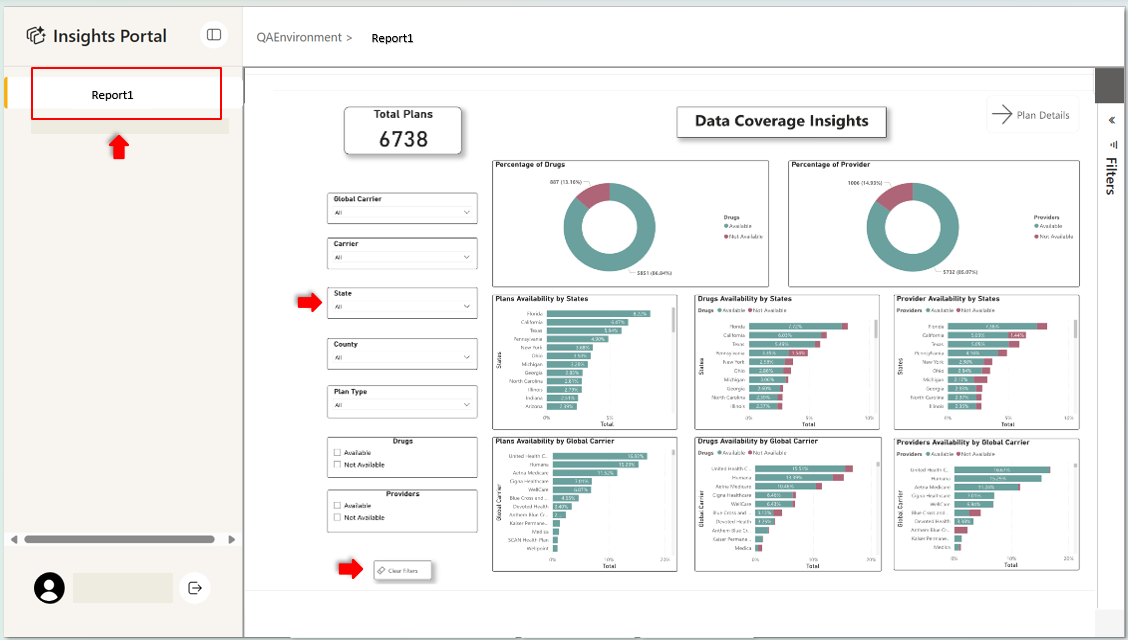 2. Use the available options to explore and analyze specific data within the report.
### C. To Refresh Reports
1. To view the latest data, locate the Refresh button on the report page.
2. Use the available options to explore and analyze specific data within the report.
### C. To Refresh Reports
1. To view the latest data, locate the Refresh button on the report page.
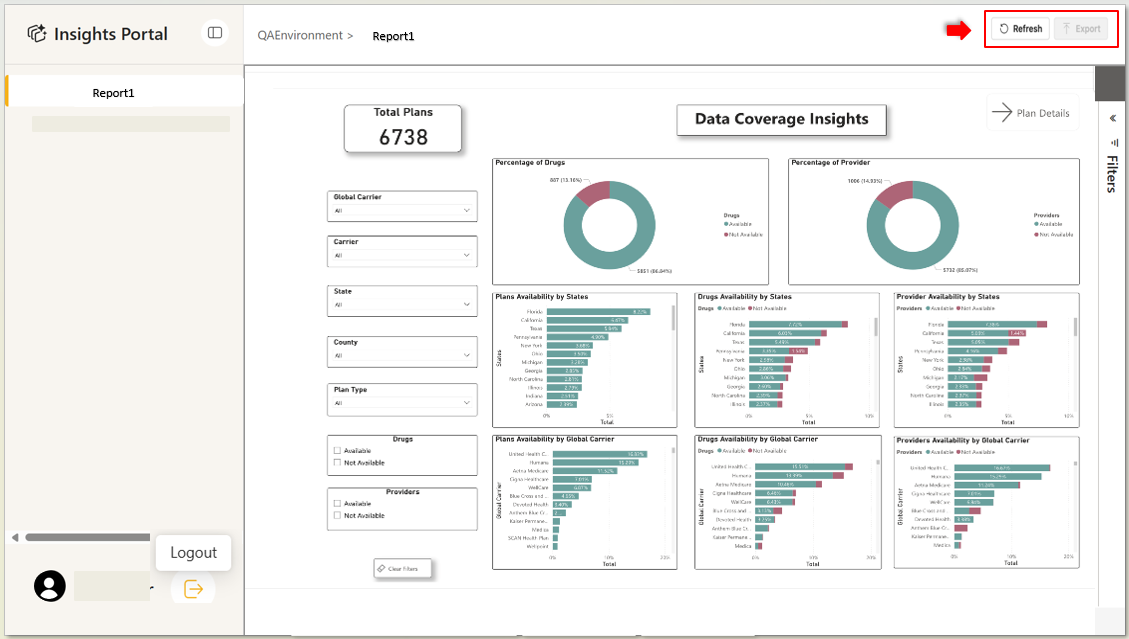 2. Click the Refresh button to update the report with the most current information.
### D. To Export Reports
1. To export the report, click the Export button at the top-right corner of the report panel.
A dropdown menu will appear
2. Click the Refresh button to update the report with the most current information.
### D. To Export Reports
1. To export the report, click the Export button at the top-right corner of the report panel.
A dropdown menu will appear
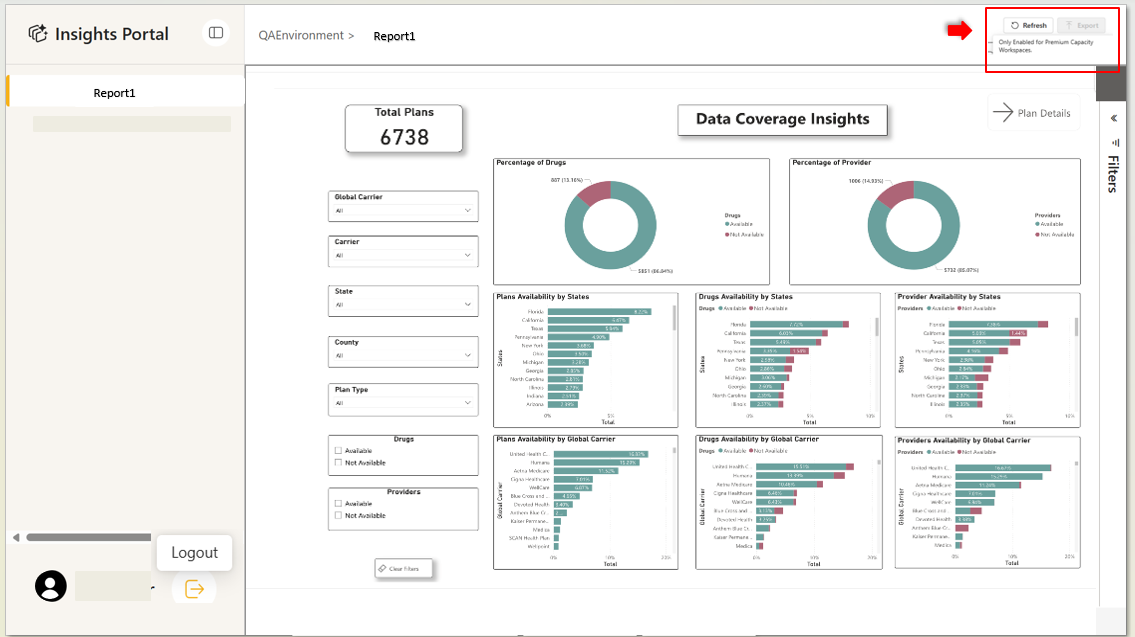 2. Select your preferred file format (e.g., Excel or PDF) to download the report.
The export button is enabled only for workspaces with premium capacity
### E. To logout from Insight Portal
1. From the bottom in the left side panel, click on your profile icon.
2. Select your preferred file format (e.g., Excel or PDF) to download the report.
The export button is enabled only for workspaces with premium capacity
### E. To logout from Insight Portal
1. From the bottom in the left side panel, click on your profile icon.
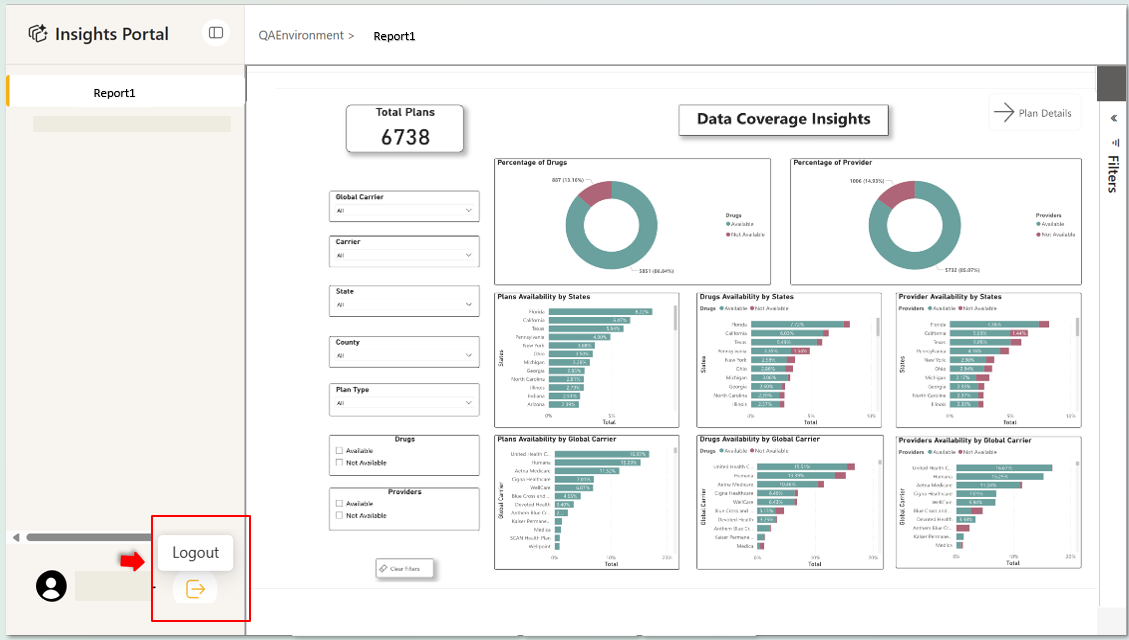 2. Click on the **Log out** button to log off from the portal.