> ## Documentation Index
> Fetch the complete documentation index at: https://docs.skypoint.ai/llms.txt
> Use this file to discover all available pages before exploring further.
#
# Connecting to Infor HMS
# Import data
## Overview
Infor HMS creates full industry suites in the cloud and deploys technology that prioritizes the user experience, leverages data science, and integrates easily into existing systems. You can use skyData's built-in connector for importing data from Infor HMS.
This document will guide you through the process of connecting Infor HMS to skyData.
## Prerequisite
You will need the following details to configure and import data using [Infor HMS](https://www.infor.com/products/hms):
* Display Name
* Account Key
* Storage Path.
You can refer to the Infor HMS Setup Guide document to learn more about the Prerequisites.
## To import data using Infor HMS connector
Follow the below steps to create a new dataflow for the Infor HMS import connector:
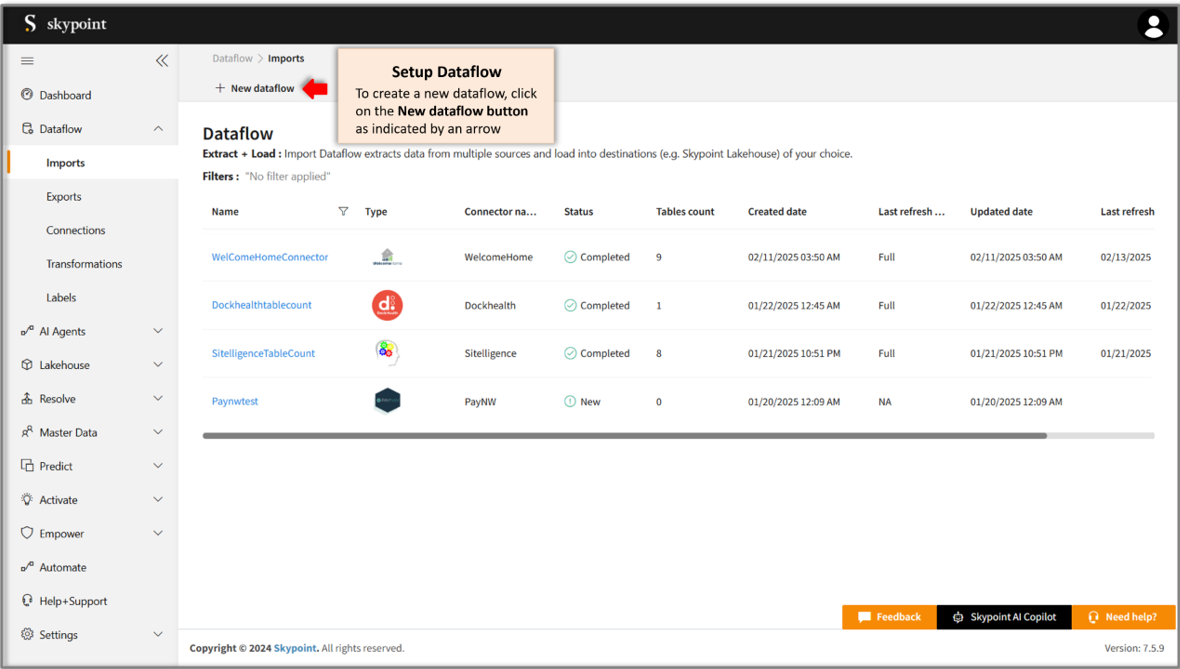
1. Go to **Dataflow > Imports**.
2. Click **New dataflow**.
The **Set dataflow name** page appears.
 3. In the **Set dataflow name** page, type dataflow name in **Name** text area.
4. Click **Next**.
The **Choose connector** page appears.
3. In the **Set dataflow name** page, type dataflow name in **Name** text area.
4. Click **Next**.
The **Choose connector** page appears.
 ## To add Infor HMS connector
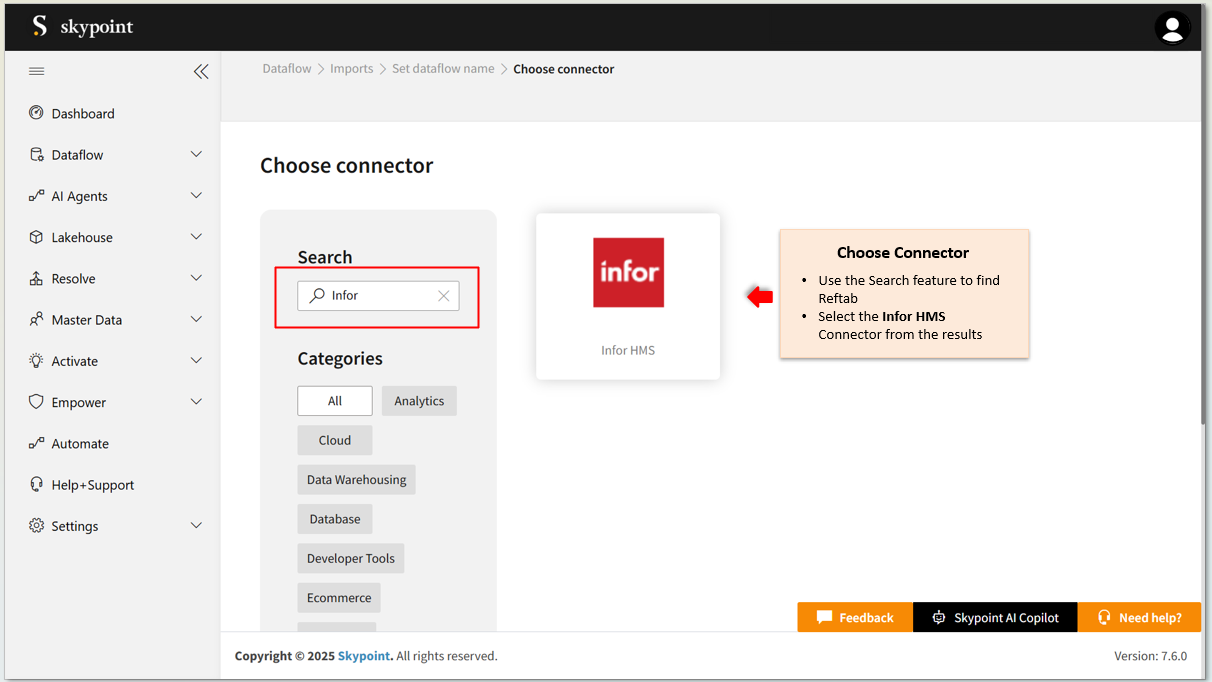
1. In the **Choose connector** page, select **Infor HMS** connector.
Use the Search function to locate the connector. You'll find the Infor HMS connector under the Healthcare category.
## To add Infor HMS connector
1. In the **Choose connector** page, select **Infor HMS** connector.
Use the Search function to locate the connector. You'll find the Infor HMS connector under the Healthcare category.
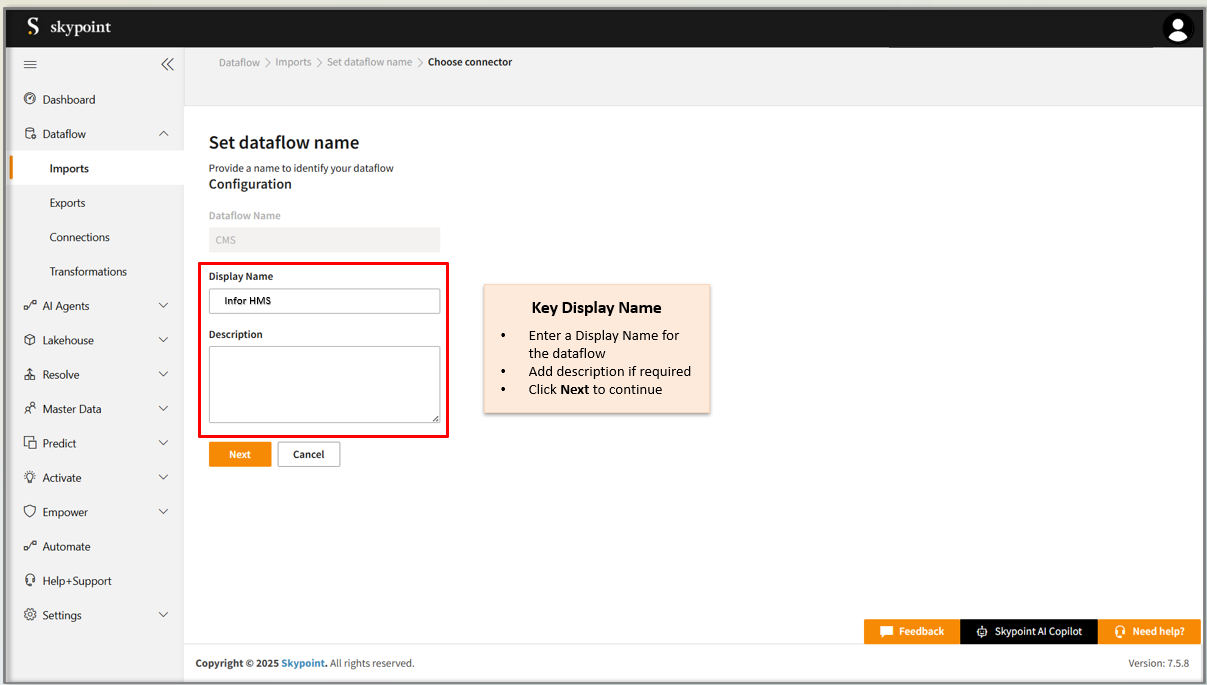 2. Enter **Display Name** for your dataflow in the text area.
3. Enter **Description** for your dataflow in the text area.
4. Click **Next**.
The **Infor HMS configuration** page appears.
2. Enter **Display Name** for your dataflow in the text area.
3. Enter **Description** for your dataflow in the text area.
4. Click **Next**.
The **Infor HMS configuration** page appears.
 ## To configure Infor HMS
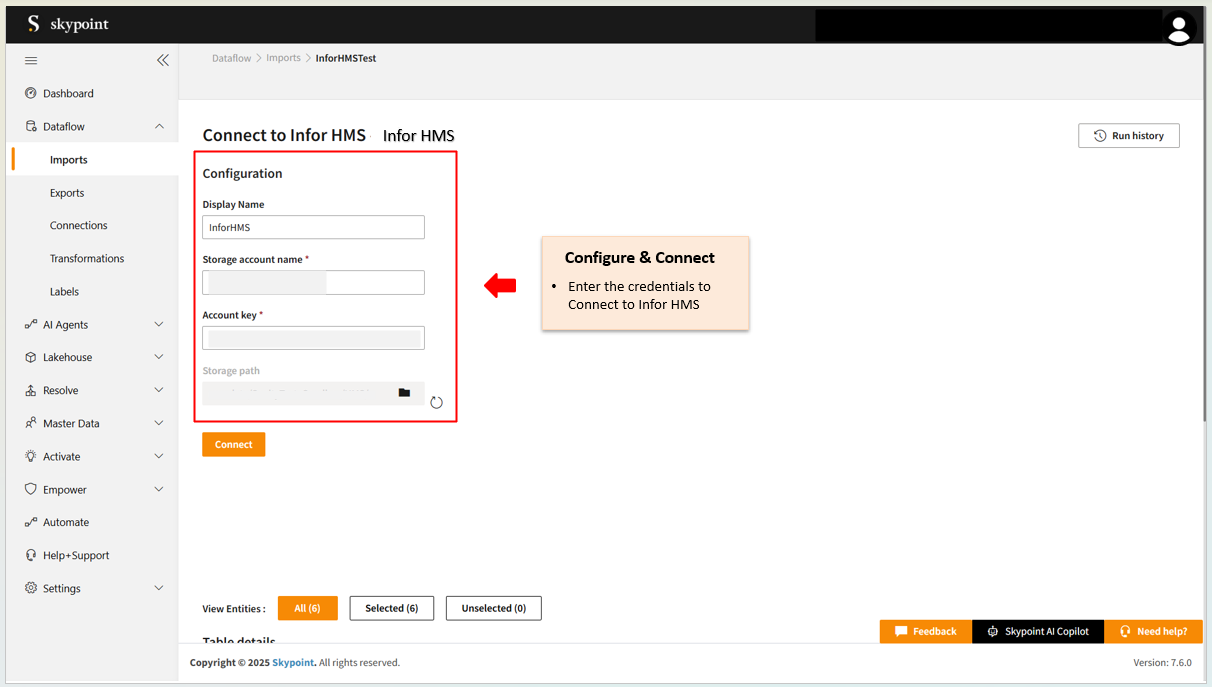
Follow the below steps to configure the connection to Infor HMS:
1. Enter **Display account name** in the text area.
2. Enter **Account key** in the text area.
3. Click the **Folder icon** in **Storage path** text area.
Once you select the storage path, **Table Details** columns appear.
## To configure Infor HMS
Follow the below steps to configure the connection to Infor HMS:
1. Enter **Display account name** in the text area.
2. Enter **Account key** in the text area.
3. Click the **Folder icon** in **Storage path** text area.
Once you select the storage path, **Table Details** columns appear.
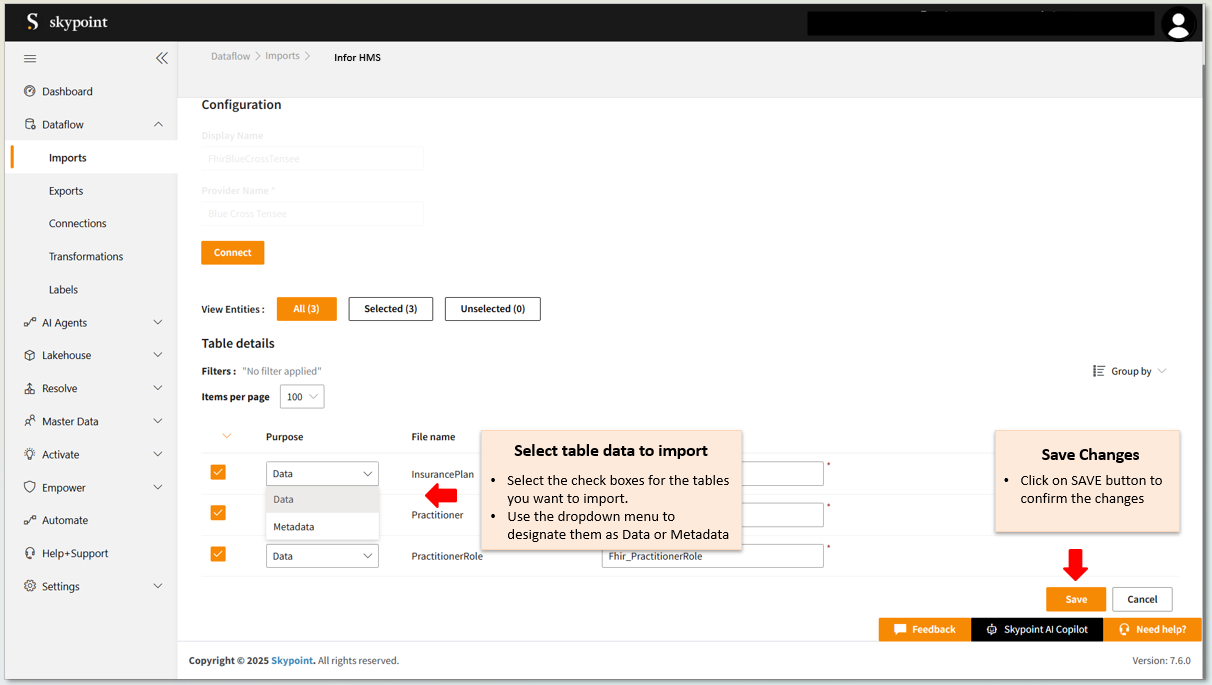 4. Enter the **Table Details** to process the data.
| Item | Description |
| :--------- | :------------------------------------------------------------ |
| Purpose | Option to assign a purpose (Data or Metadata) for each table. |
| Data | Load customer data. |
| Metadata | Load Metadata. |
| File Name | Displays the name of the file that you imported. |
| Table Name | Displays the imported table name. |
5. Click **Save**.
## Run, edit, and delete the imported data
Once you save the connector, the Infor HMS connector gets displayed in the list of tables created in the Dataflow page.
4. Enter the **Table Details** to process the data.
| Item | Description |
| :--------- | :------------------------------------------------------------ |
| Purpose | Option to assign a purpose (Data or Metadata) for each table. |
| Data | Load customer data. |
| Metadata | Load Metadata. |
| File Name | Displays the name of the file that you imported. |
| Table Name | Displays the imported table name. |
5. Click **Save**.
## Run, edit, and delete the imported data
Once you save the connector, the Infor HMS connector gets displayed in the list of tables created in the Dataflow page.
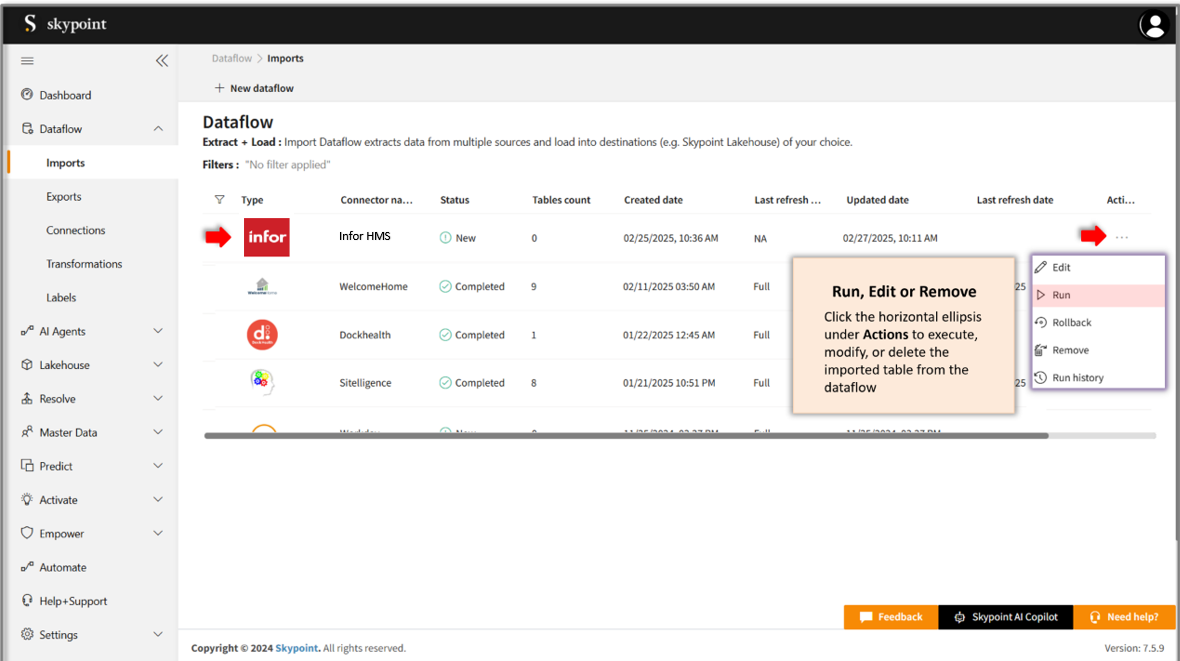 | Item | Description |
| :---------------- | :------------------------------------------------------------------------------------------------------------ |
| Name | Displays the name of the imported Dataflow. |
| Type | Displays connector type symbol. |
| Status | Indicates whether the data is imported successfully. |
| Tables Count | Displays the number of tables. |
| Created Date | Displays date of creation. |
| Last refresh type | Displays the refresh value. You can see whether the value is Full or Incremental after the last data refresh. |
| Updated Date | Displays last modified date. |
| Last Refresh | Displays the latest refresh date, which updates each time the data is refreshed. |
| Group by | Option to view the items in a specific Group (For example, name, type, status). |
* Select the horizontal ellipsis in the **Actions** column and do the following:
| If you want to | Then |
| :----------------------------------- | :------------------------------------------------------------------------------------------------- |
| Modify the Dataflow | Select **Edit** and modify the Dataflow. Click **Save** to apply your changes. |
| Execute the Dataflow | Select **Run**. |
| Bring the data to its previous state | Select **Rollback**. |
| Delete the Dataflow | Select **Remove** and then click the **Delete** button. All tables in the data source get deleted. |
| See the run history of the Dataflow | Select **Run** history. |
# Setup guide
## Overview
This document will help you gather all credentials for connecting [Infor HMS](https://www.infor.com/products/hms) with skyData.
## Prerequisite
You must have the following details:
* Infor HMS account
* API for integration.
## To call API
skyData will expose API for the following five entities:
* Reservations
* GuestProfile
* Inventory
* Rate
* GuestStayRevenue
Once the APIs are called, a data dump will be created in your skyData integrated Storage account.
## Finding Storage account
The **Storage account name** will be shared with you from skyData.
## Finding Account key
The **Account key** will be shared with you from skyData.
## Selecting Storage Path
Follow the below steps on the skyData platform Configuration page to select Storage Path:
1. Click the folder icon in **Storage Path** text area.
2. Select **raw-data** and then select the folder inside it.
3. Select **HMS**.
| Item | Description |
| :---------------- | :------------------------------------------------------------------------------------------------------------ |
| Name | Displays the name of the imported Dataflow. |
| Type | Displays connector type symbol. |
| Status | Indicates whether the data is imported successfully. |
| Tables Count | Displays the number of tables. |
| Created Date | Displays date of creation. |
| Last refresh type | Displays the refresh value. You can see whether the value is Full or Incremental after the last data refresh. |
| Updated Date | Displays last modified date. |
| Last Refresh | Displays the latest refresh date, which updates each time the data is refreshed. |
| Group by | Option to view the items in a specific Group (For example, name, type, status). |
* Select the horizontal ellipsis in the **Actions** column and do the following:
| If you want to | Then |
| :----------------------------------- | :------------------------------------------------------------------------------------------------- |
| Modify the Dataflow | Select **Edit** and modify the Dataflow. Click **Save** to apply your changes. |
| Execute the Dataflow | Select **Run**. |
| Bring the data to its previous state | Select **Rollback**. |
| Delete the Dataflow | Select **Remove** and then click the **Delete** button. All tables in the data source get deleted. |
| See the run history of the Dataflow | Select **Run** history. |
# Setup guide
## Overview
This document will help you gather all credentials for connecting [Infor HMS](https://www.infor.com/products/hms) with skyData.
## Prerequisite
You must have the following details:
* Infor HMS account
* API for integration.
## To call API
skyData will expose API for the following five entities:
* Reservations
* GuestProfile
* Inventory
* Rate
* GuestStayRevenue
Once the APIs are called, a data dump will be created in your skyData integrated Storage account.
## Finding Storage account
The **Storage account name** will be shared with you from skyData.
## Finding Account key
The **Account key** will be shared with you from skyData.
## Selecting Storage Path
Follow the below steps on the skyData platform Configuration page to select Storage Path:
1. Click the folder icon in **Storage Path** text area.
2. Select **raw-data** and then select the folder inside it.
3. Select **HMS**.
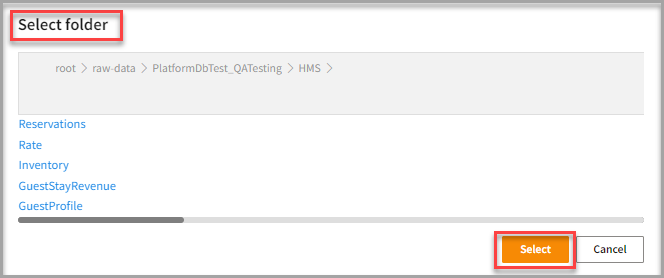 4. In the **HMS** folder, click **Select**.
Follow the steps in Connecting to Infor HMS import connector to complete your integration.
4. In the **HMS** folder, click **Select**.
Follow the steps in Connecting to Infor HMS import connector to complete your integration.