> ## Documentation Index
> Fetch the complete documentation index at: https://docs.skypoint.ai/llms.txt
> Use this file to discover all available pages before exploring further.
#
# Connecting to the Dotdigital connector
## Overview
Dotdigital is an online marketing platform that provides marketing solutions for campaigns, eCommerce, automation, email, and SMS marketing. You can use skyData's built-in connector for importing data from Dotdigital. Our platform collects, analyzes, and provides a solution to transform data into meaningful information for generating valuable insights.
## Prerequisite
* You have a [Dotdigital account](https://dotdigital.com/) and credentials such as Username and Password. Each API user has credentials that must be used to start the configuration. If you want to create an API user account, you need to set up an [API user](https://support.dotdigital.com/hc/en-gb/articles/115001718730-How-do-I-create-an-API-user).
## Import Data using Dotdigital connector
1. In the left pane, go to **Dataflow** > **Imports**.
The Dataflow window appears.
 2. Click **New Dataflow** to create dataflow.
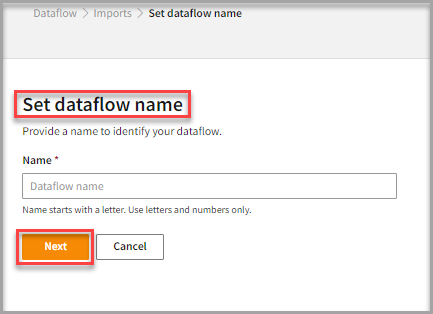 3. Enter a **Name** to identify your Dataflow.
The name must start with a letter and can only contain letters and numbers, with no spaces between characters.
4. Click **Next**.
## Add Dotdigital Connector
1. In the **All** or **Marketing** tab, select the **dotdigital** connector to start the configuration.
3. Enter a **Name** to identify your Dataflow.
The name must start with a letter and can only contain letters and numbers, with no spaces between characters.
4. Click **Next**.
## Add Dotdigital Connector
1. In the **All** or **Marketing** tab, select the **dotdigital** connector to start the configuration.
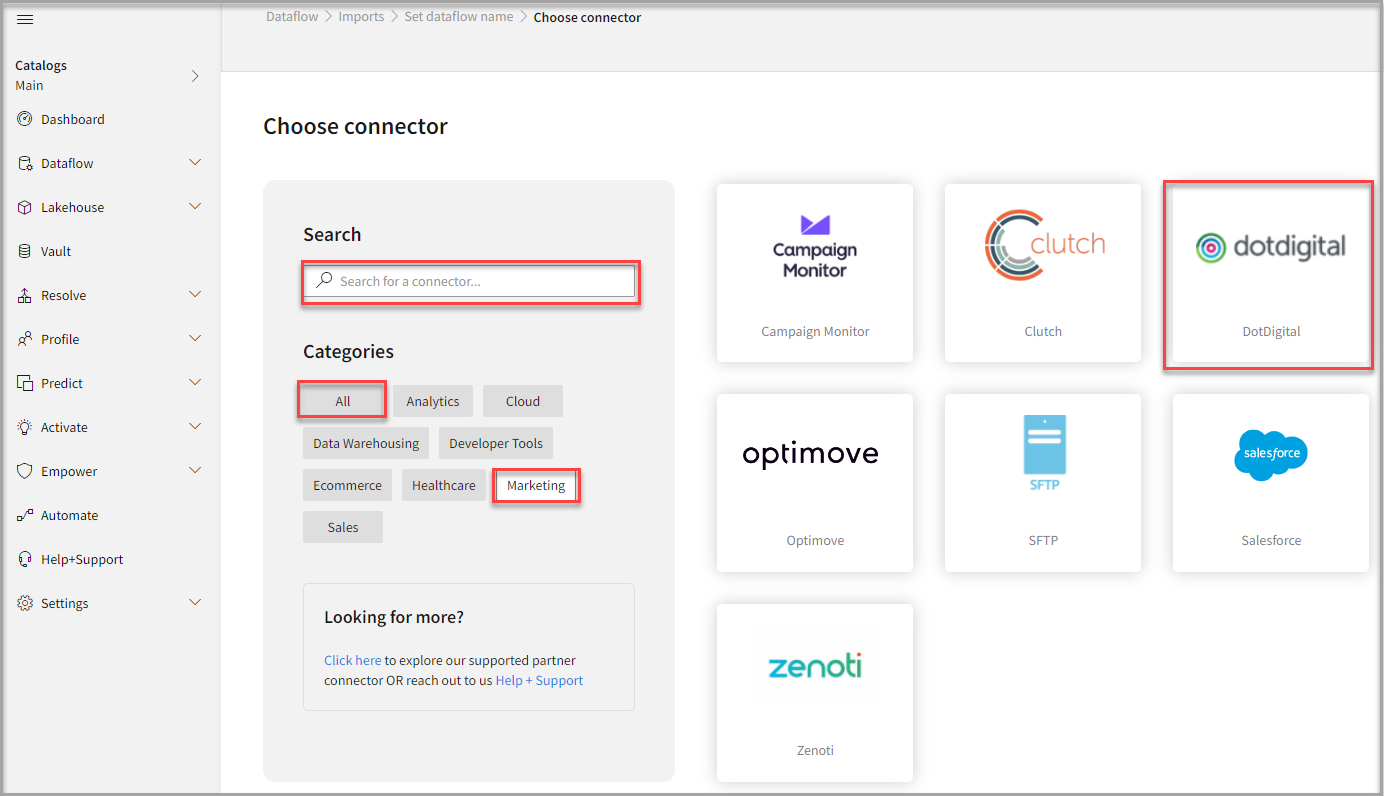 2. Also, you can use the **Search** function to find the **dotdigital** connector.
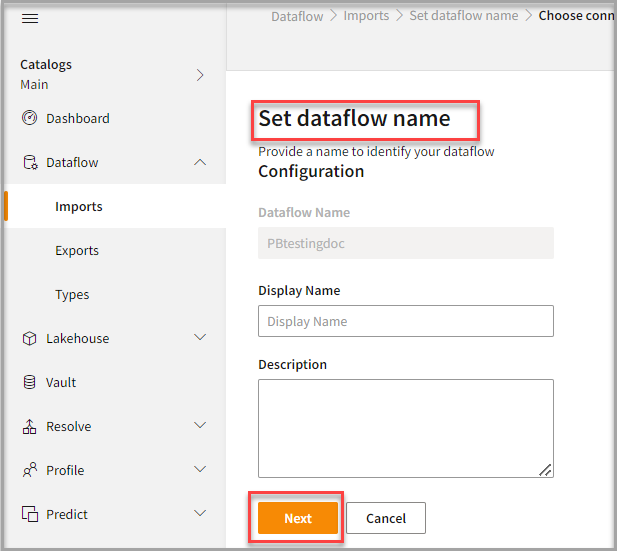 3. In the **Set dataflow name**, enter the **Display Name** to identify your dataflow.
4. In the **Description** box, you can enter an explanation of the connector.
5. Click **Next**.
3. In the **Set dataflow name**, enter the **Display Name** to identify your dataflow.
4. In the **Description** box, you can enter an explanation of the connector.
5. Click **Next**.
 ## To configure Dotdigital
Follow the below steps to configure the connection to Dotdigital:
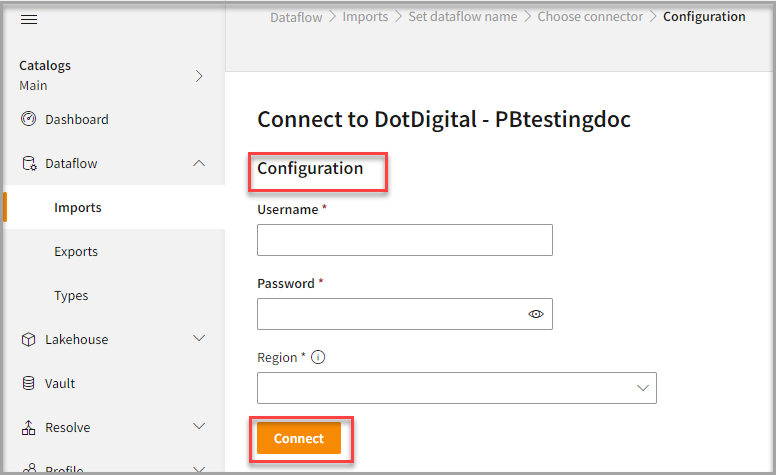
1. Enter your credentials such as **Username**, **Password**, and **Region** to configure with the Boulevard connector.
| Configuration | Description |
| :------------------ | :------------------------------------------------------------------------------------ |
| Region | Based on an API endpoint, it allows you to import data only for a particular region. |
| r1 | Allows you to use an API endpoint to import data for the **Europe** region. |
| r2 | Allows you to use an API endpoint to import data for the **North America** region. |
| r3 | Allows you to use an API endpoint to import data for the **Asia Pacific** region. |
2. Enter your [credentials](https://kwicloud9docs.com/kwi-api-details/) such as **Username**, **Password**, and **Region** to configure with the Dotdigital connector. For details about the Dotdigital account, click [Get account information](https://developer.dotdigital.com/reference/get-account-information). If you want to create an API user, refer to the [setting up your API user](https://developer.dotdigital.com/docs/getting-started-with-the-api). For more information about API endpoints and regions, see [API conventions](https://developer.dotdigital.com/docs/api-conventions).
3. Click **Connect**.
## To configure Dotdigital
Follow the below steps to configure the connection to Dotdigital:
1. Enter your credentials such as **Username**, **Password**, and **Region** to configure with the Boulevard connector.
| Configuration | Description |
| :------------------ | :------------------------------------------------------------------------------------ |
| Region | Based on an API endpoint, it allows you to import data only for a particular region. |
| r1 | Allows you to use an API endpoint to import data for the **Europe** region. |
| r2 | Allows you to use an API endpoint to import data for the **North America** region. |
| r3 | Allows you to use an API endpoint to import data for the **Asia Pacific** region. |
2. Enter your [credentials](https://kwicloud9docs.com/kwi-api-details/) such as **Username**, **Password**, and **Region** to configure with the Dotdigital connector. For details about the Dotdigital account, click [Get account information](https://developer.dotdigital.com/reference/get-account-information). If you want to create an API user, refer to the [setting up your API user](https://developer.dotdigital.com/docs/getting-started-with-the-api). For more information about API endpoints and regions, see [API conventions](https://developer.dotdigital.com/docs/api-conventions).
3. Click **Connect**.
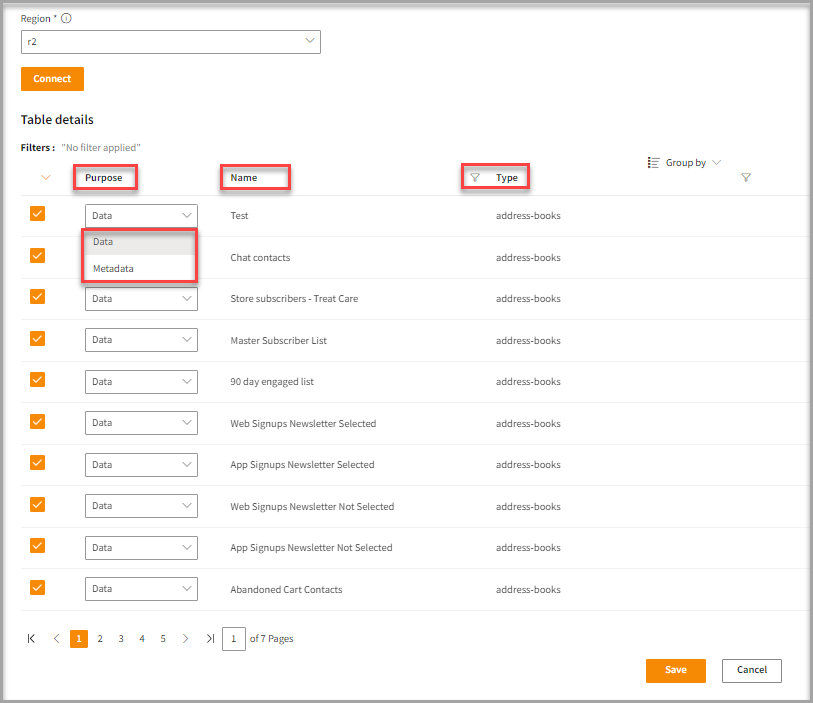 4. You can enter the **Table Details** to process the data.
In the **Table Details**, all address-books and campaigns are selected by default. Also, you can mark only those address-books or campaigns that you want to import and process the data. For example, to import customer data from the address book and marketing campaigns, you can check only those which contain customer information, such as name, email, address, and contact details.
| Item | Description |
| :------------------------ | :------------------------------------------------------------ |
| Purpose | Option to assign a purpose (Data or Metadata) for each table. |
| Data | Loads customer data |
| Metadata | Loads Metadata |
| File Name | Displays the name of the file that you imported. |
| Table Name | Displays the imported table name. |
5. Click **Save** to apply the changes.
## Run, edit, and delete the imported data
1. After saving the connection, the Dotdigital connector appears on the Dataflow page. Also, you can see the list of created tables in the [Databases](https://skypointcdpdocs.z22.web.core.windows.net/docs/entities.html) section.
4. You can enter the **Table Details** to process the data.
In the **Table Details**, all address-books and campaigns are selected by default. Also, you can mark only those address-books or campaigns that you want to import and process the data. For example, to import customer data from the address book and marketing campaigns, you can check only those which contain customer information, such as name, email, address, and contact details.
| Item | Description |
| :------------------------ | :------------------------------------------------------------ |
| Purpose | Option to assign a purpose (Data or Metadata) for each table. |
| Data | Loads customer data |
| Metadata | Loads Metadata |
| File Name | Displays the name of the file that you imported. |
| Table Name | Displays the imported table name. |
5. Click **Save** to apply the changes.
## Run, edit, and delete the imported data
1. After saving the connection, the Dotdigital connector appears on the Dataflow page. Also, you can see the list of created tables in the [Databases](https://skypointcdpdocs.z22.web.core.windows.net/docs/entities.html) section.
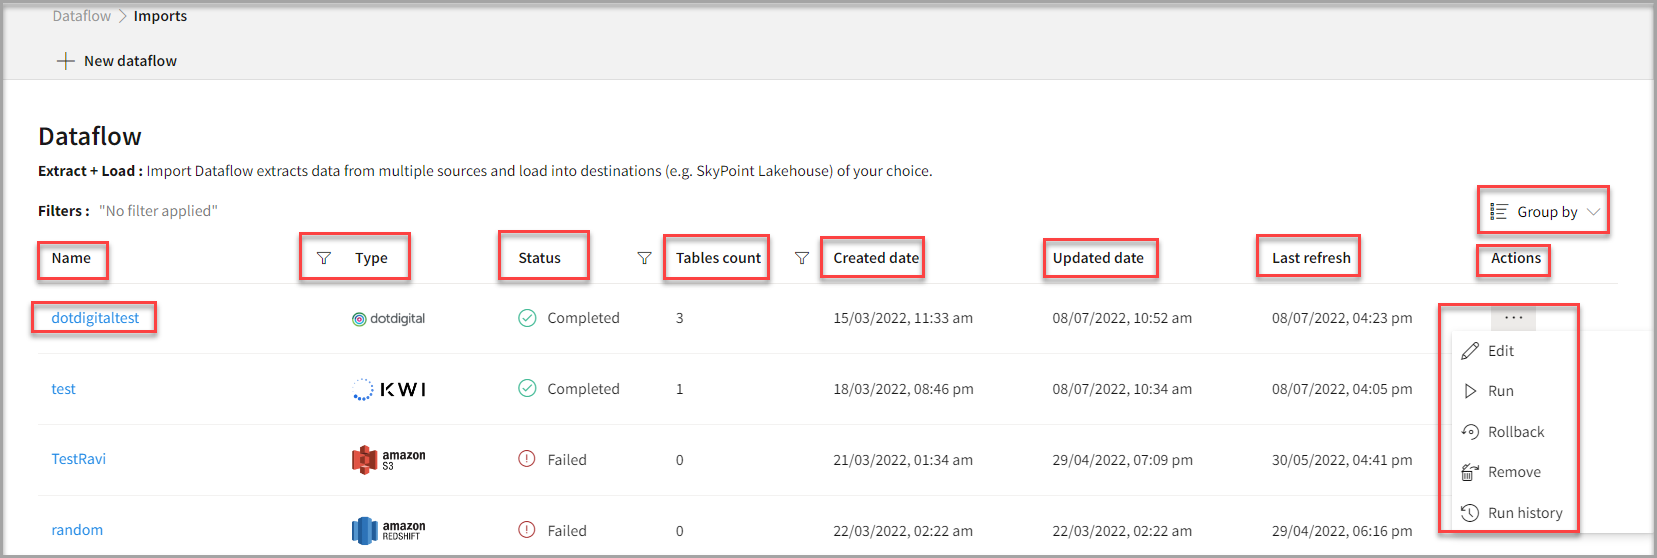 | Item | Description |
| :----------- | :------------------------------------------------------------------------------ |
| Name | Displays the name of the Dataflow. |
| Type | Displays connector type symbol. |
| Status | Indicates whether the data is imported successfully. |
| Tables Count | Displays the number of tables. |
| Created Date | Displays date of creation. |
| Updated Date | Displays last modified date. |
| Last Refresh | Displays the latest refresh date, which updates each time you refresh the data. |
| Group by | Option to view the items in a specific Group (For example, name, type, status). |
2. Select the horizontal ellipsis in the **Actions** column and do the following:
| If you want to | Then |
| :----------------------------------- | :------------------------------------------------------------------------------------------------- |
| Modify the Dataflow | Select **Edit** and modify the Dataflow. Click **Save** to apply your changes. |
| Execute the Dataflow | Select **Run**. |
| Bring the data to its previous state | Select **Rollback**. |
| Delete the Dataflow | Select **Remove** and then click the **Delete** button. All tables in the data source get deleted. |
| See the run history of the Dataflow | Select **Run History**. |
You can view the error message for any data import failures from a data source by navigating to Dataflow and checking under **Run history** > **Description**.
## Next step
After completing the data import, start the [Master Data Management (MDM) - Stitch](stitch.md) process to develop a unified view of your customers.
| Item | Description |
| :----------- | :------------------------------------------------------------------------------ |
| Name | Displays the name of the Dataflow. |
| Type | Displays connector type symbol. |
| Status | Indicates whether the data is imported successfully. |
| Tables Count | Displays the number of tables. |
| Created Date | Displays date of creation. |
| Updated Date | Displays last modified date. |
| Last Refresh | Displays the latest refresh date, which updates each time you refresh the data. |
| Group by | Option to view the items in a specific Group (For example, name, type, status). |
2. Select the horizontal ellipsis in the **Actions** column and do the following:
| If you want to | Then |
| :----------------------------------- | :------------------------------------------------------------------------------------------------- |
| Modify the Dataflow | Select **Edit** and modify the Dataflow. Click **Save** to apply your changes. |
| Execute the Dataflow | Select **Run**. |
| Bring the data to its previous state | Select **Rollback**. |
| Delete the Dataflow | Select **Remove** and then click the **Delete** button. All tables in the data source get deleted. |
| See the run history of the Dataflow | Select **Run History**. |
You can view the error message for any data import failures from a data source by navigating to Dataflow and checking under **Run history** > **Description**.
## Next step
After completing the data import, start the [Master Data Management (MDM) - Stitch](stitch.md) process to develop a unified view of your customers.