> ## Documentation Index
> Fetch the complete documentation index at: https://docs.skypoint.ai/llms.txt
> Use this file to discover all available pages before exploring further.
#
# Connecting to Azure Blob Storage
## Overview
Azure Blob Storage helps you to store massive amounts of unstructured data in the Blob storage. You can use skyData's built-in connector for importing data from Azure Blob Storage.
This document will guide you through the process of connecting Azure Blob Storage to skyData.
## Prerequisite
You will need the following details to configure and import data using [Azure Blob Storage](https://azure.microsoft.com/en-in/free/):
* Storage Account Name
* Account Key
* Storage Path.
You can refer to the Setting up Azure Blob Storage document to learn more about the Prerequisites.
## To import data using Azure Blob Storage connector
Follow the below steps to create a new dataflow for the Azure Blob Storage import connector:
1. Go to **Dataflow > Imports**.
2. Click **New dataflow**.
The **Set dataflow name** page appears.
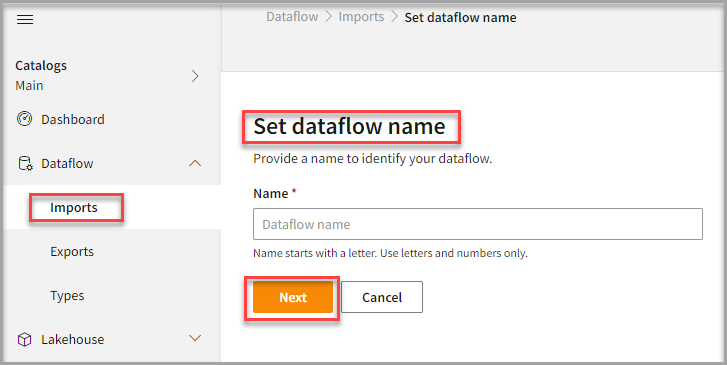 3. In the **Set dataflow name** page, type dataflow name in the **Name** text area.
4. Click **Next**.
The **Choose connector** page appears.
3. In the **Set dataflow name** page, type dataflow name in the **Name** text area.
4. Click **Next**.
The **Choose connector** page appears.
 ## To add Azure Blob Storage connector
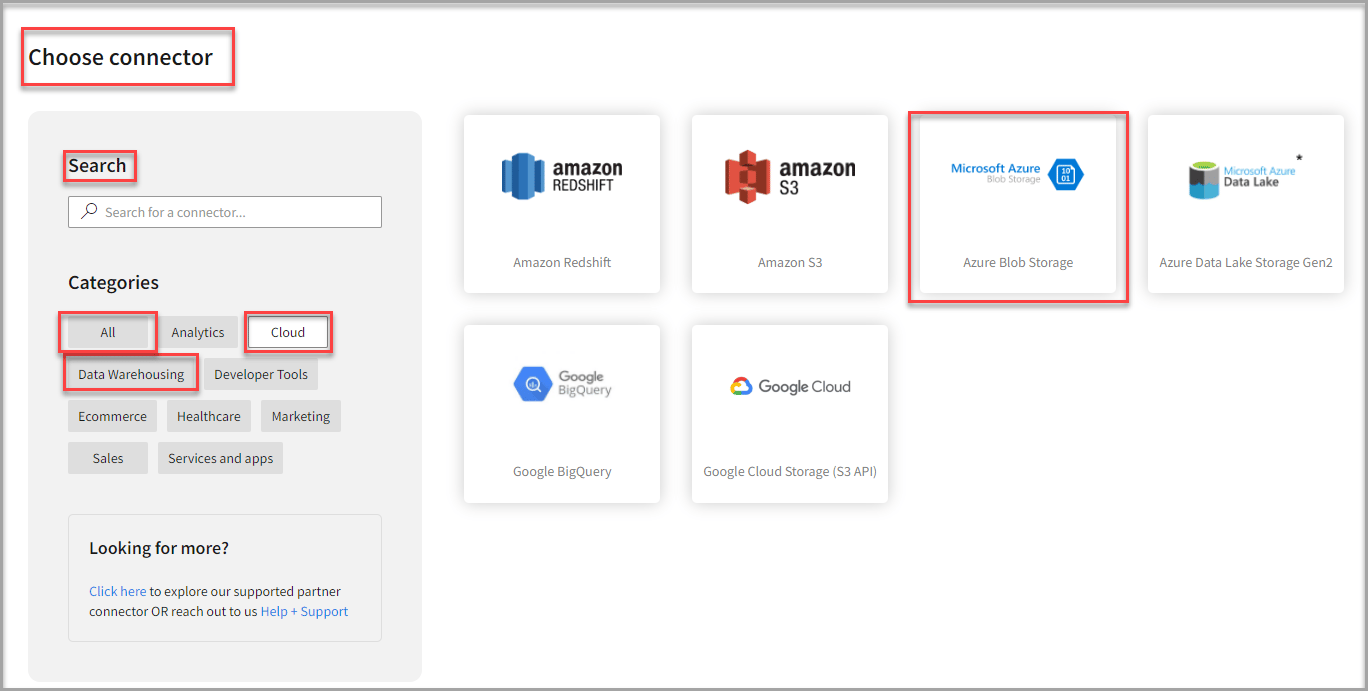
1. In the **Choose connector** page, select **Azure Blob Storage** connector.
You can also use the **Search** feature to find the connector. The **Azure Blob Storage** connector is located under the **Cloud** and **Data Warehousing** category.
## To add Azure Blob Storage connector
1. In the **Choose connector** page, select **Azure Blob Storage** connector.
You can also use the **Search** feature to find the connector. The **Azure Blob Storage** connector is located under the **Cloud** and **Data Warehousing** category.
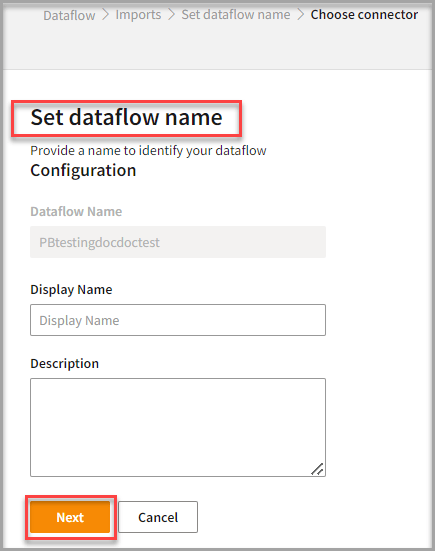 2. Enter **Display Name** for your dataflow in the text area.
3. Enter **Description** for your dataflow in the text area.
4. Click **Next**.
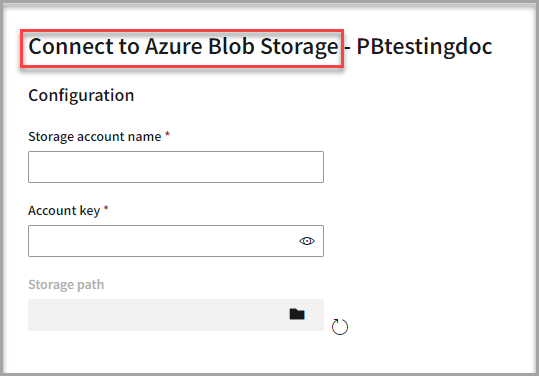
The **Connect to Azure Blob Storage** page appears.
2. Enter **Display Name** for your dataflow in the text area.
3. Enter **Description** for your dataflow in the text area.
4. Click **Next**.
The **Connect to Azure Blob Storage** page appears.
 ## To configure Azure Blob Storage
Follow the below steps to configure the connection to **Azure Blob Storage**:
1. Enter the **Storage account name** in the text area.
2. Enter the **Account key** in the text area.
3. Click the **Folder icon** in the **Storage path** text area.
Once you select the storage path, the **Table Details** columns appear.
## To configure Azure Blob Storage
Follow the below steps to configure the connection to **Azure Blob Storage**:
1. Enter the **Storage account name** in the text area.
2. Enter the **Account key** in the text area.
3. Click the **Folder icon** in the **Storage path** text area.
Once you select the storage path, the **Table Details** columns appear.
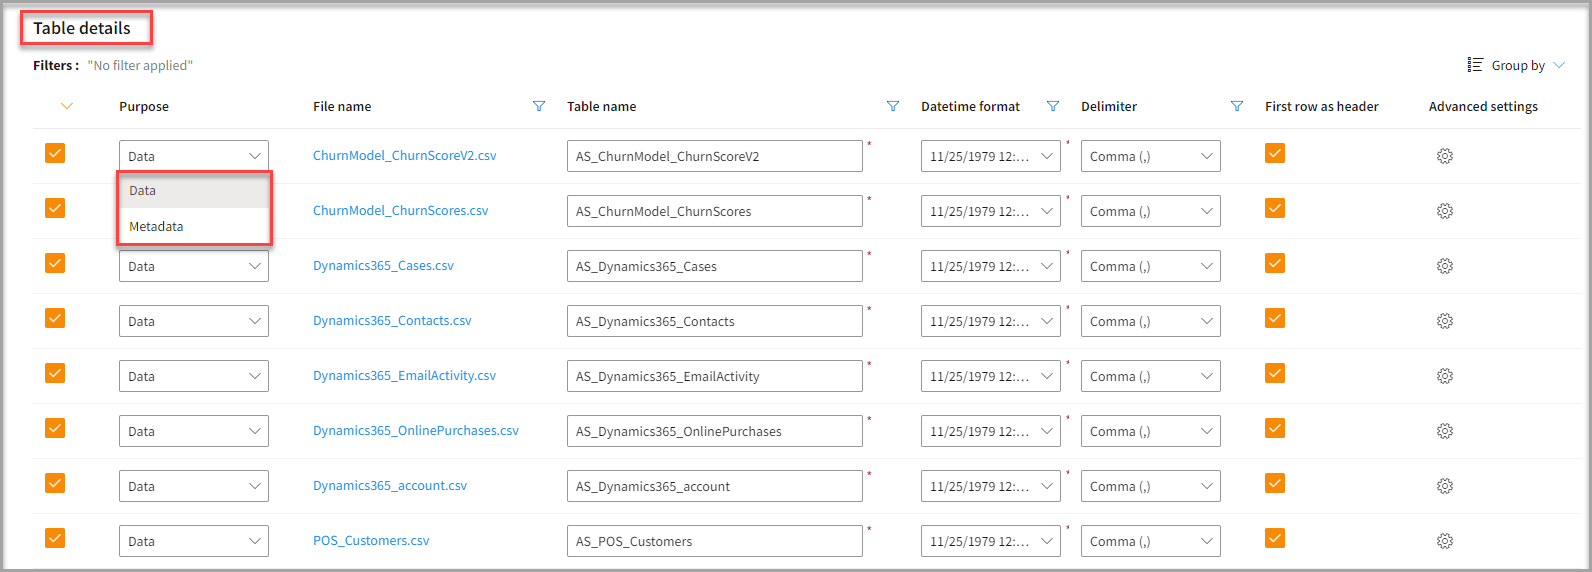 4. Enter the **Table Details** to process the data.
| Item | Description |
| :------------------ | :----------------------------------------------------------------------------------------------- |
| Purpose | Option to assign a purpose (Data or Metadata) for each table. |
| Data | Load customer data. |
| Metadata | Load Metadata. |
| File Name | Displays the name of the file that you imported. |
| Table Name | Displays the imported table name. |
| Datetime format | Displays a number of **Datetime Formats** and skyData is set to automatically detect them. |
| Delimiter | Displays available separators for the variables in the imported data. |
| First Row as Header | Check the box for the system to automatically collect the data according to the Header Contents. |
| Advanced Settings | Select the options to fine tune the Import process with minute details. |
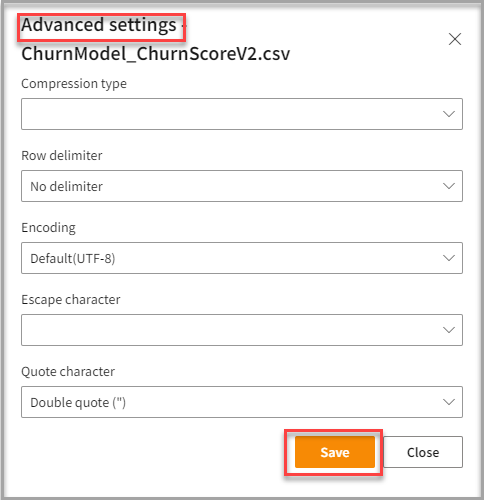
5. Click the **Advanced settings** for your desired file name.
The **Advanced settings** pop-up appears.
4. Enter the **Table Details** to process the data.
| Item | Description |
| :------------------ | :----------------------------------------------------------------------------------------------- |
| Purpose | Option to assign a purpose (Data or Metadata) for each table. |
| Data | Load customer data. |
| Metadata | Load Metadata. |
| File Name | Displays the name of the file that you imported. |
| Table Name | Displays the imported table name. |
| Datetime format | Displays a number of **Datetime Formats** and skyData is set to automatically detect them. |
| Delimiter | Displays available separators for the variables in the imported data. |
| First Row as Header | Check the box for the system to automatically collect the data according to the Header Contents. |
| Advanced Settings | Select the options to fine tune the Import process with minute details. |
5. Click the **Advanced settings** for your desired file name.
The **Advanced settings** pop-up appears.
 | Item | Description |
| :--------------- | :------------------------------------------------------------------------------------------------------------------------------------------------------------------------------------------ |
| Compression type | Method that is used for compressing the details from source, Azure Blob Storage. |
| Row delimiter | A separator that identifies the boundaries of the flow of a data stream. In case, a different separator is used in it, the information requires change for more accuracy in data ingestion. |
| Encoding | As the data comes in data stream, there is a type of encoding used for deciphering it. The default encoding is **UTF-8**. |
| Escape character | It is a particular case of metacharacters that is given an identification of start or end. You can manually select it from the drop-down list. |
| Quote character | You can select one of the advanced Quote characters mentioned in the drop-down list. |
6. Click **Save** on the **Advanced settings** pop-up to save the advanced settings.
7. Click **Save**.
## Run, edit, and delete the imported data
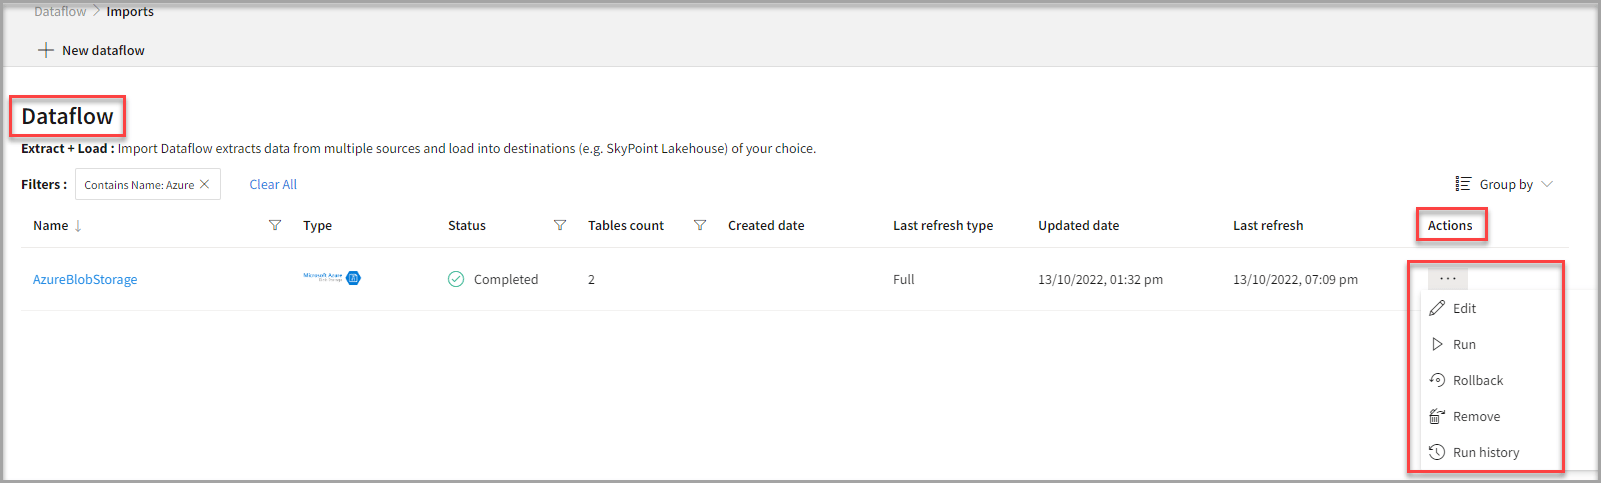
Once you save the connector, the Azure Blob Storage connector gets displayed in the list of tables created in the Dataflow page.
| Item | Description |
| :--------------- | :------------------------------------------------------------------------------------------------------------------------------------------------------------------------------------------ |
| Compression type | Method that is used for compressing the details from source, Azure Blob Storage. |
| Row delimiter | A separator that identifies the boundaries of the flow of a data stream. In case, a different separator is used in it, the information requires change for more accuracy in data ingestion. |
| Encoding | As the data comes in data stream, there is a type of encoding used for deciphering it. The default encoding is **UTF-8**. |
| Escape character | It is a particular case of metacharacters that is given an identification of start or end. You can manually select it from the drop-down list. |
| Quote character | You can select one of the advanced Quote characters mentioned in the drop-down list. |
6. Click **Save** on the **Advanced settings** pop-up to save the advanced settings.
7. Click **Save**.
## Run, edit, and delete the imported data
Once you save the connector, the Azure Blob Storage connector gets displayed in the list of tables created in the Dataflow page.
 | Item | Description |
| :---------------- | :------------------------------------------------------------------------------------------------------------------ |
| Name | Displays the name of the imported Dataflow. |
| Type | Displays connector type symbol. |
| Status | Indicates whether the data is imported successfully. |
| Tables Count | Displays the number of tables. |
| Created Date | Displays date of creation. |
| Last refresh type | Displays the refresh value. After the last data refresh, it will indicate whether the value is Full or Incremental. |
| Updated Date | Displays last modified date. |
| Last Refresh | Displays the latest refresh date, which updates each time you refresh the data. |
| Group by | Option to view the items in a specific Group (For example, name, type, status). |
* Select the horizontal ellipsis in the Actions column and do the following:
| If you want to | Then |
| :----------------------------------- | :------------------------------------------------------------------------------------------------- |
| Modify the Dataflow | Select **Edit** and modify the Dataflow. Click **Save** to apply your changes. |
| Execute the Dataflow | Select **Run**. |
| Bring the data to its previous state | Select **Rollback**. |
| Delete the Dataflow | Select **Remove** and then click the **Delete** button. All tables in the data source get deleted. |
| See the run history of the Dataflow | Select **Run** history. |
## Next step
After completing the data import, start the [Master Data Management (MDM) - Stitch](stitch.md) process to develop a unified view of your customers.
| Item | Description |
| :---------------- | :------------------------------------------------------------------------------------------------------------------ |
| Name | Displays the name of the imported Dataflow. |
| Type | Displays connector type symbol. |
| Status | Indicates whether the data is imported successfully. |
| Tables Count | Displays the number of tables. |
| Created Date | Displays date of creation. |
| Last refresh type | Displays the refresh value. After the last data refresh, it will indicate whether the value is Full or Incremental. |
| Updated Date | Displays last modified date. |
| Last Refresh | Displays the latest refresh date, which updates each time you refresh the data. |
| Group by | Option to view the items in a specific Group (For example, name, type, status). |
* Select the horizontal ellipsis in the Actions column and do the following:
| If you want to | Then |
| :----------------------------------- | :------------------------------------------------------------------------------------------------- |
| Modify the Dataflow | Select **Edit** and modify the Dataflow. Click **Save** to apply your changes. |
| Execute the Dataflow | Select **Run**. |
| Bring the data to its previous state | Select **Rollback**. |
| Delete the Dataflow | Select **Remove** and then click the **Delete** button. All tables in the data source get deleted. |
| See the run history of the Dataflow | Select **Run** history. |
## Next step
After completing the data import, start the [Master Data Management (MDM) - Stitch](stitch.md) process to develop a unified view of your customers.