> ## Documentation Index
> Fetch the complete documentation index at: https://docs.skypoint.ai/llms.txt
> Use this file to discover all available pages before exploring further.
#
# Using skyData Agents
## Overview
skyData Studio now supports AI Agents Configuration, enabling users to create, customize, and manage AI agents directly within the platform. Users can work with multiple agents, track version history, and tailor agent behavior to their specific business needs. With the Agents feature in Studio, users can manage task-specific AI settings enhancing flexibility, control, and performance across workflows.
skyData Studio provides following built-in agent templates:
* General Knowledge Agent
* Database Analyst (Jack)
* Microsoft Copilot Studio Agent (MSA)
## How to Customize and Configure the Existing Agent templates?
Navigate to the **Agents** tab within the **Applications** module on your skyData Studio dashboard. The **Manage Agents** page will appear and then select the **agent name** you'd like to configure from the panel.
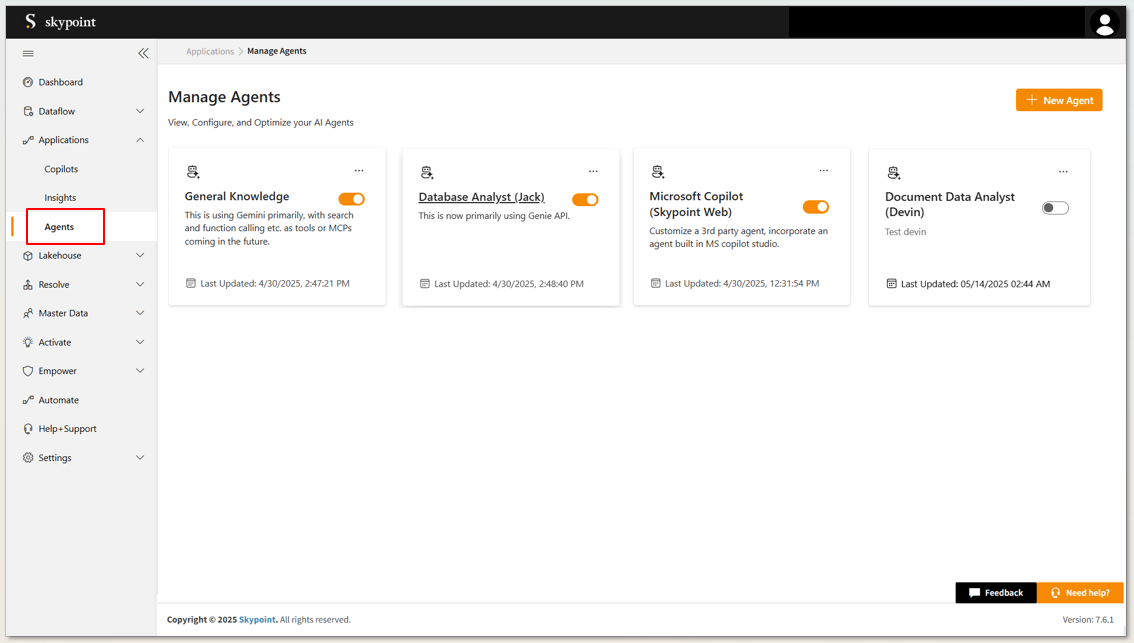 ### A. General Knowledge Agent
The General Knowledge Agent delivers context-aware responses on a wide range of topics, providing flexible support to meet diverse business needs.
From the panel, select **General Knowledge Agent**, detailed page for the agent will appear with following tabs.
* Overview
* Configuration
Follow the steps below to configure the agent:
### A. General Knowledge Agent
The General Knowledge Agent delivers context-aware responses on a wide range of topics, providing flexible support to meet diverse business needs.
From the panel, select **General Knowledge Agent**, detailed page for the agent will appear with following tabs.
* Overview
* Configuration
Follow the steps below to configure the agent:
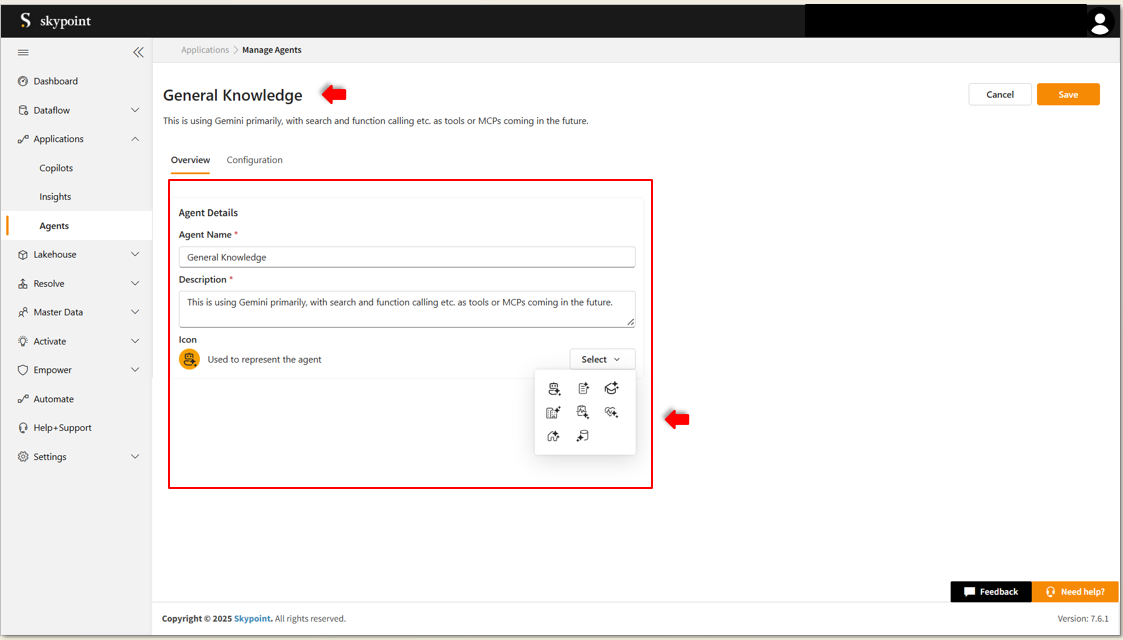 1. Enter the agent details, such as **Name** and **Description**.
2. Choose an **icon** from the drop-down menu to represent the agent.
1. Enter the agent details, such as **Name** and **Description**.
2. Choose an **icon** from the drop-down menu to represent the agent.
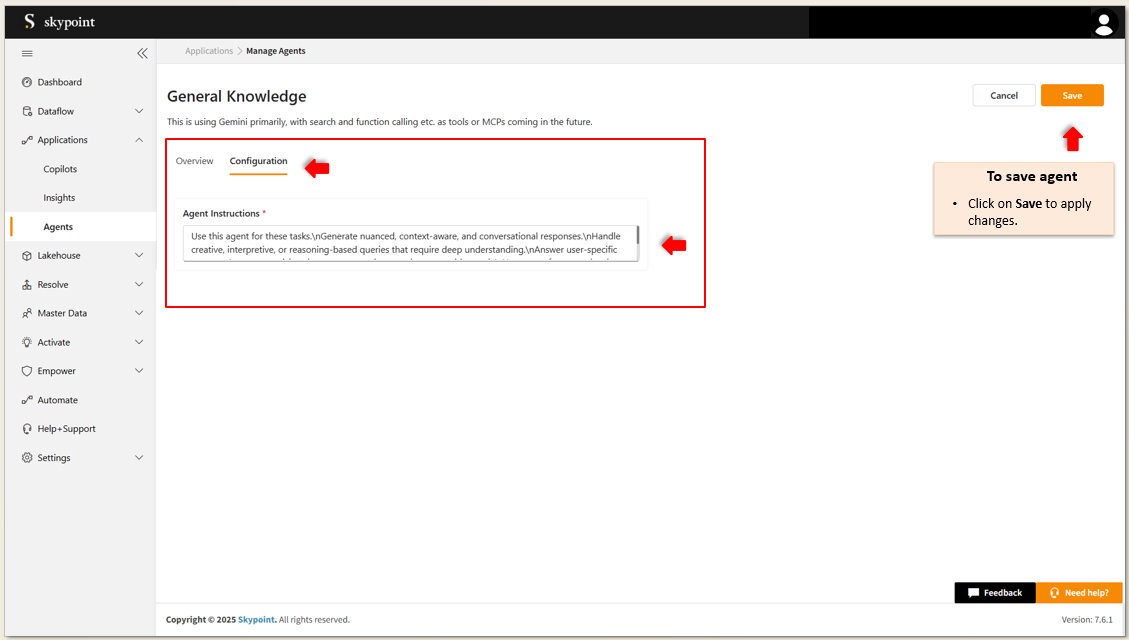 3. Inside the Configuration tab, enter the **Agent instructions** in the provided space to define the agent’s behavior.
The **Instructions** field defines the agent's behavior and tasks by providing clear directives for its responses and actions.
4. Click **Save Changes** to apply the changes.
### B. Database Analyst Agent (Jack)
The Database Analyst (Jack) Agent specializes in querying and analyzing data, offering precise insights into structured datasets to support data-driven decision-making.
From the panel, select **Database Analyst (Jack)** detailed page for the agent will appear with following tabs.
* Overview
* Configuration
* Knowledge
Follow the steps below to configure the agent:
3. Inside the Configuration tab, enter the **Agent instructions** in the provided space to define the agent’s behavior.
The **Instructions** field defines the agent's behavior and tasks by providing clear directives for its responses and actions.
4. Click **Save Changes** to apply the changes.
### B. Database Analyst Agent (Jack)
The Database Analyst (Jack) Agent specializes in querying and analyzing data, offering precise insights into structured datasets to support data-driven decision-making.
From the panel, select **Database Analyst (Jack)** detailed page for the agent will appear with following tabs.
* Overview
* Configuration
* Knowledge
Follow the steps below to configure the agent:
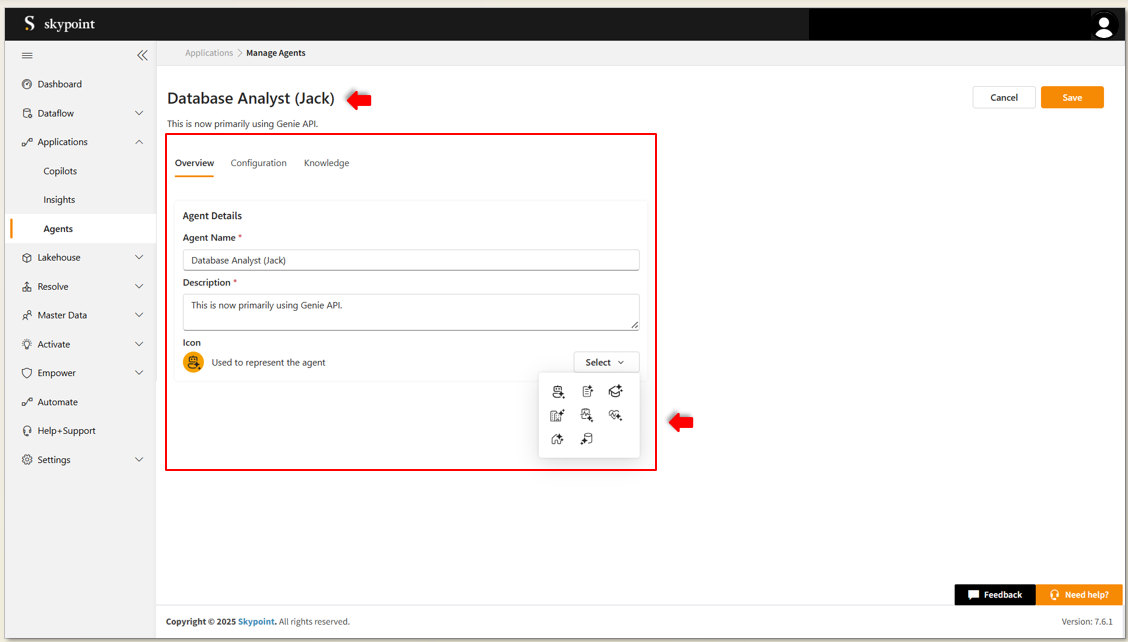 1. Enter the agent details, such as **Name** and **Description**.
2. Choose an **icon** from the drop-down menu to represent the agent.
3. Inside the **Configuration** tab.
4. Enter the **Agent instructions** to define the agent’s behavior and analysis tasks.
5. Select **Markdown LLM** from the drop-down menu to specify the model for data analysis
1. Enter the agent details, such as **Name** and **Description**.
2. Choose an **icon** from the drop-down menu to represent the agent.
3. Inside the **Configuration** tab.
4. Enter the **Agent instructions** to define the agent’s behavior and analysis tasks.
5. Select **Markdown LLM** from the drop-down menu to specify the model for data analysis
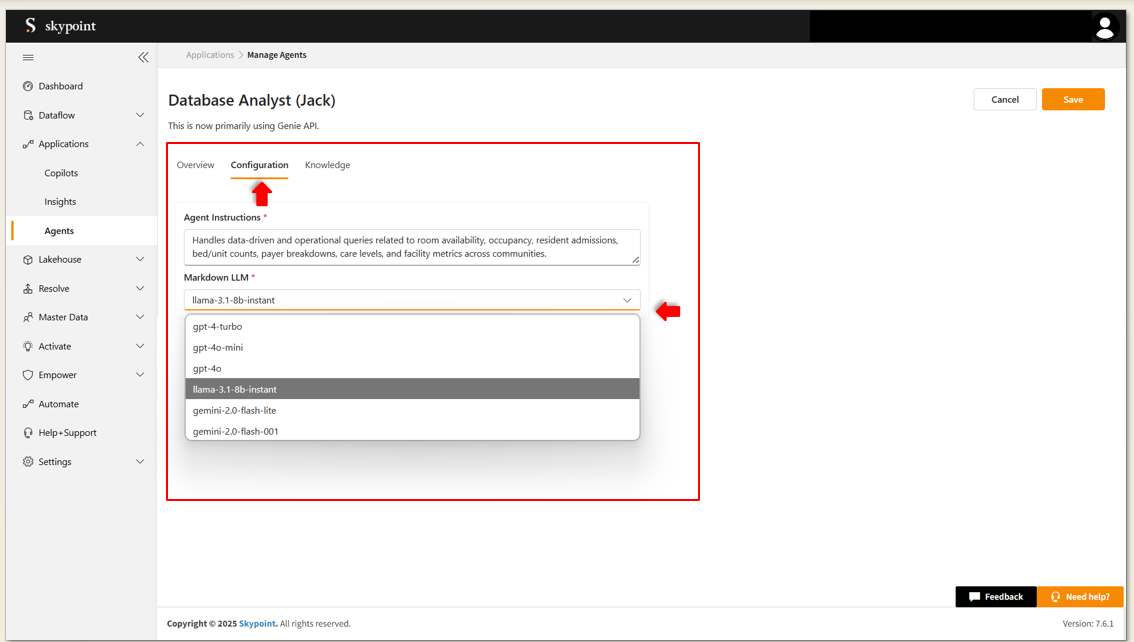 6. Click on the **Knowledge** tab to continue configuring the agent.
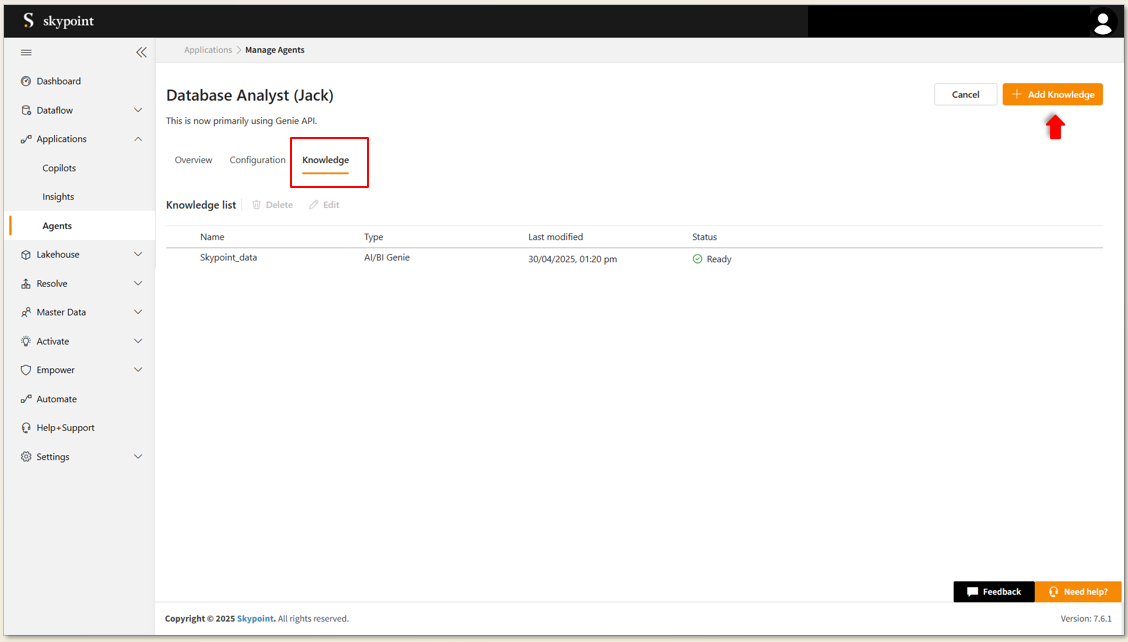 7. To add new knowledge, click the **Add Knowledge** button located at the top right corner.
Add knowledge page appears.
7. To add new knowledge, click the **Add Knowledge** button located at the top right corner.
Add knowledge page appears.
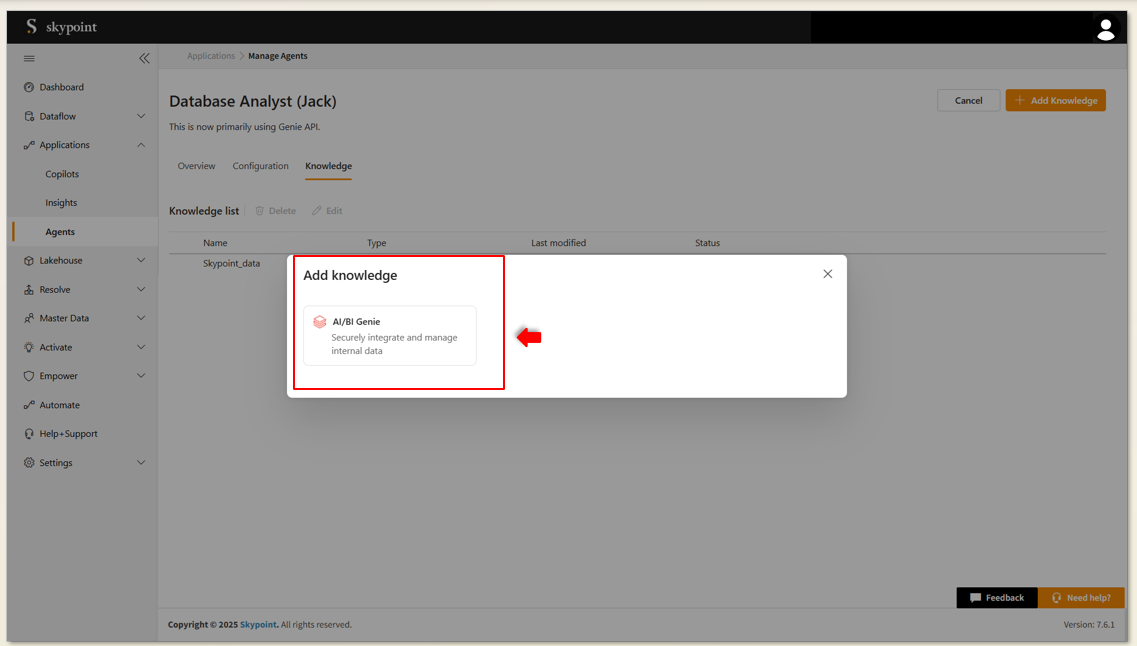 8. Click **AI/BI GENIE** knowledge card on page.
Add source details page appears
8. Click **AI/BI GENIE** knowledge card on page.
Add source details page appears
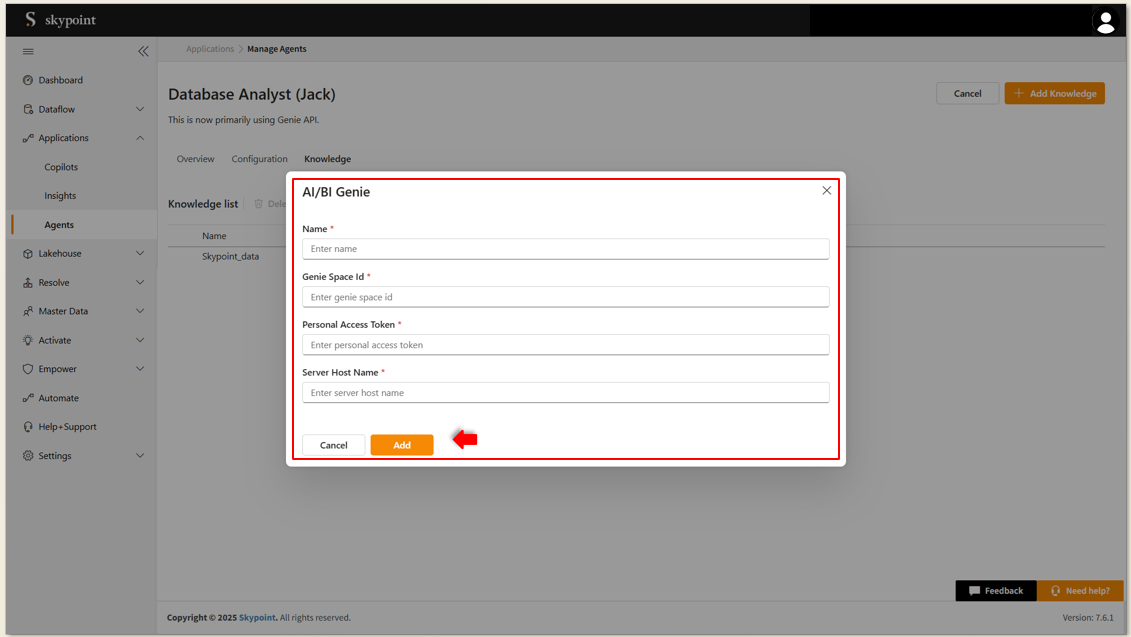 9. Enter the **Genie Space ID**, **Personal Access Token**, and **Server Host Name** in the provided fields.
10. Then, click **Add** to add the knowledge. You can see the added knowledge in the panel under the knowledge tab.
9. Enter the **Genie Space ID**, **Personal Access Token**, and **Server Host Name** in the provided fields.
10. Then, click **Add** to add the knowledge. You can see the added knowledge in the panel under the knowledge tab.
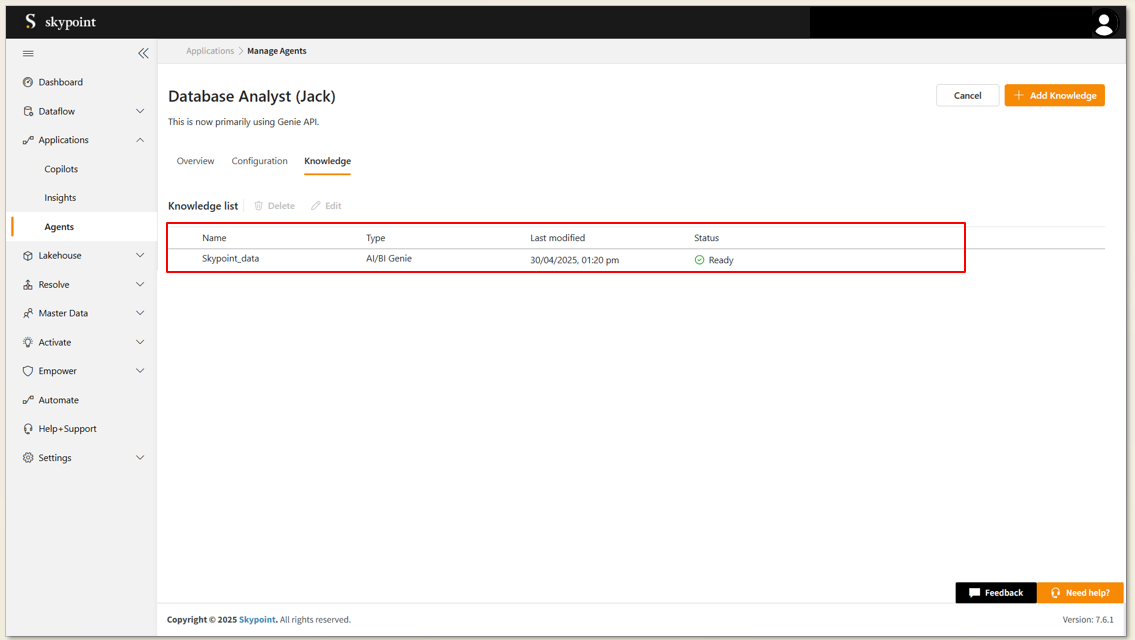 11. To modify existing knowledge, select the desired resource and click **Edit**.
12. To delete existing knowledge, select the desired knowledge resource and click the **Delete** option at the top.
13. Click on **Save Changes** to apply the changes.
### C. Microsoft Copilot Studio Agent (MSA)
The Microsoft Copilot Studio Agent (MSA) is designed to integrate with the Copilot Studio, offering powerful capabilities for task automation and process management.
From the panel, select **Microsoft Copilot Studio Agent (MSA)**. detailed page for the agent will appear with following tabs.
* Overview
* Configuration
Follow the steps below to configure the agent:
11. To modify existing knowledge, select the desired resource and click **Edit**.
12. To delete existing knowledge, select the desired knowledge resource and click the **Delete** option at the top.
13. Click on **Save Changes** to apply the changes.
### C. Microsoft Copilot Studio Agent (MSA)
The Microsoft Copilot Studio Agent (MSA) is designed to integrate with the Copilot Studio, offering powerful capabilities for task automation and process management.
From the panel, select **Microsoft Copilot Studio Agent (MSA)**. detailed page for the agent will appear with following tabs.
* Overview
* Configuration
Follow the steps below to configure the agent:
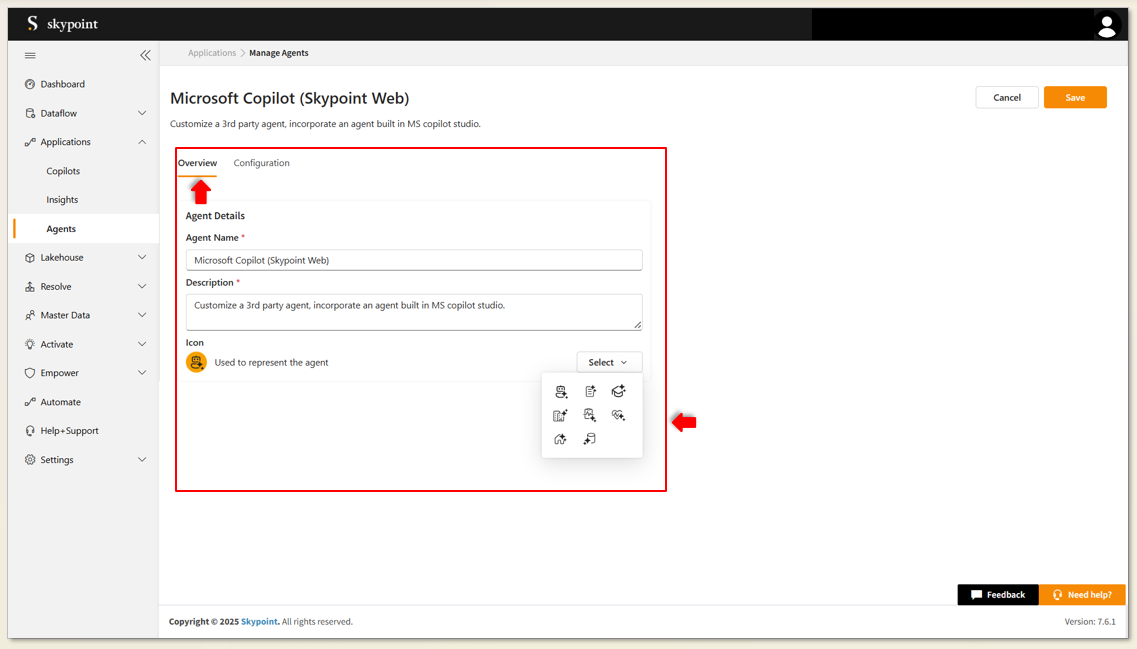 1. Enter the agent details, such as **Name** and **Description**.
2. Choose an **icon** from the drop-down menu to represent the agent.
3. Inside the Configuration tab, enter the **Agent instructions** in the provided space to define the agent’s behavior.
1. Enter the agent details, such as **Name** and **Description**.
2. Choose an **icon** from the drop-down menu to represent the agent.
3. Inside the Configuration tab, enter the **Agent instructions** in the provided space to define the agent’s behavior.
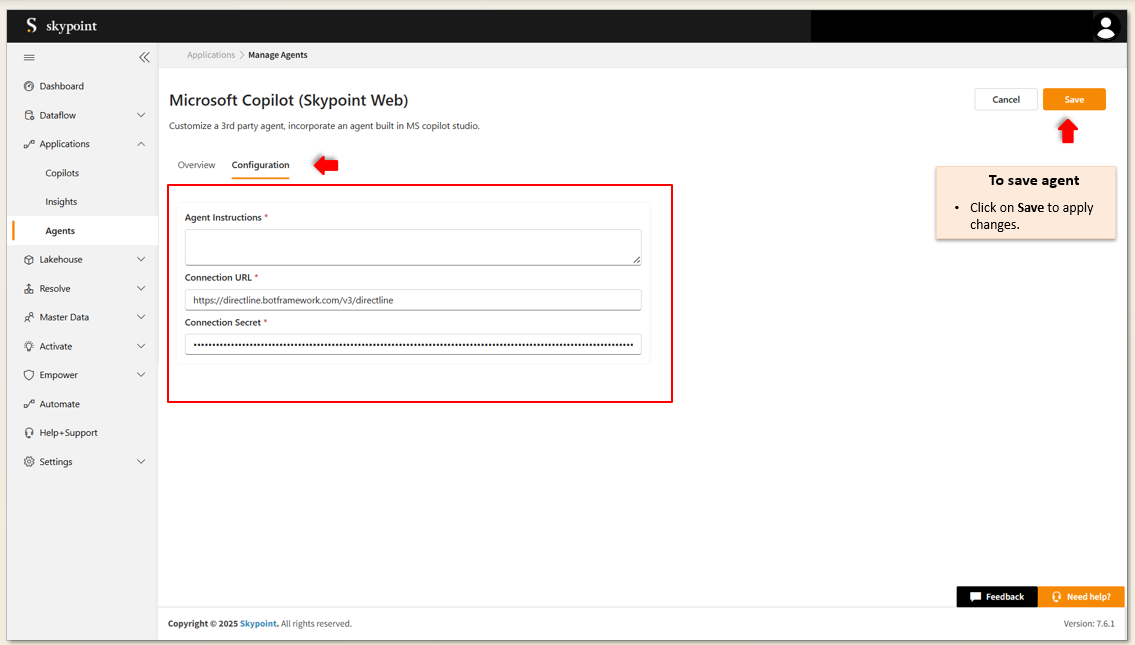 4. Enter the **Connection Secret** and **Connection URL** to link the agent with the relevant system or environment.
5. Click on **Save** to apply the changes.
### D. Document Data Analyst Agent (Devin)
The Document Data Analyst Agent (Devin) focuses on processing and analyzing document-based data, extracting key insights from unstructured content to enhance decision-making.
From the panel, select **Document Data Analyst Agent (Devin)** detailed page for the agent will appear with following tabs
* Overview
* Configuration
* Knowledge
Follow the steps below to configure the agent:
4. Enter the **Connection Secret** and **Connection URL** to link the agent with the relevant system or environment.
5. Click on **Save** to apply the changes.
### D. Document Data Analyst Agent (Devin)
The Document Data Analyst Agent (Devin) focuses on processing and analyzing document-based data, extracting key insights from unstructured content to enhance decision-making.
From the panel, select **Document Data Analyst Agent (Devin)** detailed page for the agent will appear with following tabs
* Overview
* Configuration
* Knowledge
Follow the steps below to configure the agent:
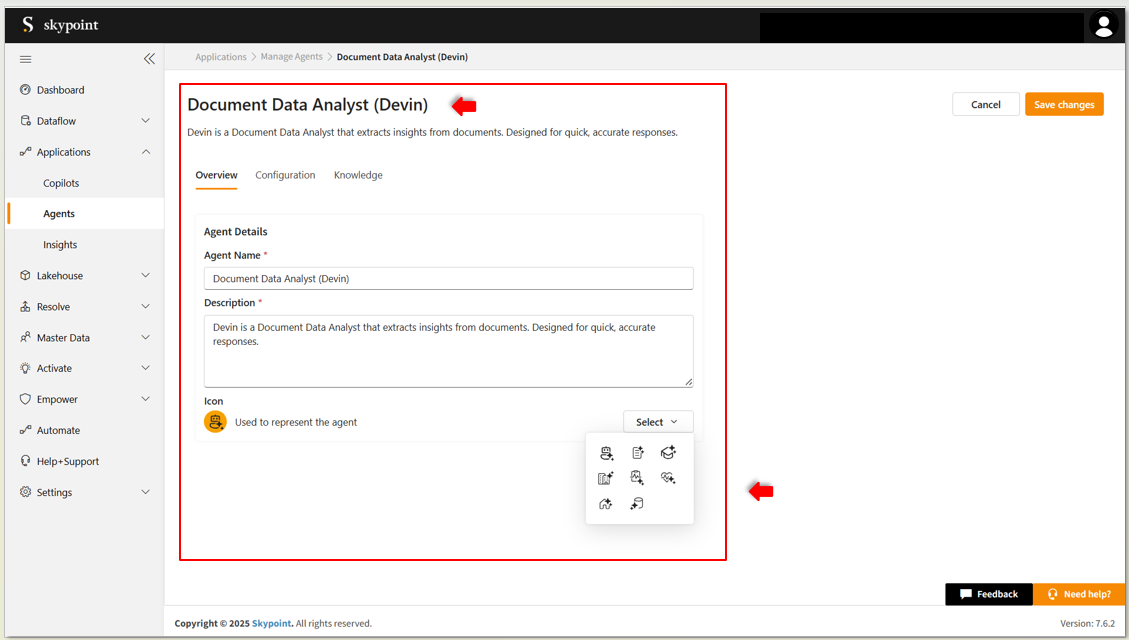 1. Enter the agent details, such as **Name** and **Description**
2. Choose an **icon** from the drop-down menu to represent the agent.
3. In the provided space, enter the **Agent instructions** to define the agent’s behavior for document processing.
1. Enter the agent details, such as **Name** and **Description**
2. Choose an **icon** from the drop-down menu to represent the agent.
3. In the provided space, enter the **Agent instructions** to define the agent’s behavior for document processing.
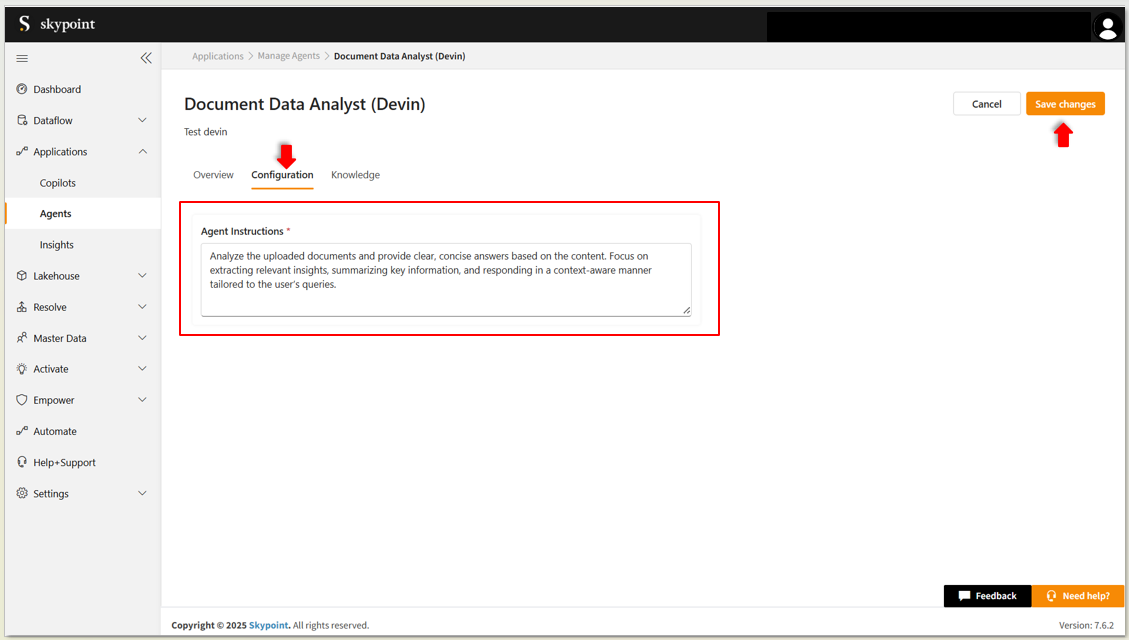 4. Click on the **Knowledge** tab to continue configuring the agent.
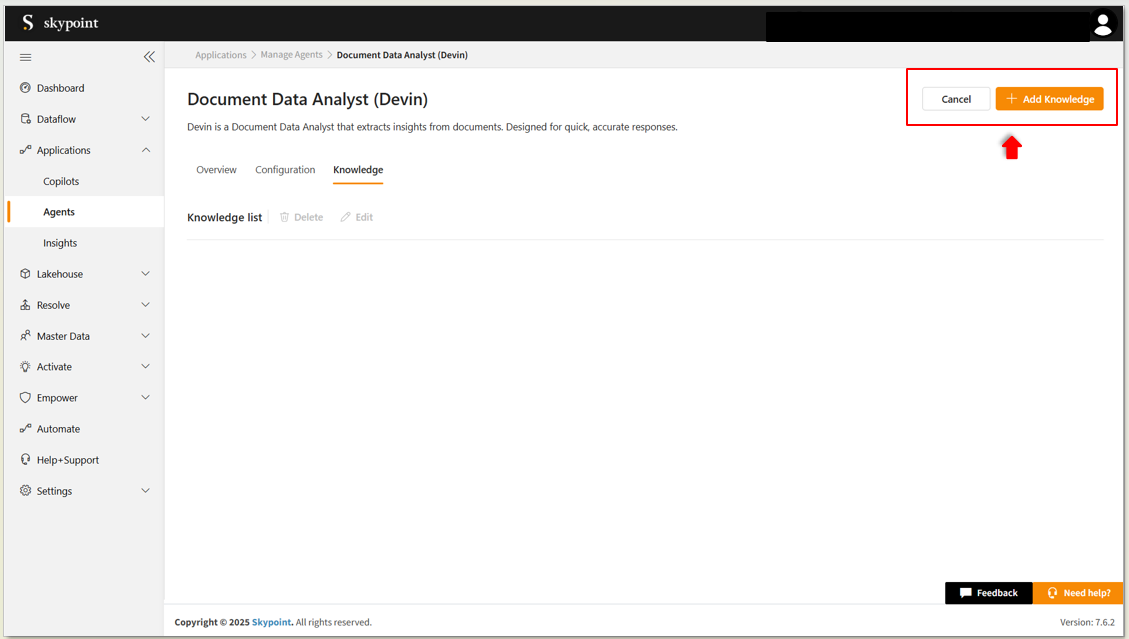 5. To add new knowledge, click the **Add Knowledge** button located at the top right corner.
Add knowledge page appears
5. To add new knowledge, click the **Add Knowledge** button located at the top right corner.
Add knowledge page appears
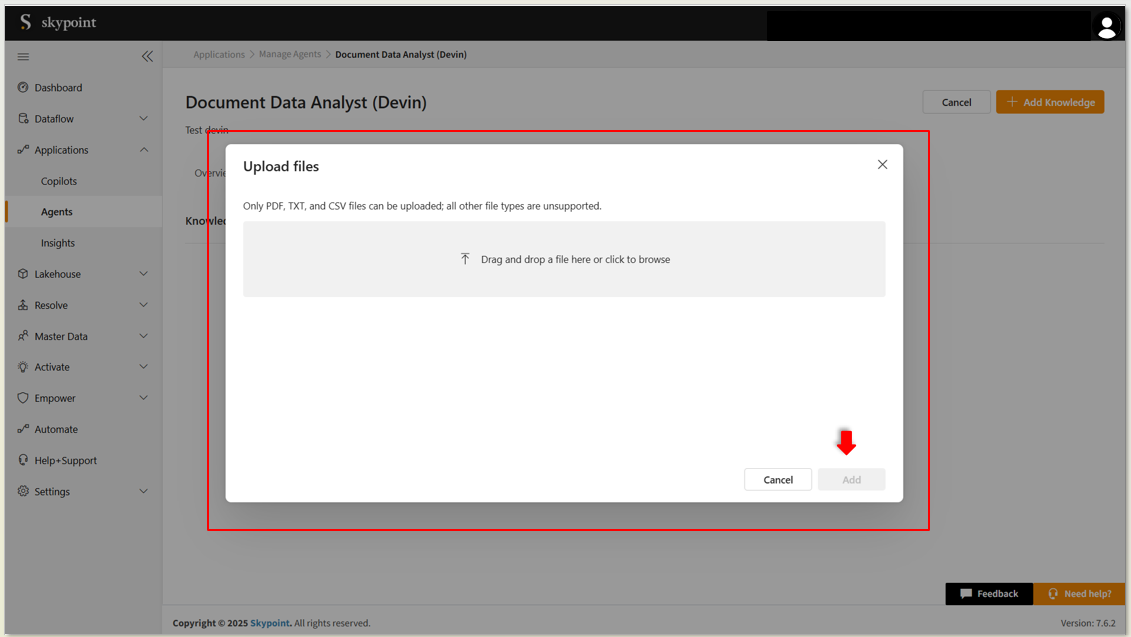
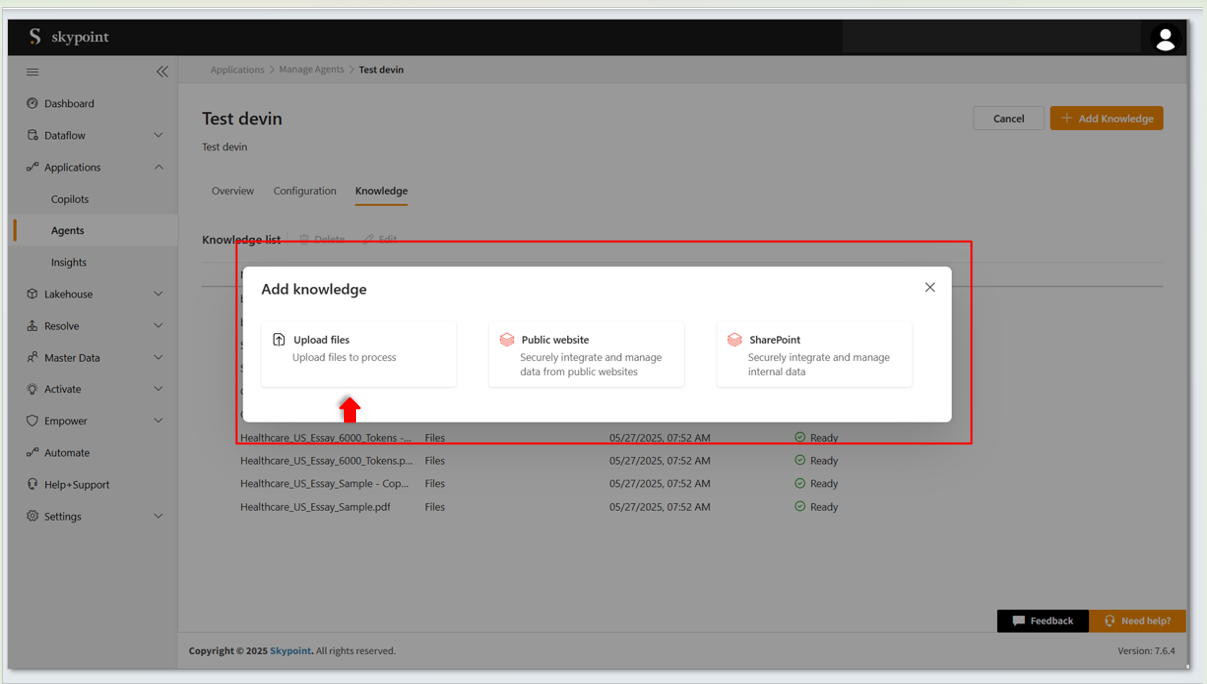 6. Drag and drop the required file or click **Browse Document** to upload it.
 7. To connect **public websites** to the agent, click on the Public Website tab.
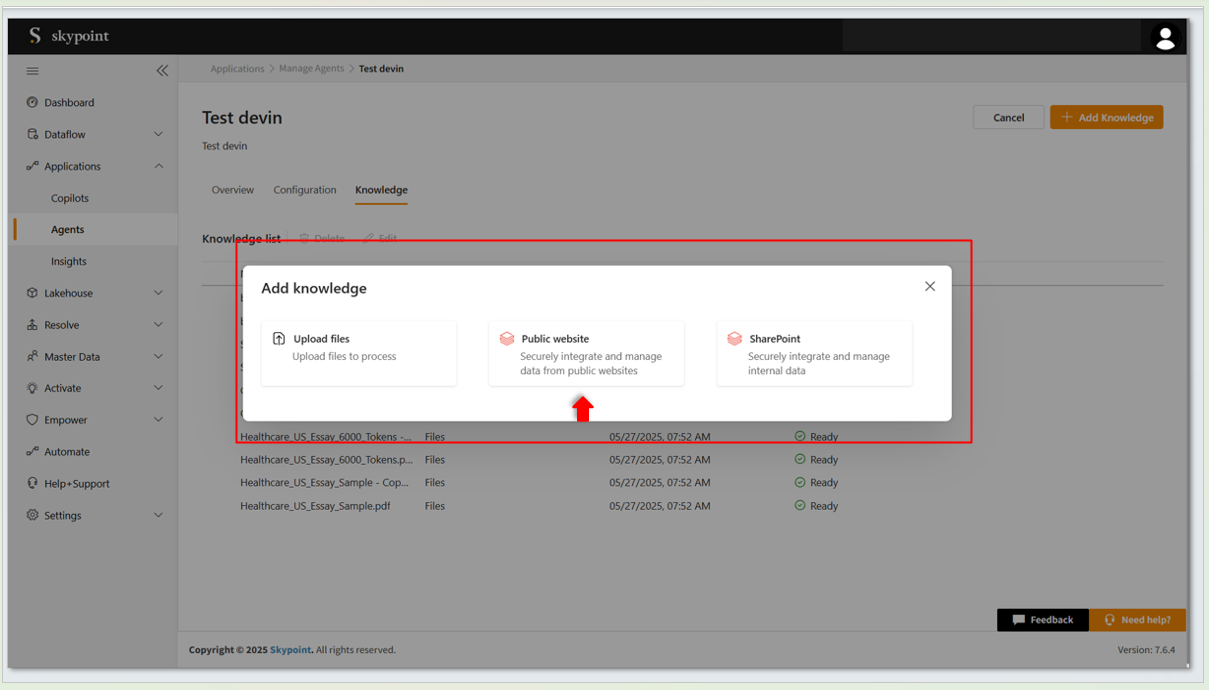 Public Website page appears.
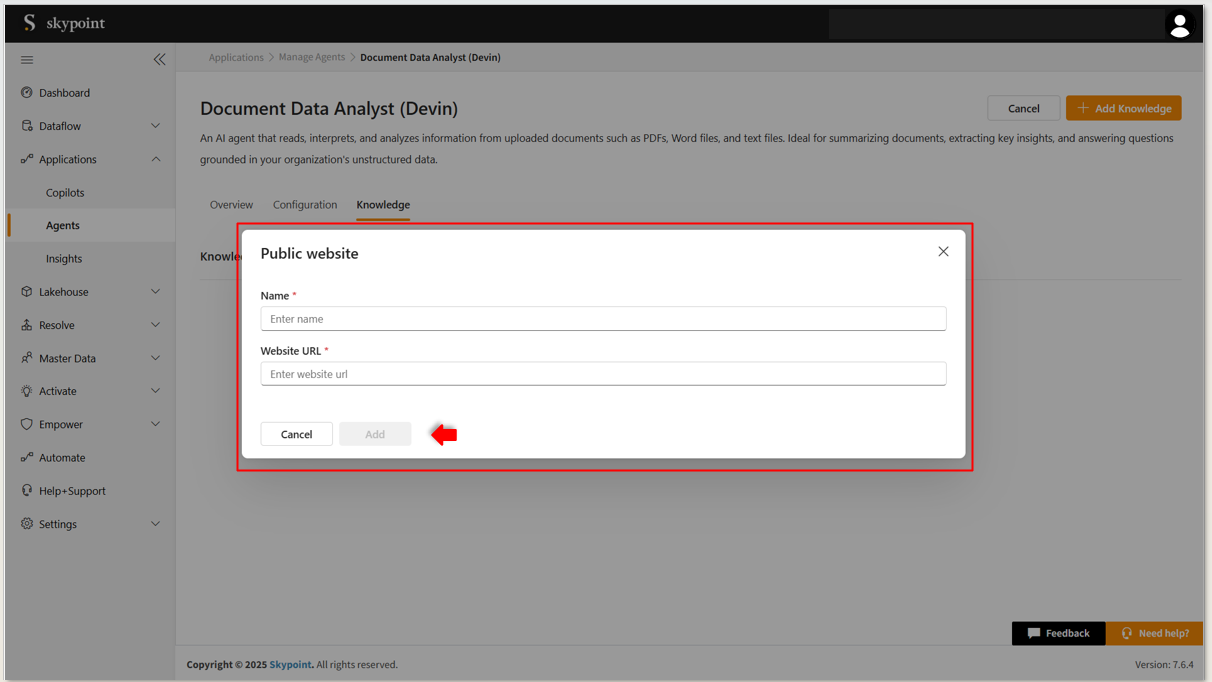 8. Enter the website's URL.
9. Click **Add** to include the public website.
10. Click on **Save** to add the knowledge.
Before configuring **SharePoint** in the Devin Agent, you must first establish a SharePoint connection.
11. Navigate to **Dataflow** and click on the **Connections** tab.
12. Click on **Setup** of SharePoint connector.
8. Enter the website's URL.
9. Click **Add** to include the public website.
10. Click on **Save** to add the knowledge.
Before configuring **SharePoint** in the Devin Agent, you must first establish a SharePoint connection.
11. Navigate to **Dataflow** and click on the **Connections** tab.
12. Click on **Setup** of SharePoint connector.
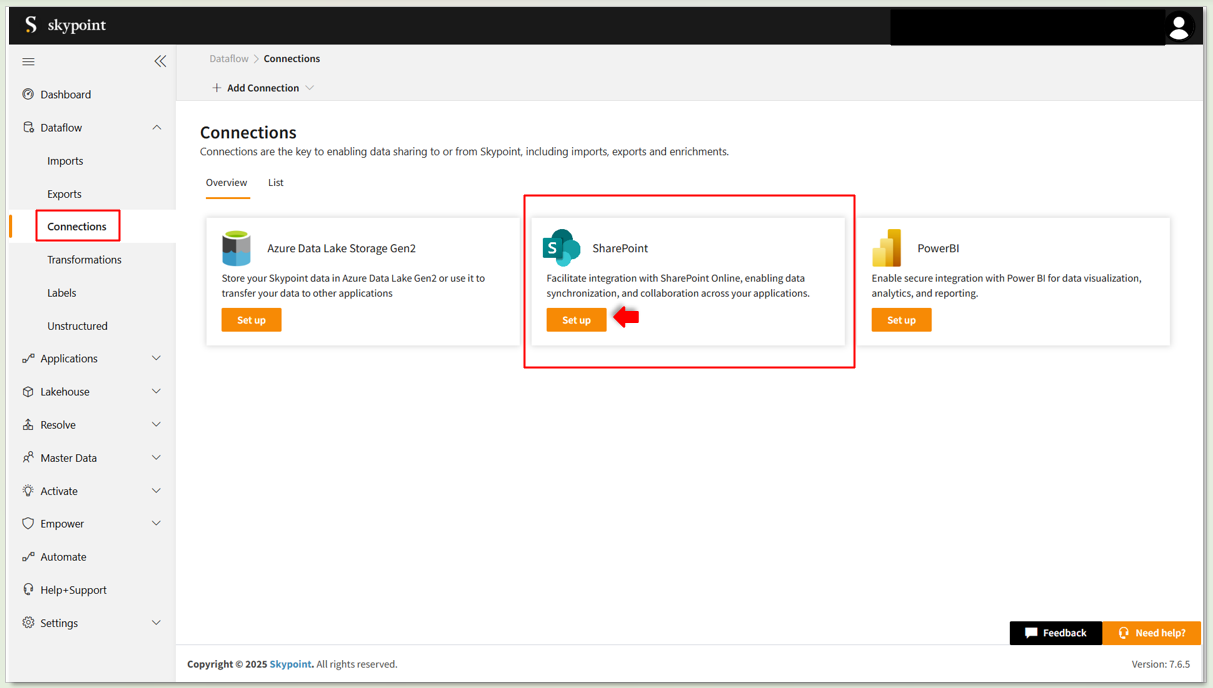 The **SharePoint Setup** page appears.
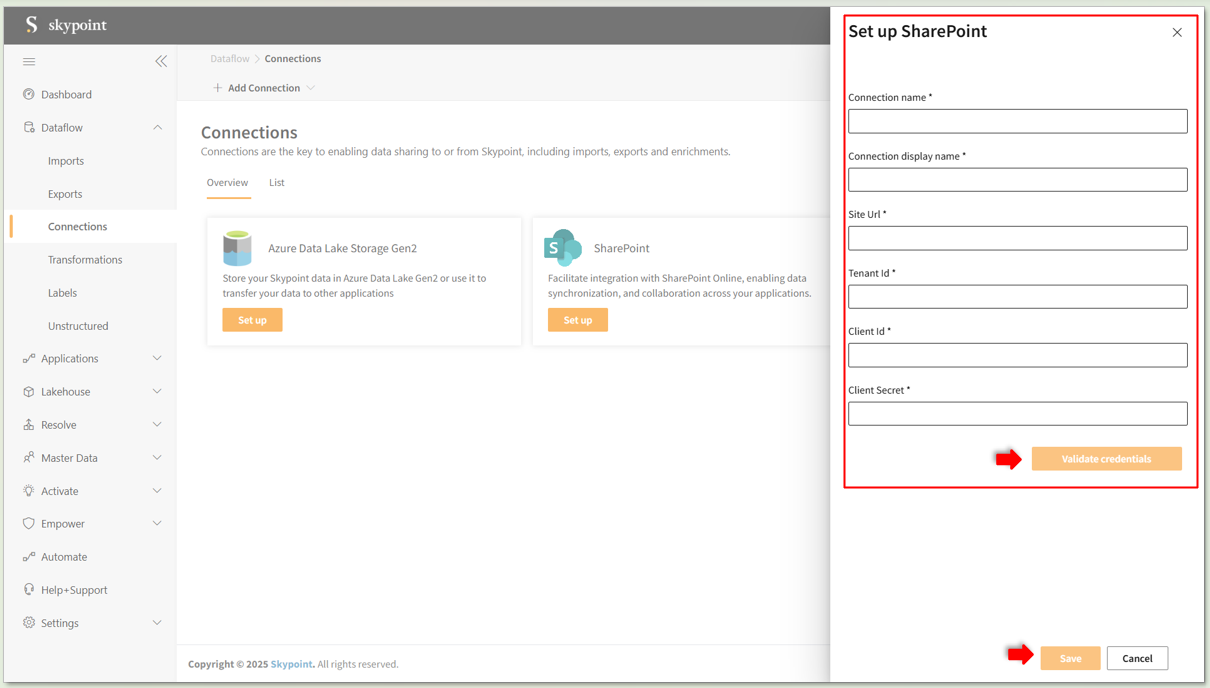 13. Fill in the required fields **Connection Name,Connection Display Name, Site URL, Tenant ID,Client ID,Client Secret.**
14. Click **Validate Credentials** to verify the information provided.
15. Once validated, click **Save** to complete the connection setup.
To configure SharePoint as a knowledge source for the Devin Agent, follow the steps below:
16. Click on the **SharePoint** option in the Devin Agent to securely connect to internal SharePoint data.
13. Fill in the required fields **Connection Name,Connection Display Name, Site URL, Tenant ID,Client ID,Client Secret.**
14. Click **Validate Credentials** to verify the information provided.
15. Once validated, click **Save** to complete the connection setup.
To configure SharePoint as a knowledge source for the Devin Agent, follow the steps below:
16. Click on the **SharePoint** option in the Devin Agent to securely connect to internal SharePoint data.
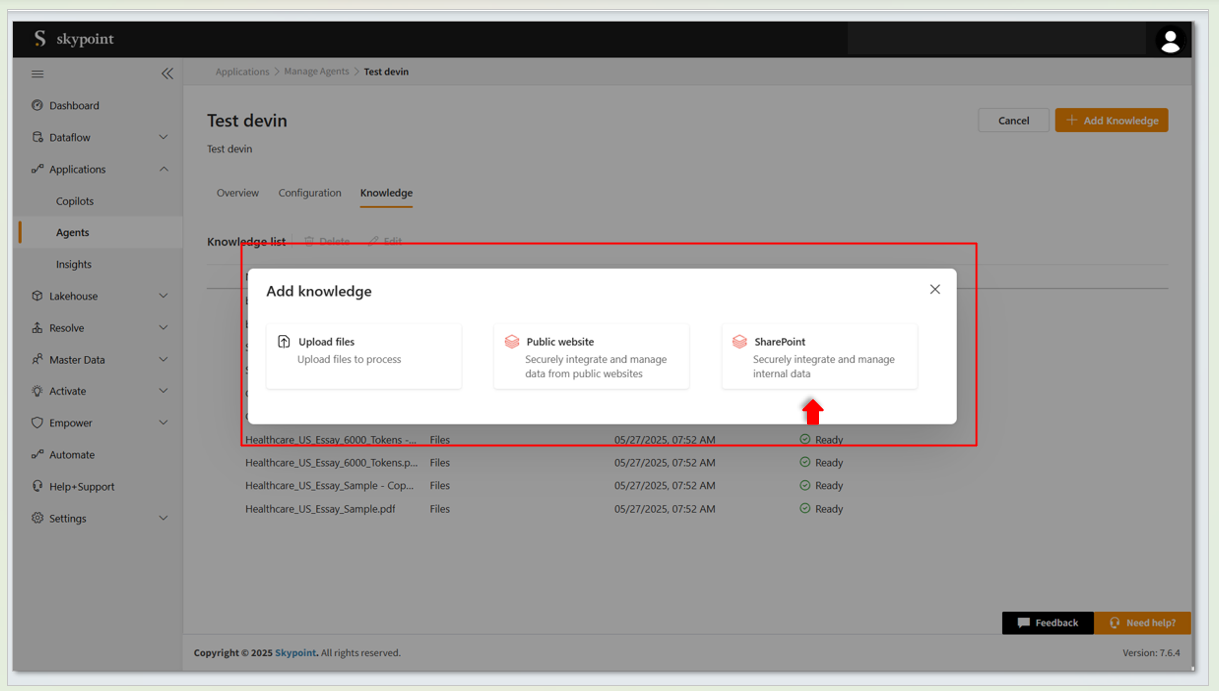 Share point page appears.
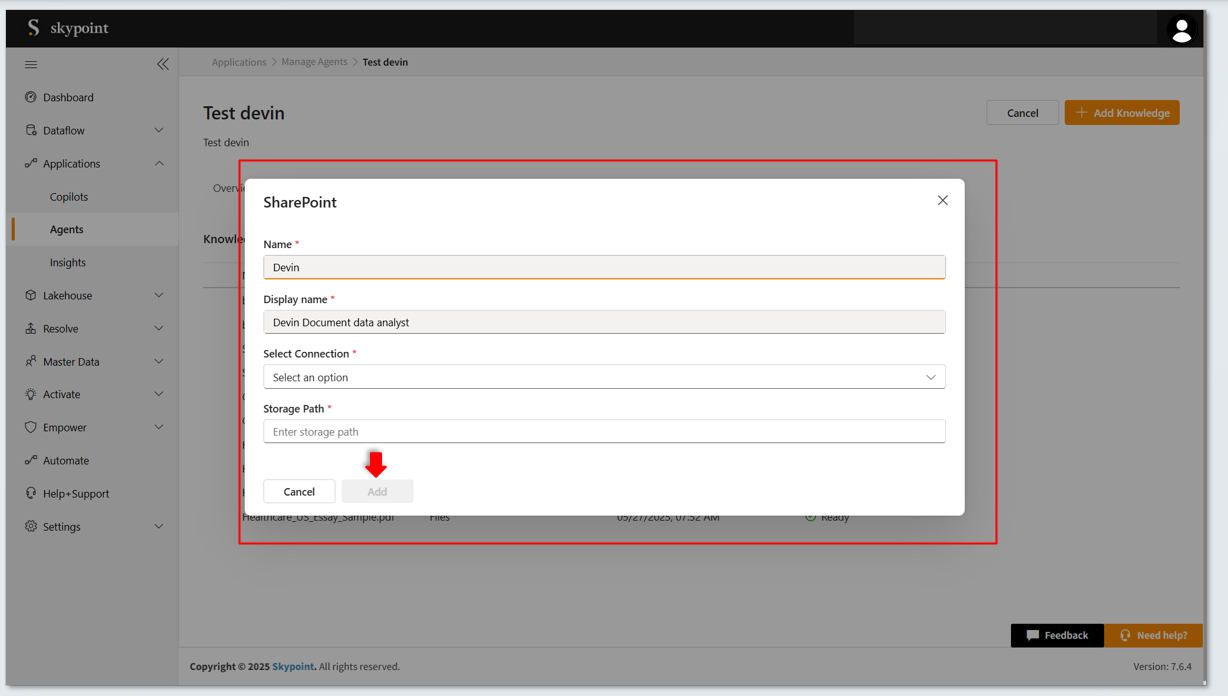 17. Enter the **Name** and **Display name** of the Knowledge.
18. Select the **Sharepoint Connection** from the drop-down menu.
19. Add the **Storage Path.**
20. Click **Add** to save the SharePoint Knowledge configuration.
21. To modify existing knowledge, select the desired resource and click **Edit**.
22. To delete existing knowledge, select the desired knowledge resource and click the **Delete** option at the top.
23. Click **Save Changes** to apply the changes.
## How to create new Agent?
Follow the steps below to create a new agent:
1. Click the **New Agent** button to add a new agent to the Copilot.
17. Enter the **Name** and **Display name** of the Knowledge.
18. Select the **Sharepoint Connection** from the drop-down menu.
19. Add the **Storage Path.**
20. Click **Add** to save the SharePoint Knowledge configuration.
21. To modify existing knowledge, select the desired resource and click **Edit**.
22. To delete existing knowledge, select the desired knowledge resource and click the **Delete** option at the top.
23. Click **Save Changes** to apply the changes.
## How to create new Agent?
Follow the steps below to create a new agent:
1. Click the **New Agent** button to add a new agent to the Copilot.
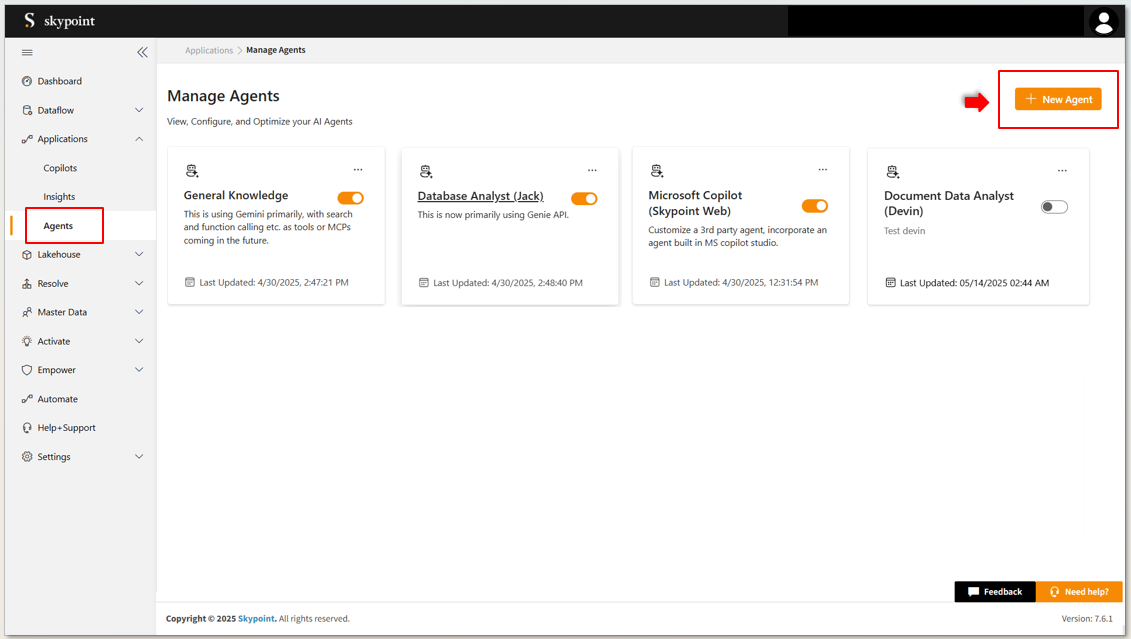 Create a new agent page appears.
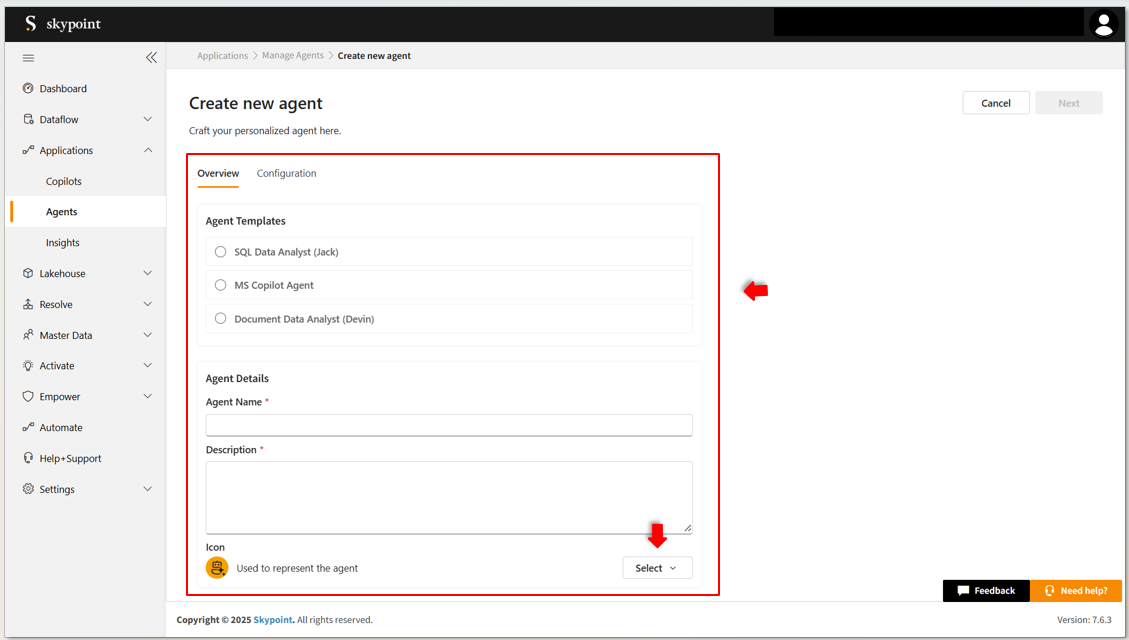 2. Select the **Agent type** from the drop-down.
3. Add agent details such as **Name**,**Description**.
4. Select the suitable **Icon** to represent agent from dropdown.
5. Click on **Next** to proceed.
2. Select the **Agent type** from the drop-down.
3. Add agent details such as **Name**,**Description**.
4. Select the suitable **Icon** to represent agent from dropdown.
5. Click on **Next** to proceed.
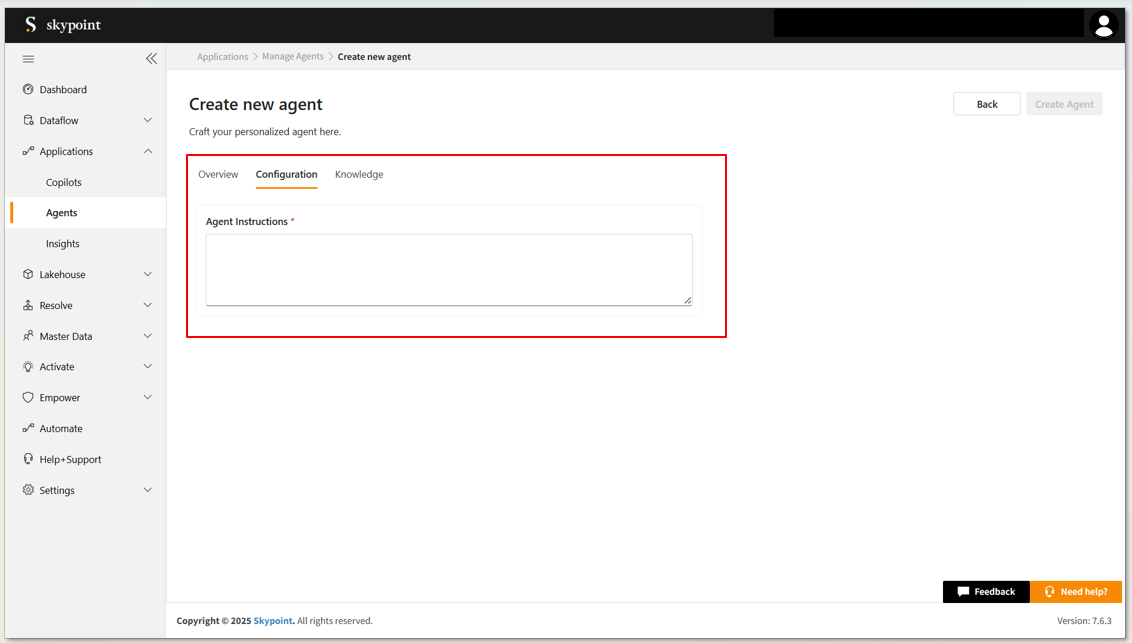 6. Under the Configuration tab, add **Agent Instructions** to define how your agent should interpret and respond.
Knowledge configuration depends on the type of agent you are creating. Based on the selected agent type, follow the steps above to configure knowledge where applicable.
## How to Enable and Disable an Agent?
Follow the steps below to enable existing agents after completing the configuration based on your specific needs.
1. Click the **toggle switch** on the agent card to **enable** or **disable** the agent, as shown in the image.
6. Under the Configuration tab, add **Agent Instructions** to define how your agent should interpret and respond.
Knowledge configuration depends on the type of agent you are creating. Based on the selected agent type, follow the steps above to configure knowledge where applicable.
## How to Enable and Disable an Agent?
Follow the steps below to enable existing agents after completing the configuration based on your specific needs.
1. Click the **toggle switch** on the agent card to **enable** or **disable** the agent, as shown in the image.
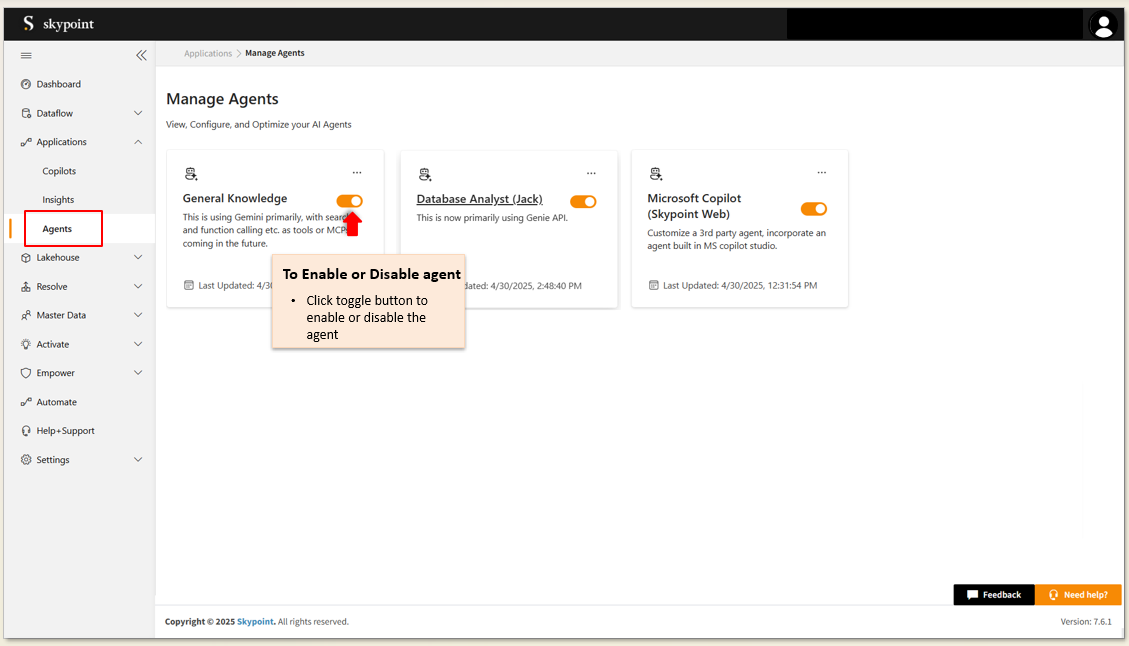 2. To **edit** click on the three-dot menu on the agent card.